
In this tutorial, we’ll learn what testing is, the different types of testing, and then we’ll use Puppeteer to perform end-to-end testing on our application. By the end of this tutorial, you should be able to end-to-end test your apps easily with Puppeteer.
What is Puppeteer?
Puppeteer is a Node library which provides a high-level API to control Chrome or Chromium over the DevTools Protocol. Puppeteer runs headless by default, but can be configured to run full (non-headless) Chrome or Chromium.
Prerequisites
For this tutorial, you need a basic knowledge of JavaScript, ES6+ and Node.js.
You must also have installed the latest version of Node.js.
We’ll be using yarn throughout this tutorial. If you don’t have yarn already installed, install it from here.
You should also know the basics of Puppeteer. To understand the basics of Puppeteer, check out this simple tutorial.
To make sure we’re on the same page, these are the versions used in this tutorial:
- Node 13.3.0
- npm 6.13.2
- yarn 1.21.1
- puppeteer 2.0.0
- create-react-app 3.3.0
Introduction to Testing
In simple terms, testing is a process to evaluate the application works as expected. It helps in catching bugs before your application gets deployed.
There are four different types of testing:
- Static Testing: uses a static type system like TypeScript, ReasonML, Flow or a linter like ESLint. This helps in capturing basic errors like typos and syntax.
- Unit Testing: the smallest part of an application, also known as a unit, is tested.
- Integration Testing: multiple related units are tested together to see if the application works perfectly in combination.
- End-to-end Testing: the entire application is tested from start to finish, just like a regular user would, to see if it behaves as expected.
The testing trophy by Kent C Dodds is a great visualization of the different types of testing:
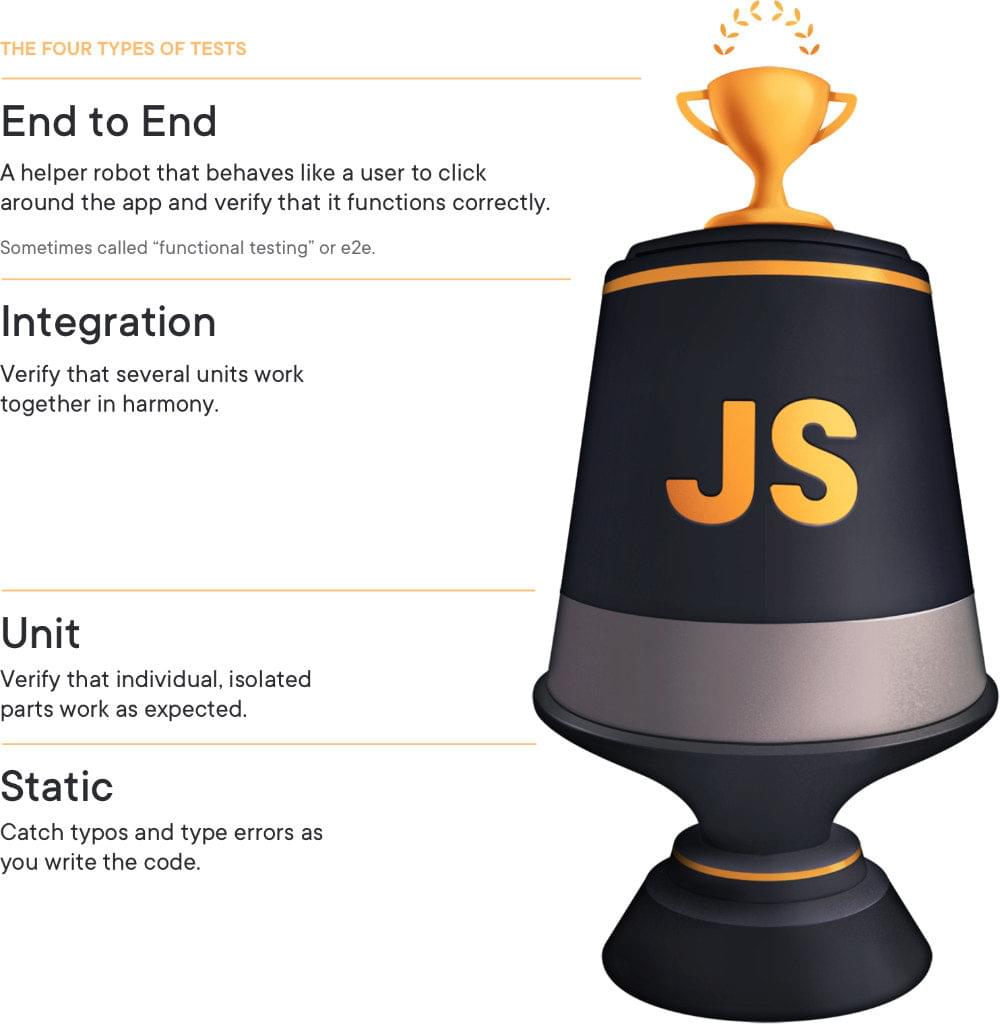
The testing trophy should be read bottom-to-top. If you perform these four levels of testing, you can be confident enough with the code you ship.
Now let’s perform end-to-end testing with Puppeteer.
End-to-end Testing with Puppeteer
Let’s bootstrap a new React project with create-react-app, also known as CRA. Go ahead and type the following in the terminal:
$ npx create-react-app e2e-puppeteer
This will bootstrap a new React project in a e2e-puppeteer folder. Thanks to the latest create-react-app version, this will also install testing-library by default so we can test our applications easily.
Go inside the e2e-puppeteer directory and start the server by typing the following in the terminal:
$ cd e2e-puppeteer
$ yarn start
It should look like this:
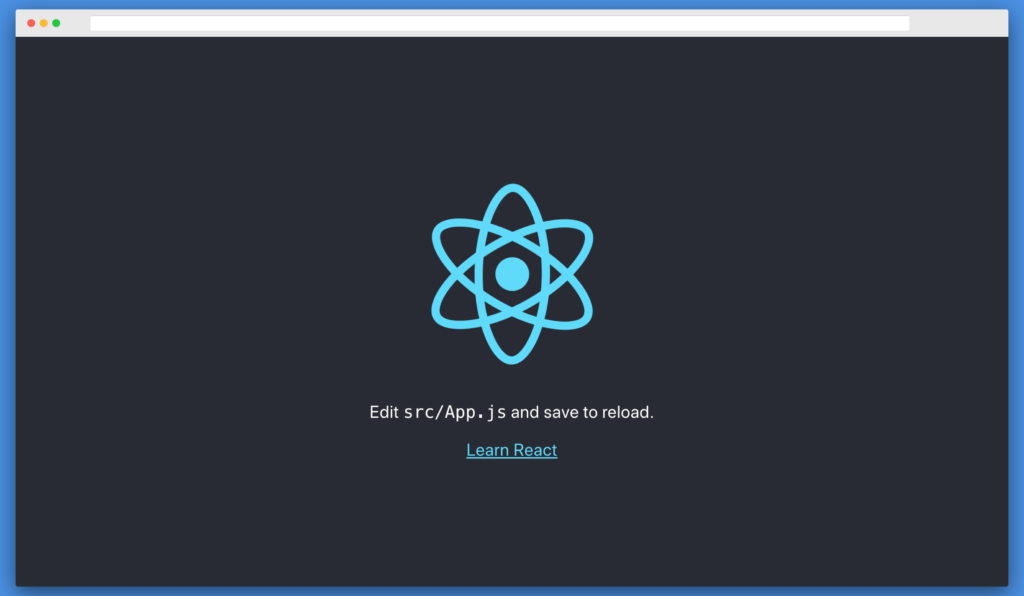
Our App.js looks like this:
import React from 'react';
import logo from './logo.svg';
import './App.css';

function App() {
  return (
    <div className="App">
      <header className="App-header">
        <img src={logo} className="App-logo" alt="logo" />
        <p>
          Edit <code>src/App.js</code> and save to reload.
        </p>
        <a
          className="App-link"
          href="https://reactjs.org"
          target="_blank"
          rel="noopener noreferrer"
        >
          Learn React
        </a>
      </header>
    </div>
  );
}

export default App;
We’ll be testing the App.js function and the code will be written in App.test.js. So go ahead and open up App.test.js. It should have the following content:
import React from 'react';
import { render } from '@testing-library/react'; // 1
import App from './App';

test('renders learn react link', () => { // 2
  const { getByText } = render(<App />); // 3
  const linkElement = getByText(/learn react/i); // 4
  expect(linkElement).toBeInTheDocument(); // 5
});
Here’s what’s happening in the code above:
- We
importtherenderfunction from the@testing-library/reactpackage. - We then use the global
testfunction from Jest, which is our test runner installed by default through CRA. The first parameter is a string which describes our test, and the second parameter is a function where we write the code we want to test. - Next up, we render the
Appcomponent and destructure a method calledgetByText, which searches for all elements that have a text node withtextContent. - Then, we call the
getByTextfunction with the text we want to check. In this case, we check forlearn reactwith the case insensitive flag. - Finally, we make the assertion with the
expectfunction to check if the text exists in the DOM.
This comes by default when we bootstrap with CRA. Go ahead and open up another terminal and type the following:
$ yarn test
When it shows a prompt, type a to run all the tests. You should now see this:
Now let’s test this application with end-to-end testing.
Testing the Boilerplate with Puppeteer
Go ahead and install puppeteer as a dev dependency by typing the following in the terminal:
$ yarn add -D puppeteer
Now open up App.test.js and paste the following:
import puppeteer from "puppeteer"; // 1

let browser;
let page;

// 2
beforeAll(async () => {
  browser = await puppeteer.launch({
    headless: false
  });
  page = await browser.newPage();
  await page.goto("http://localhost:3000/");
});

// 3
test("renders learn react link", async () => {
  await page.waitForSelector(".App");

  const header = await page.$eval(".App-header>p", e => e.innerHTML);
  expect(header).toBe(`Edit <code>src/App.js</code> and save to reload.`);

  const link = await page.$eval(".App-header>a", e => {
    return {
      innerHTML: e.innerHTML,
      href: e.href
    };
  });
  expect(link.innerHTML).toBe(`Learn React`);
  expect(link.href).toBe("https://reactjs.org/");
});

// 4
afterAll(() => {
  browser.close();
});
This is what we’re doing in the code above:
- Firstly, we import the
puppeteerpackage and declare some global variables,browserandpage. - Then we have the
beforeAllfunction provided by Jest. This runs before all tests are run. Here, we launch a new Chromium browser by callingpuppeteer.launch(), while settingheadlessmode tofalseso we see what’s happening. Then, we create a new page by callingbrowser.newPage()and then go to our React application’s URLhttp://localhost:3000/by calling thepage.goto()function. - Next up, we wait for the
.Appselector to load. When it loads, we get theinnerHTMLof.App-header>pselector by using thepage.$eval()method and compare it withEditsrc/App.jsand save to reload.. We do the same thing with the.App-header>aselector. We get backinnerHTMLandhrefand then we compare them withLearn Reactandhttps://reactjs.org/respectively to test our assertion with Jest’sexpect()function. - Finally, we call the
afterAllfunction provided by Jest. This runs after all tests are run. Here, we close the browser.
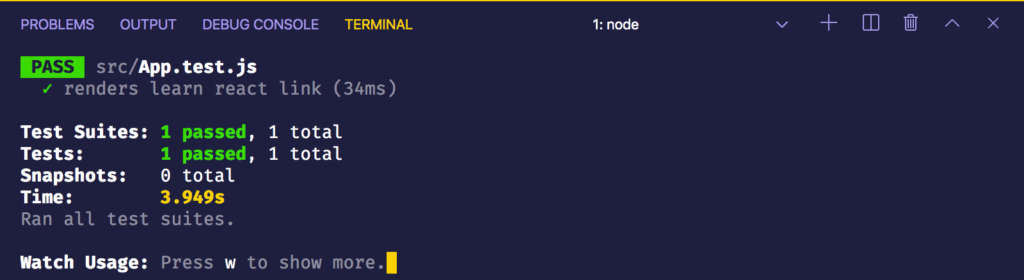
This test should automatically run and give you the following result:
Let’s go ahead and make a counter app.
Converting the Boilerplate to a Counter App
Firstly, edit some CSS by changing App.css to the following:
.header {
  font-size: 56px;
  text-align: center;
}

.counter-app {
  display: flex;
  justify-content: space-around;
}

button {
  background-color: navajowhite;
  font-size: 32px;
}

.count {
  font-size: 48px;
}
Now change App.js to the following:
import React, { useState } from "react";
import "./App.css";

function App() {
  const [count, setCount] = useState(0);
  return (
    <>
      <h1 className="header">Counter</h1>
      <div className="counter-app">
        <button className="increment" onClick={() => setCount(count + 1)}>
          Increment
        </button>
        <div className="count">{count}</div>
        <button className="decrement" onClick={() => setCount(count - 1)}>
          Decrement
        </button>
      </div>
    </>
  );
}

export default App;
Here, we’re making a simple counter application with two buttons, Increment and Decrement. By pressing the Increment button, the counter gets increased by 1, and by pressing Decrement button, the counter gets decreased by 1. It looks like this:

Testing the Counter App with Puppeteer
Now change the App.test.js to the following:
import puppeteer from "puppeteer";

let browser;
let page;

beforeAll(async () => {
  browser = await puppeteer.launch({
    headless: false
  });
  page = await browser.newPage();
  await page.goto("http://localhost:3000/");
});

// 1
test("renders counter", async () => {
  await page.waitForSelector(".header");

  const header = await page.$eval(".header", e => e.innerHTML);
  expect(header).toBe("Counter");
});

// 2
test("sets initial state to zero", async () => {
  await page.waitForSelector(".counter-app");

  const count = await page.$eval(".count", e => e.innerHTML);
  expect(count).toBe("0");
});

// 3
test("increments counter by 1", async () => {
  await page.waitForSelector(".counter-app");

  await page.click(".increment");
  const count = await page.$eval(".count", e => e.innerHTML);
  expect(count).toBe("1");
});

// 4
test("decrements counter by 1", async () => {
  await page.waitForSelector(".counter-app");

  await page.click(".decrement");
  const count = await page.$eval(".count", e => e.innerHTML);
  expect(count).toBe("0");
});

afterAll(() => {
  browser.close();
});
Here, we keep the beforeAll and afterAll function the same, as before, where we initialize a browser and go to http://localhost:3000/ in beforeAll and we close the browser in afterAll. Then, we do the following:
- We check if the text
Counteris rendered. For that, we wait for the.headerselector to load. Then we usepage.$eval()to get theinnerHTMLof.headerselector. And then we finally make the assertion to check ifCounteris rendered. - Next, we check if the initial state is zero. We wait for the
.counter-appselector to load. Then we get theinnerHTMLfrom the.countselector. We finally compare if thecountis0. Notice that we’re using astringwhile our state is anumber. This is becauseinnerHTMLalways returns astring. - Here, we check if clicking the button increments the state by 1. First, we wait for the
.counter-appselector to load. We then click on the.incrementbutton. This should increase the state from0to1. We then get theinnerHTMLfrom the.countselector. Then we compare it to1, as ourincrementfunction should always increase state by1. - The decrement button should decrease the state by 1. It works the same way as the increment button. First, we wait for the
.counter-appselector to load. We then click on the.decrementbutton. This should decrease the state from1to0. Notice that the state was1after we clicked theincrementbutton. We then get theinnerHTMLfrom the.countselector. Then we compare it to0, as ourdecrementfunction should always decrease state by1.
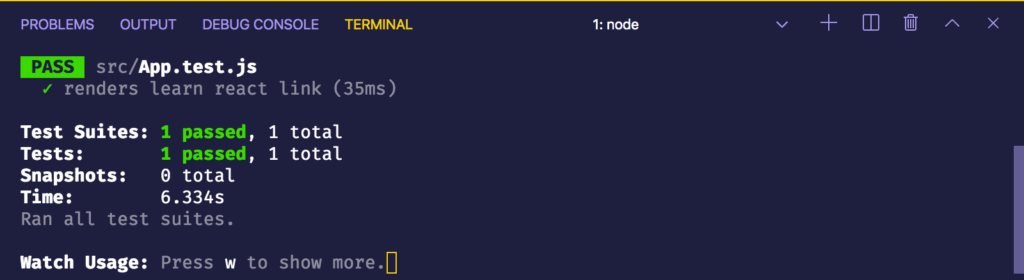
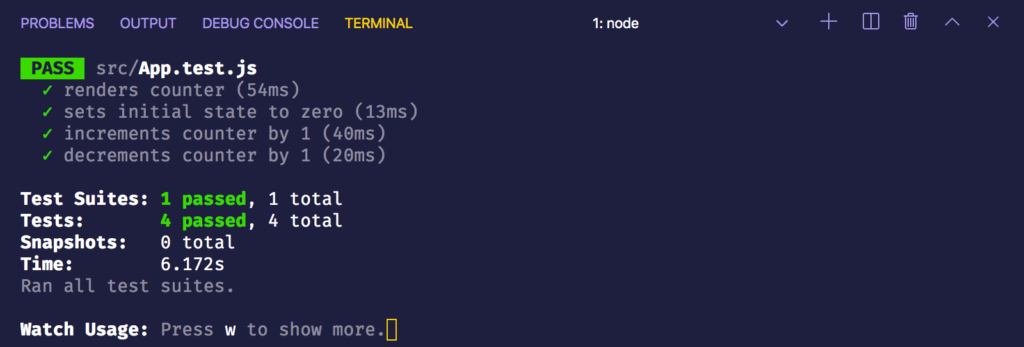
The result should now look like this:
Conclusion
In this tutorial, we learned about different types of testing — static testing, unit testing, integration testing and end-to-end testing. We then performed end-to-end testing on our boilerplate, bootstrapped with the help of create-react-app.
Later, we converted the app to a counter application. And finally we performed end-to-end testing on the counter application.
The Puppeteer library is useful not only for performing end-to-end testing, but also for doing different kinds of browser automation. Puppeteer is backed by Google and is actively maintained, so be sure to check its docs to understand the wide-ranging use cases it offers.
You can find the code for this tutorial on GitHub.
For more on testing, SitePoint Premium provides a range of resources, including:
- Front-end Testing in Python: A Detailed Guide
- Introducing Detox, a React Native End-to-end Testing and Automation Framework
- Python Testing Cookbook – Second Edition
If you enjoyed this article, you might also find the following articles useful:
- Cypress Testing: A Guide to Running Web Application Tests
- An Introduction to Python Unit Testing with unittest and pytest
- How to Test React Components Using Jest
- 3 Methods for Hands-free Continuous Testing
- Re-Introducing Jenkins: Automated Testing with Pipelines
FAQs: Puppeteer
Puppeteer is a Node library that provides a high-level API to control headless browsers (browsers without a graphical user interface). Its primary purpose is to automate browser tasks, such as web scraping, taking screenshots, generating PDFs, and automating user interactions for testing.
Puppeteer stands out for its ability to control headless browsers, allowing for a more comprehensive automation of browser activities. Unlike traditional scraping libraries, Puppeteer enables developers to interact with dynamic web pages, execute JavaScript, and simulate user behavior.
Yes, Puppeteer is versatile and can be used for both browser automation and web scraping. It provides a powerful set of features for interacting with web pages, capturing screenshots, and generating PDFs, making it suitable for various use cases.
Headless browsers are web browsers without a graphical user interface. Puppeteer leverages headless browsers to perform automated tasks in the background, making it ideal for server-side applications, testing, and scraping where a visible browser window is not necessary.
Puppeteer primarily supports the Chromium browser, which includes Google Chrome and other browsers built on the Chromium project. While it is not designed for cross-browser testing out of the box, some projects aim to extend Puppeteer’s capabilities for other browsers.
 Akshay Kadam
Akshay is a creator, computer artist and micropreneur from Mumbai.