
In this tutorial, we’ll go over how to create a Firefox add-on that allows the user to create alarms at specified times with custom text. We’ll cover how to create a basic add-on, adding a popup and an options page, adding permissions, storing information, sending notifications, and creating a background script for sending the notifications.
This tutorial doesn’t require any prior experience with creating Firefox add-ons or any browser extensions. You’ll only need to know some JavaScript basics. You can find the code to this tutorial in this GitHub Repository and you can also find the created add-on published here.
Setting Up Our Firefox Add-on
The first step to create a Firefox add-on is to create the manifest.json file. This file is the only file required for a Firefox add-on. The basic format of a manifest.json file should include the following keys:
name: the name of the add-on in slug format — such asmy-extension.version: the current version of the add-on. When updating anything in the extension, you’ll need to update this version, so it’s recommended to start low.manifest_version: at the time of writing, Firefox only supports Manifest V2, so the value for this should be2. However, if future support for V3 is added, the value can be3as well.
These’re the mandatory fields for any add-on. The following two are optional but recommended:
description: a short description for your add-on that explains its purpose.icons: a list of icons of different sizes. These icons will be used in the settings, toolbar of the browser, and other places as well. Recommended sizes to add are16px,32px,48px, and128px.
For our add-on, let’s start by creating a folder named firefox-alarms-addon. Then add a manifest.json with the following content:
{
  "name": "personalized-alarms",
  "version": "0.0.1",
  "description": "Create personalized alarms",
  "manifest_version": 2,
  "icons": {
    "16": "assets/images/icon16.png",
    "32": "assets/images/icon32.png",
    "48": "assets/images/icon48.png",
    "128": "assets/images/icon128.png"
  }
}
As you can see, the icons key is an object with keys of the file size and the path to it. The path is relative to the root of the add-on, which is where manifest.json resides. For this tutorial, I’m using an icon downloaded from iconscout by Twitter Emoji where I can download the different sizes needed as well.
If you’re following along, grab these files from our repo and place them in the appropriate directory (assets/images/).
That’s all that’s needed to create a Firefox add-on!
Loading the Add-on in Firefox
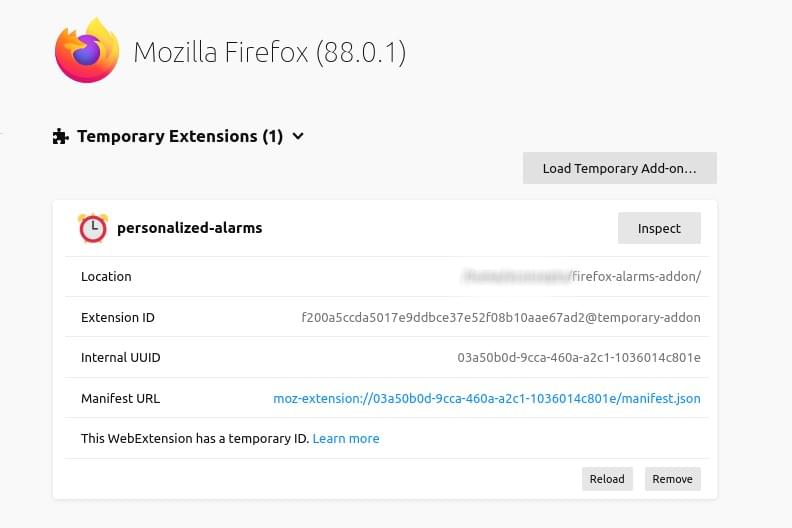
To test our Firefox add-on and be able to debug it later on before uploading it to Mozilla’s Developer Hub, open Firefox, then choose Add-ons and Themes from the right menu, or using the shortcut ctrl + shift + A. Then, Click on the “Settings” icon next to Manage Your Extensions and choose Debug Add-ons.

A new page’ll open for Temporary Extensions.
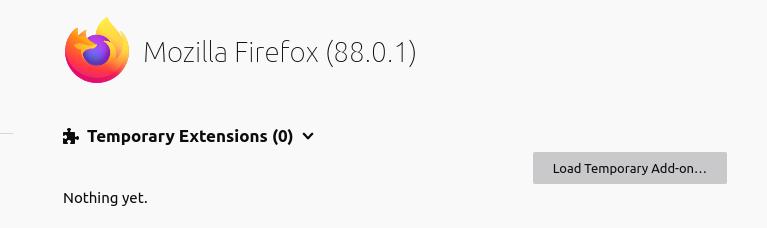
Click on Load Temporary Add-on button and choose the manifest.json file you just created. If everything was done correctly, you’ll see the newly created add-on with some information about it and the icon we specified in the manifest.json.
Adding a Popup
Firefox add-ons can be made accessible via different methods, and one of them is by adding a popup page. When adding a popup page, the icon for your extension will show up in the toolbar and once the user clicks on it, the popup page you specify will show up.
We’ll use the popup page to show the user the list of upcoming alarms and a link to add a new alarm that takes the user to the options page (which we’ll talk about in the next section).
Create a popup.html file in the project root with the following content:
<!DOCTYPE html>
<html lang="en">
<head>
<meta charset="UTF-8">
<meta name="viewport" content="width=device-width, initial-scale=1.0">
<title>Personalized Alarms</title>
<link href="assets/css/bootstrap.min.css" rel="stylesheet" />
</head>
<body class="p-3">
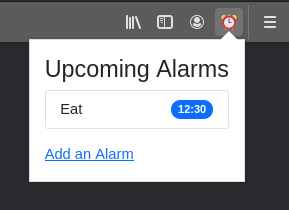
<h1>Upcoming Alarms</h1>
<ul class="list-group" id="alarmsList">
</ul>
<div class="mt-3">
<a href="#" class="link-primary" id="optionsLink">Add an Alarm</a>
</div>
<script src="assets/js/jquery.min.js"></script>
</body>
</html>
As you can see, it’s just an HTML document. We’ve also added bootstrap.min.css to assets/css and linked it here, and jquery.min.js under assets/js/jquery.min.js and linked it as well. These two libraries are just to make things easier, but you don’t have to actually use them. You can grab them from our repo here and here.
In the content of the page, we’ll show the list of alarms that are upcoming and a link to the options page.
The next step to make a popup work is to add the following in manifest.json:
"browser_action": {
  "default_popup": "popup.html",
  "browser_style": true
}
browser_action is an object that has a number of options, but the only mandatory one is default_popup, which is the relative path to the popup from the add-on root directory. browser_style isn’t mandatory, but it’s recommended that it be set to true. This means that Firefox will inject the browser’s default styles to make sure the add-on’s popup styling is similar to the rest of the browser.
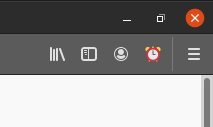
That’s all that’s required to add a popup. Go to the Temporary Add-ons page that we went to before and click on the Reload button for the add-on. This will make Firefox check manifest.json for any changes and apply them.
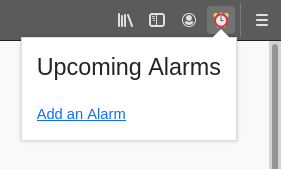
Once you do, you’ll be able to see an icon of your extension in the toolbar menu.
If you click on it, you can see the popup page we just created.
Two things are still left in our popup to make it fully functional: using storage to get the upcoming alarms, and making the “Add an Alarm” link take the user to the options page.
Using Storage
Storage in browser extensions allows us to store data relevant to the extension or the user, either locally on the machine, or in sync based on their account. Local storage stores information locally in the browser, which means that if the user is logged in to Firefox with the same email from another machine, this stored information will not be present there. Sync storage stores information for the current user logged, which allows this information to be available wherever the user is logged in.
Sync storage should be used for certain settings the user wants to have available everywhere, whereas local storage should be used for information or options that are relevant for the current browser installation only.
In our example, we’ll make alarms available everywhere the user is logged in, so we’ll store them in sync storage. But let’s say we want to add a “temporary disable” option that mutes the alarms for a while. In that case it would probably be more suitable to use local storage.
Storage can be accessed easily through the Storage API through get and set methods, but first, we need to request permission to use storage in our add-on. This can be done inside manifest.json:
"permissions": [
  "storage"
],
When the user installs your add-on, they’ll get to see what permissions you require and need them to accept to install your add-on.
There’s one other thing we need to add in order to be able to test the add-on locally: an explicit add-on ID to be able to use the storage. To do so, add this in the manifest.json as well:
"browser_specific_settings": {
  "gecko": {
    "id": "addon@example.com",
    "strict_min_version": "42.0"
  }
}
This is just to be able to test it locally. Once we publish it, we’ll remove this from the manifest.
The next thing we’ll do is create a new assets/js/popup.js file, which will get the alarms from storage and display them.
To get items from the storage, you can use browser.storage.sync.get or browser.storage.local.get. This depends on whether you’re storing the information in sync storage or local storage. In our case, we’re storing alarms in sync storage, so we’ll use browser.storage.sync.get. It should be noted that all methods under browser.storage.sync.* and browser.storage.local.* have the same signature and accept/return the same types.
browser.storage.sync.get takes one parameter: an array of strings that are the keys of the data we’re retrieving. These keys are defined when we set the storage (which we’ll talk about in the next section). This function returns a promise that resolves to a results object containing the keys we specified in the first parameters and their values, if they exist.
Note: if you’re making the add-on compatible with Chrome, be sure to check out the “Making Add-ons Compatible with Chrome” section.
Create assets/js/popup.js with the following content:
$(document).ready(() => {
  const listElement = $('#alarmsList');

  browser.storage.sync.get(['alarms'])
    .then((result) => {
      if (result.alarms && result.alarms.length) {
        //loop over the alarms and display them
        result.alarms.forEach((alarm) => {
          appendItem(alarm.content, alarm.time);
        });
      } else {
        //show no items available
        appendItem('No alarms are available');
      }
    });

  function appendItem(content, badgeContent = null) {
    listElement.append(`
      <li class="list-group-item d-flex justify-content-between align-items-center">
        ${content}
        ${badgeContent ? `<span class="badge bg-primary rounded-pill">${badgeContent}</span>` : ''}
      </li>
    `);
  }
});
You’ll also need to include this file in popup.html:
  ...
  <script src="assets/js/popup.js"></script>
</body>
</html>
When the document is ready, we’re using browser.storage.sync.get to get the alarms created by the user. We’re then checking if there are any alarms. If there are, we’re looping over them and displaying them using the appendItem helper function, which just appends an HTML list element li to #alarmsList. If there are no alarms available, we’re just showing “no items available”.
If we reload the add-on now, you’ll notice a new installation of the add-on has been added. This is because we explicitly specified the ID in the manifest.json. You can remove the old one to avoid conflict.
You’ll notice that nothing has changed in our popup, since we don’t have any alarms added yet. We’ll do this in the next section.
Adding an Options Page
To allow your users to customize or edit options or settings in the add-on, you create an HTML page that holds the options and the logic behind setting or changing them. Then you link to it in the manifest.json file.
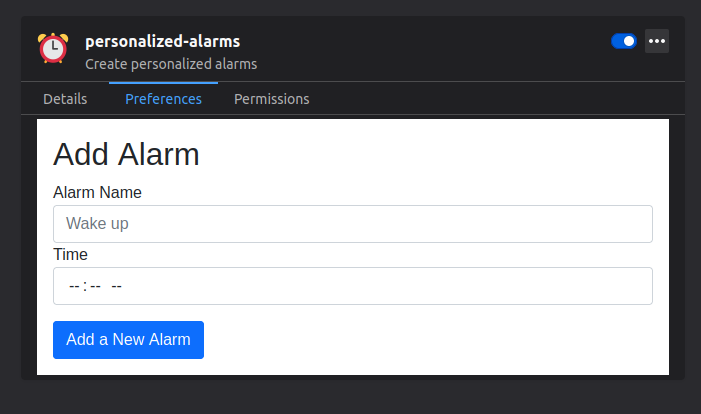
In our add-on, we’ll use the Options page to allow the user to create alarms. Let’s first create the file options.html. You can create it anywhere in the add-on project directory. We’ll create it in the root of the project with the following content:
<!DOCTYPE html>
<html lang="en">
<head>
  <meta charset="UTF-8">
  <meta name="viewport" content="width=device-width, initial-scale=1.0">
  <title>Options</title>
  <link href="assets/css/bootstrap.min.css" rel="stylesheet" />
</head>
<body class="p-3">
  <h1>Add Alarm</h1>
  <form>
    <div class="form-group">
      <label for="name">Alarm Name</label>
      <input type="text" class="form-control" name="name" id="name" placeholder="Wake up" />
    </div>
    <div class="form-group">
      <label for="time">Time</label>
      <input type="time" class="form-control" name="time" id="time" />
    </div>
    <button type="submit" class="btn btn-primary mt-3">
      Add a New Alarm
    </button>
  </form>
  <script src="assets/js/jquery.min.js"></script>
  <script src="assets/js/options.js"></script>
</body>
</html>
Here, we’re just displaying a form with two input fields: “Alarm Name”, which will be the text displayed in the alarm when the notification is sent, and “Time”, which is the time to set the alarm at.
We’ll need to create assets/js/options.js, which will listen for the submit event for the form and set alarms in the sync storage, adding a new alarm to the array.
Similarly to our use of the get method, to set the storage we can use browser.storage.sync.set or browser.storage.local.set, depending on whether we’re storing the data just locally or in sync between all logged-in instances. Since we’re storing our alarms in sync, we’ll use browser.storage.sync.set.
The set method takes one parameter that’s an object of keys and values. The key is what we use to retrieve the value later on, just like we did earlier with get.
Create assets/js/options.js with the following content:
$(document).ready(() => {
  const nameElm = $('#name');
  const timeElm = $('#time');
  const formElm = $('form');
  formElm.on('submit', () => {
    $('.alert').remove(); //remove previous success alerts, if any
    //get existing alarms
    browser.storage.sync.get(['alarms'])
      .then((result) => {
        let alarms = result.alarms;
        const alarmName = nameElm.val().trim() + '_' + (Math.random() * 100);
        if (!alarms) {
          alarms = [];
        }
        alarms.push({
          content: nameElm.val().trim(),
          time: timeElm.val(),
          alarmName
        });

        //set alarms in the storage
        browser.storage.sync.set({alarms})
          .then(() => {
            //TODO schedule notification
            formElm.prepend('<div class="alert alert-success">Alarm added successfully</div>');
            nameElm.val('');
            timeElm.val('');
          });
      });
    return false; //disable default form submit action
  });
});
On form submission, we’re first retrieving stored alarms, if there are any. Then, we’re pushing the new alarm we’re creating through the form to the alarms array. Notice how we’re also creating an alarmName variable. We’ll be using this variable to create a unique alarm, then cancel it when the user deletes it. Finally, we’re using browser.storage.sync.set to set the new alarms array.
You might also notice that we added a TODO comment, which is where we’ll schedule notifications in the next section.
Our options page is now ready. To make it available, we first need to add the following to manifest.json:
"options_ui": {
  "page": "options.html",
  "browser_style": false
}
This tells Firefox where to find our Options page. We’re also setting browser_style to false because we don’t want Firefox’s styling to override the Bootstrap styling.
Second, we’ll now make the link in the popup take the user to the options page. To do this, we use the method browser.runtime.openOptionsPage() in a new event listener attached to #optionsLink. We’ll add the following to assets/js/popup.js:
$(document).ready(() => {
  ...

  // New code here
  $('#optionsLink').on('click', () => {
    browser.runtime.openOptionsPage();
  });

  function appendItem(content, badgeContent = null) { ... }
});
Now, when the user clicks the “Add an Alarm” link, it will take them to the Options page.
Go to the Temporary Add-ons page, and click the reload button. Now, our options page will be registered.
Let’s test it out. Open the popup and click on “Add an Alarm”. It should take you to the Preferences tab in the add-on’s page, and the content will be the content we added in the options.html page.
Now, try to add a test alarm with any name and time and click on “Add an Alarm”. You should be able to see it in the popup after that.
We still need to make one change to assets/js/popups.js, which is to show alarms whose time is later than the current time. Change the call to browser.storage.sync.get to the following:
browser.storage.sync.get(['alarms'])
  .then((result) => {
    if (result.hasOwnProperty('alarms') && result.alarms) {
      //get current time
      const minutes = (new Date).getMinutes().toString().padStart(2, '0');
      const hours = (new Date).getHours().toString().padStart(2, '0');
      const now = new Date('1970-01-01T' + hours + ':' + minutes + 'Z').getTime();

      //loop over the alarms and display them
      result.alarms.forEach((alarm) => {
        const alarmTime = new Date('1970-01-01T' + alarm.time + 'Z').getTime();
        if (alarmTime > now) {
          appendItem(alarm.content, alarm.time);
        }
      });
    } else {
      //show no items available
      appendItem('No alarms are available');
    }
  });
This checks for each alarm if its time is greater than the current time and then displays it. The reason we’re formatting the time as '1970-01-01T' + alarm.time + 'Z' is because we’re creating the alarms independent of the date. This is just to make the tutorial simpler. We’re also padding hours and minutes with zeros when they’re one digit when calculating the current time, since the required format for new Date should have two digits for both numbers.
If you check now, you’ll notice that the previous alarm we added is shown or not depending on when its time is. You can also test adding a new alarm at another time to see whether it appears in the popup or not.
Scheduling Notifications
To send notifications, we need to use the Notifications API and the Alarms API. The Alarms API allows us to schedule “alarms” that fire at certain times. Then we can add an event listener for the onAlarm event and dispatch notifications at that time using the Notifications API.
To use the Notifications API and Alarms API, we need to add necessary permissions for each in manifest.json, just like we did before with the Storage API:
"permissions": [
  "storage",
  "alarms",
  "notifications"
],
The next thing we’ll do is replace the TODO we had before with the code necessary to create an alarm inside assets/js/options.js.
To create an alarm, we use the browsers.alarms.create function, to which we pass two parameters. The first one is the name of the alarm. This allows us to have different type of alarms in the add-on and act differently based on the name. The second one is an object of options:
when: the time the alarm should be fired at (in the form of a timestamp)delayInMinutes: a delay in minutes before the alarm fires, if necessaryperiodInMinutes: the number of minutes between each fire
All these options are optional. If you don’t pass any of them, the alarm will be fired once right after creation. If you need to fire the alarm once at a specified time, just pass when with the time to be fired at. If you want to fire the alarm once after a specified number of minutes, you can just pass delayInMinutes. If you want to fire the alarm at a specified number of minutes repeatedly, then you can just pass the periodInMinutes. Unless periodInMinutes is passed, the alarm will fire only once.
In our add-on, we need the alarm to fire once every day at the specified time that the user entered when creating the alarm. So, we’ll use a combination of when and periodInMinutes.
Replace the TODO comment in assets/js/options.js with the following:
//create a new alarm
const currentDate = new Date();
const currentMonth = (currentDate.getMonth() + 1).toString().padStart(2, '0');
const currentDay = currentDate.getDate().toString().padStart(2, '0');
//same as before, add 0 to month and day if they're less than 10
browser.alarms.create(alarmName, {
  when: new Date(
    currentDate.getFullYear() + '-' + currentMonth + '-' + currentDay + 'T' + timeElm.val()
  ).getTime(),
  periodInMinutes: 1440,
});
As a first argument, we’re passing the unique alarm name we created earlier. Alarm names in add-ons should be unique, because if they aren’t the newly added one will override the previous one with the same name. In the options object, we’re passing the time the user chooses in the when property, and for periodInMinutes we’re passing 1440, since that’s the number of minutes in a day.
Just as before, we’re also padding the month and day with 0 if they’re less than one digit to make sure they are two digits, as that’s the required format for new Date.
This means that the alarm will fire at the specified time the user entered once a day.
Now that we’ve created alarms successfully, the next thing we need to do is listen to when these alarms fire, and when they do, send a notification to the user. To do that, we need to use a background script.
Background Scripts
Add-ons, popups, options pages or any other pages are only active when we open them. This means that if we listen to events inside the popup or any other page, the listeners will only work once we open them. This won’t be helpful when listening to alarms at different times of the day.
For this reason, we need a background script. Background scripts are always running in the background, even if the popup, option page, or any other page of the add-on aren’t open. So, inside the background script we can add listeners to any event and ensure they’ll work accordingly.
To add a background script, we first need to add it in manifest.json:
"background": {
  "scripts": ["assets/js/background.js"]
}
Once we create assets/js/background.js and reload the extension, this script will always be working in the background.
We’ll listen in background.js for the alarms firing. To do that, we need to use browser.alarms.onAlarm.addListener, which takes a function that will execute every time an alarm fires. The function has an alarmInfo object as a parameter, which has information about the fired alarm.
Create assets/js/background.js with the following content:
browser.alarms.onAlarm.addListener((alarmInfo) => {
  const alarmName = alarmInfo.name.split('_')[0];
  console.log(alarmName);
  //TODO send notification
});
We’re retrieving the alarm name from alarmInfo by also removing the random integer we attached to it. We’ll then send a notification with the content of alarmName. For now, we’ve just placed a TODO comment. We’ve also added console.log for testing purposes.
Once we reload the extension, this background script will start working and listening for alarms. Let’s test it. Reload the extension, then go to the options page and add an alarm that will go off one minute from now. Next, on the Temporary Add-ons page, click on the Inspect button for the add-on. This will open a new window where you can see the console. If you wait until the time of the alarm, you’ll be able to see the name of the alarm in the console . That’s because we’re currently listening for the alarm and just logging its name in the console.

Now we have a working background script! The next step is to send notifications when an alarm is fired.
Sending Notifications
To create and send a notification, we use the browser.notifications.create method. This method, along with all methods in the Notifications API, is only accessible after adding the notifications permission in manifest.json, which we already added earlier.
browser.notifications.create accepts two arguments:
id: a string to identify the notification. This can be helpful if you’ll later on need to update the notification or clear it. If another notification has the sameid, the older one will be replaced by the new one. If this parameter is omitted, anidwill be generated.notificationOptions: an object of options for the notification. This object has three mandatory properties:type,title,message. Based on thetype, some other options will be required. The allowed types arebasic, which just displays the extension icon, title, and message;image, which shows an image in the notification;list, which shows a list of items, though this mainly only works in macOS; andprogress, which shows a progress bar.
At the moment, Firefox only supports the basic type, with the properties type, title, message, and, optionally, iconUrl, specifying the icon to show.
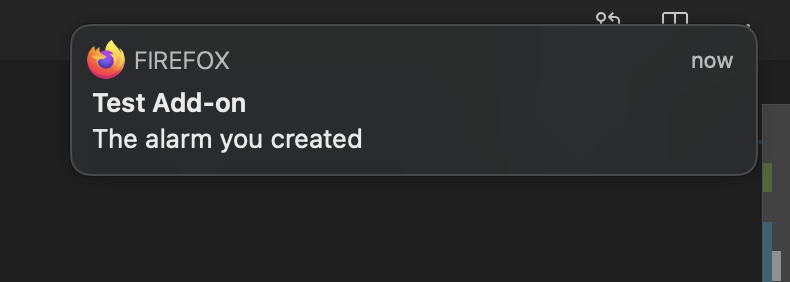
In assets/background.js, we’ll replace the TODO comment with the following:
browser.alarms.onAlarm.addListener((alarmInfo) => {
  const alarmName = alarmInfo.name.split('_')[0];

  browser.notifications.create({
    type: 'basic',
    title: alarmName,
    message: 'The alarm you created'
  });
});
For the title, we’ll show the message the user entered in the form when creating the alarm, and we’re just adding a descriptive message.
Go back to the Temporary Add-ons page and reload the extension, then test it out. Create the alarm with a close time, and check the notification you receive.
If you don’t receive any notification and you’re using macOS, make sure notifications are allowed from Firefox.
Deleting Notifications
The last feature we’ll add is deleting notifications. We’ll allow the user to delete notifications they see from the popup and cancel the alarms for the deleted notification using the alarm name.
Before we start, we’ll use the trash icon from Feather. You can download it from there, or you can get it from the GitHub repository of this tutorial. It should be added in assets/images/trash.svg.
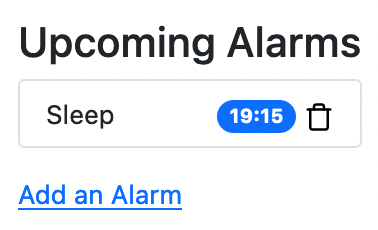
We need to make changes to assets/js/popup.js to show a trash button next to the time of each alarm. We’ll also use the alarm’s index in the alarms array in the storage as the ID of the element to be able to access it later easily.
We’ll add a new optional parameter for appendItem called id and show a new button:
function appendItem (content, badgeContent = null, id = null) {
  listElement.append(`
    <li class="list-group-item d-flex justify-content-between align-items-center alarm-item" ${id !== null ? `id="alarm_${id}"` : ''}>
      ${content}
      ${badgeContent ? `
        <div>
          <span class="badge bg-primary rounded-pill">${badgeContent}</span>
            <button class="trash-btn p-0"><img src="assets/images/trash.svg" alt="delete" /></button>
        </div>
      ` : ''}
    </li>
`);
}
Then, inside the forEach loop, we’ll add the index to the list of parameters:
result.alarms.forEach((alarm, index) => {
  const alarmTime = new Date('1970-01-01T' + alarm.time + 'Z').getTime();
  if (alarmTime > now) {
    appendItem(alarm.content, alarm.time, index);
  }
});
Next, we’ll add a click event listener on .trash-btn that first retrieves the index of the alarm from its parent:
$('body').on('click', '.trash-btn', function () {
  const parent = $(this).parents('.alarm-item');
  const parentId = parent.attr('id');
  const alarmIndex = parentId.split('_')[1];

  //TODO delete alarm from alarms array in storage
});
After that, we’ll get the alarms array from the storage, then remove the alarm at index alarmIndex using splice and set the alarms array again in storage:
//get alarms from storage
browser.storage.sync.get(['alarms'])
  .then((result) => {
    let alarms = [];
    let alarmName = '';
    if (result.alarms && result.alarms.length > alarmIndex) {
      alarmName = result.alarms[alarmIndex].alarmName;
      result.alarms.splice(alarmIndex, 1);
    }
    browser.storage.sync.set({alarms})
      .then(() => {
        //TODO cancel the alarm
      });
});
Then, we need to cancel the alarm so that it doesn’t ring later on. To do that, we’ll use browser.alarms.clear, which takes the alarm name as a parameter to cancel it. Finally, we’ll remove the alarm element from the popup:
//remove alarm by name
browser.alarms.clear(alarmName);
//remove alarm item from list
parent.remove();
And with that, we’ve added a delete feature that deletes an alarm from the storage and also cancels it from going off in the background.
Let’s add some styling to the button we just added. Create the file assets/css/popup.css with the following content:
.trash-btn {
  background-color: transparent;
  border: none;
}

.trash-btn img {
  width: 15px;
  height: 15px;
}
Then add this stylesheet in popup.html:
<link href="assets/css/popup.css" rel="stylesheet" />
Check the popup now. It should look like this:
Try adding an alarm that should send a notification in the next few minutes. Then remove it. No alarm should sound at the time you scheduled it.
That’s it! We’ve created an extension that stores information for the user in the sync storage, then we learned how to create alarms that fire at certain time intervals. We then created a background script that listens for the alarms firing, and finally we learned how to send notifications to the user after listening to the alarms firing.
The next step in the lifecycle of creating an add-on is publishing it on Mozilla’s Developer Hub.
Publishing the Add-on
Now that we’re ready to publish the add-on, we can remove the browser_specific_settings key in manifest.json, so make sure to do that first.
You need to log in to your account, or create a new one. You can do that here.
Once you’re logged in, you can see the section “My Add-ons”. Click on the Submit a New Add-on button at the bottom right.

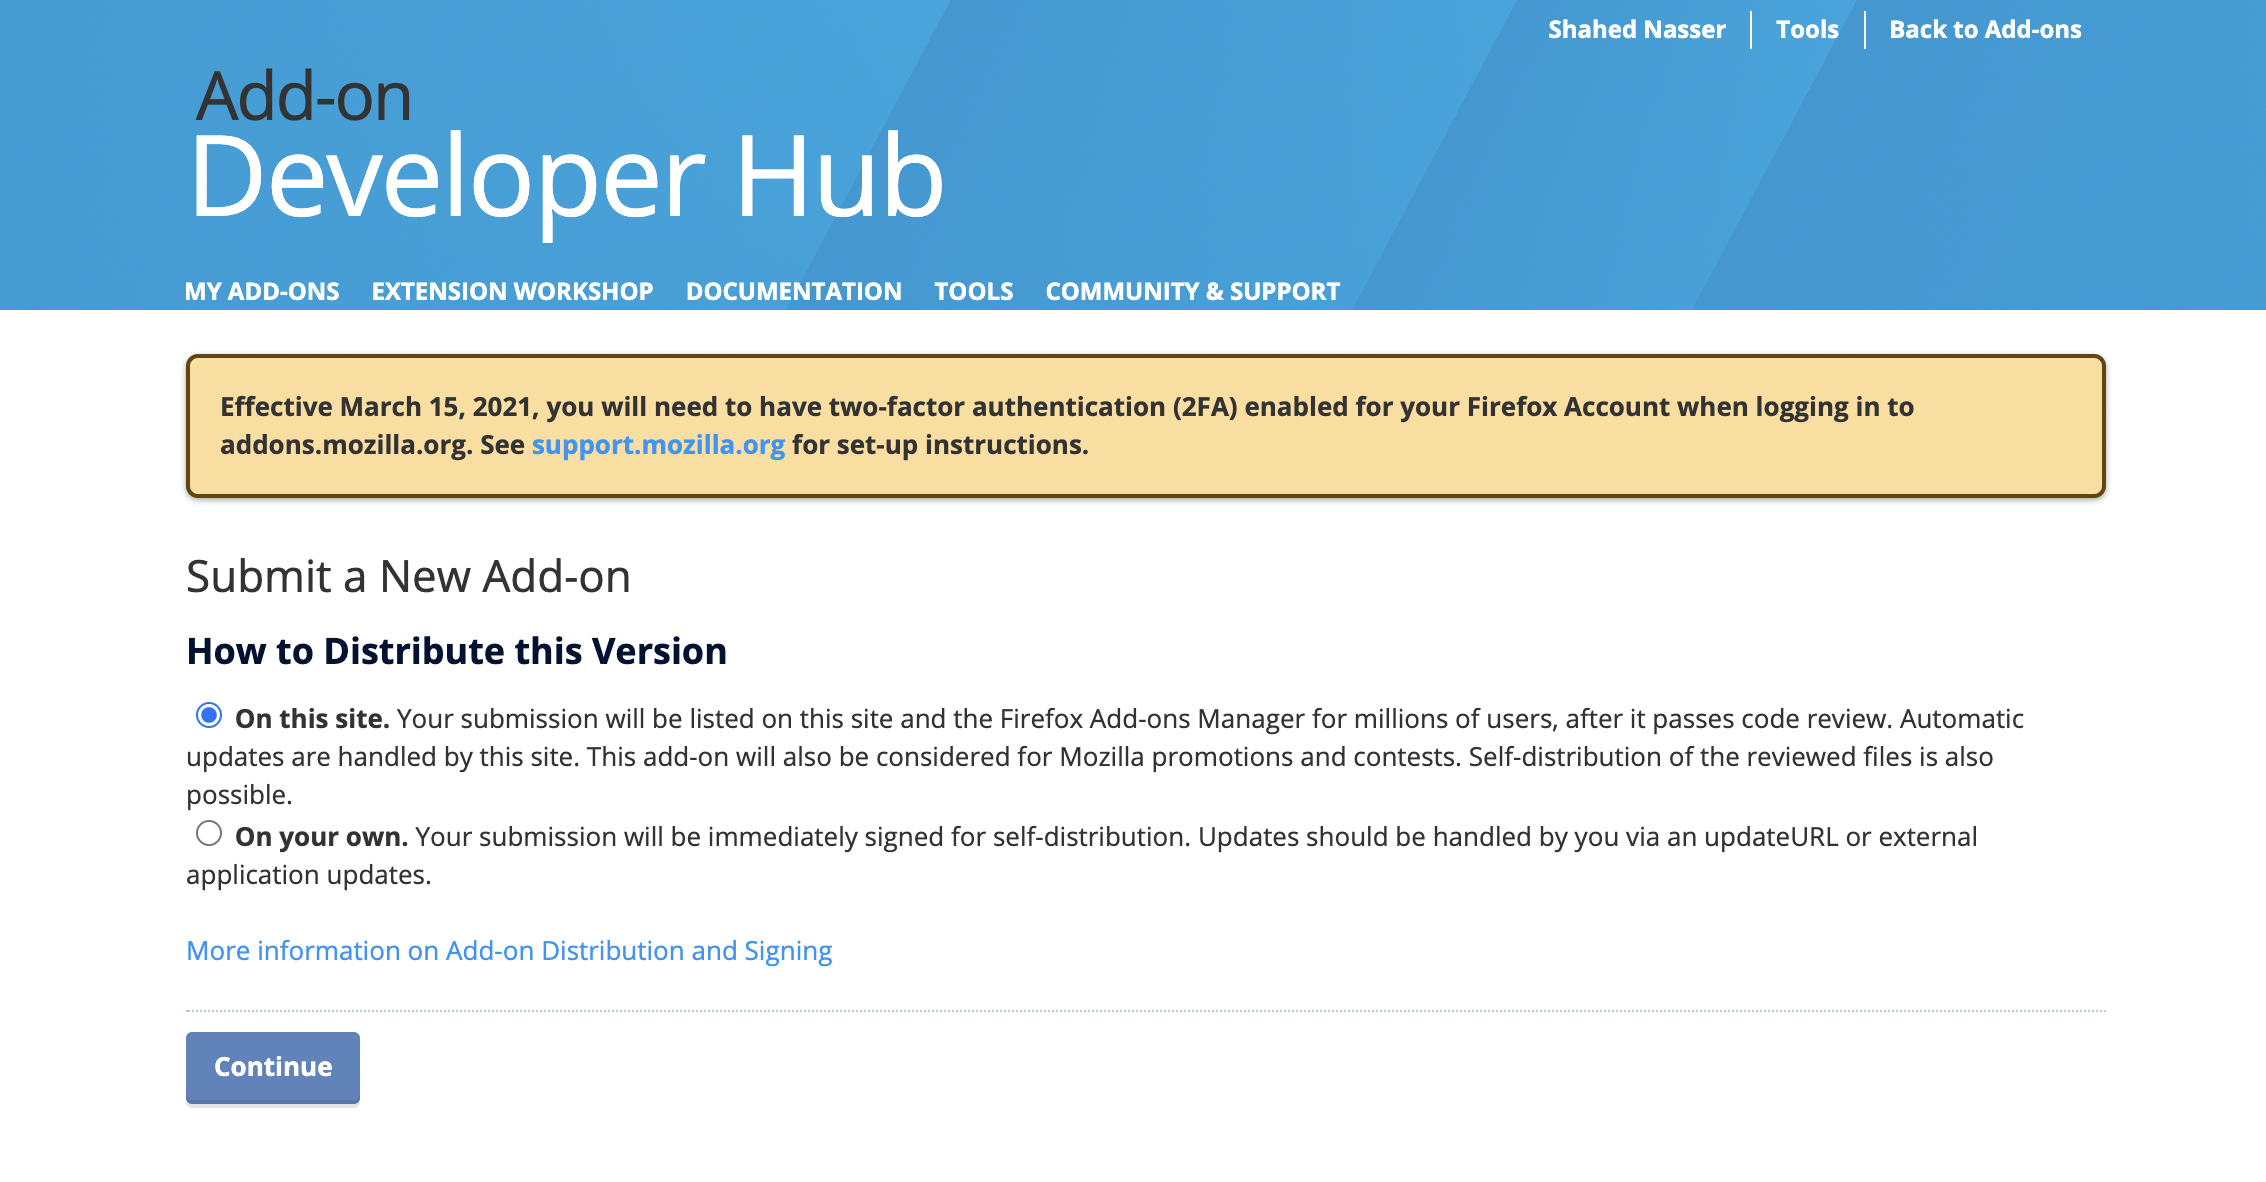
The process to submit a new add-on will then start. You’ll first be asked if you’ll publish the add-on on Firefox add-ons Manager or you’ll distribute it on your own. Leave the first default option checked and click Continue.
Next, you’ll be asked to upload the extension. To do that, go to the directory you created the add-on inside and create a compressed ZIP file with all the content. Make sure that the root of the add-on is the root of the ZIP file, which means that manifest.json should be in the root of the ZIP file. Then upload that ZIP file. You can also choose to make the add-on available for Firefox Android.
Note: if you get the error “Duplicate add-on ID found”, make sure that you’ve removed the browser_specific_settings key from manifest.json.
Once the file uploads with no errors, click Continue.
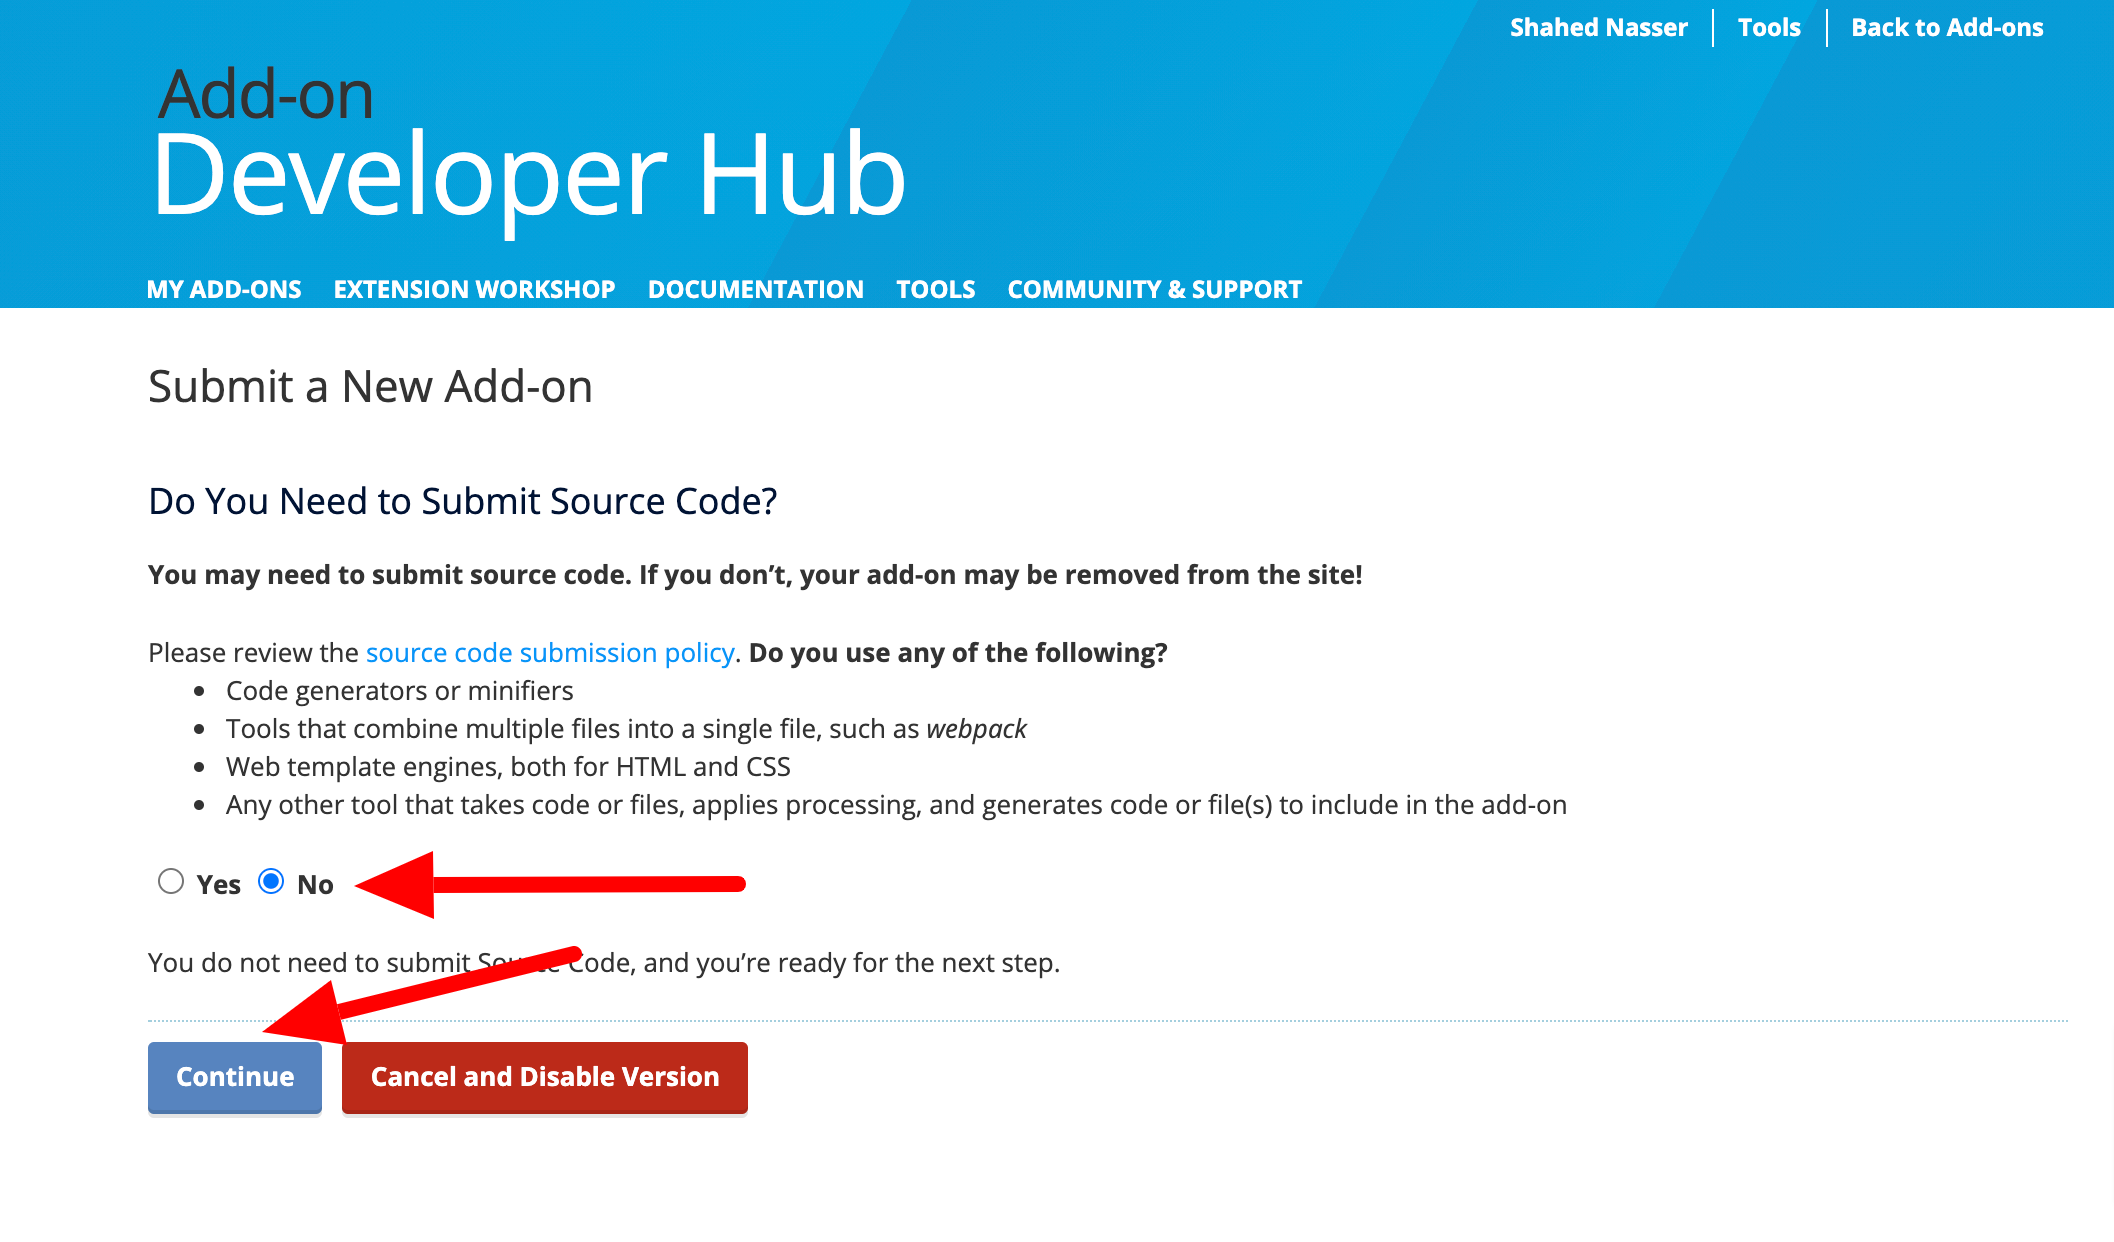
In the next step, you’ll be asked to specify whether your add-on uses any compilers or minifiers or any tool that does any processing to the code of the add-on. The reason behind this is that Firefox will then need you to submit the original code for review. Since our add-on doesn’t use any of these tools, just check No and click Continue.
In the final step, you’ll be asked to enter some information about the add-on. This information will be seen by any user that wants to install your add-on, so make sure to make it as clear and descriptive as possible. Enter the add-on’s name, description, categories, and so on. Once you’re done, click Submit Version. If you’re not ready to fill out some information, don’t worry, as you can edit it later on.
And that’s it! Once you click Submit Version, your add-on will be awaiting review, which doesn’t take long. The review process can take up to a day. Once approved, you’ll get an email notifying you and then you can view the add-on on Firefox store. You can also go to the add-on’s information page and add or edit any information like its description, images, and so on.
Updating the add-on is also easy. You can just upload the updated version and it will be available right away! This makes publishing add-ons on Firefox easier and faster than most other browsers.
Making Add-ons Compatible with Chrome
To make the extension we just created compatible with Chrome, we’ll need to make the following amendments:
- Replace all occurrences of
browser.*withchrome.*. - On Chrome, all of its APIs use callbacks instead of returning promises. This means that instead of using promises in our code, we need to pass a callback function as the last parameter.
An example of making these changes would be in assets/js/popups.js. We used the following code to get the alarms from storage and display them:
browser.storage.sync.get(['alarms'])
  .then((result) => {
  //...
});
We’ll replace this code with the following:
chrome.storage.sync.get(['alarms'], (result) => {
  //...
});
That’s it. We just move the rest of the code inside the callback function.
Conclusion
In this tutorial, we went over how to create an add-on with basic and necessary features like using the storage, sending notifications, creating background script, and more. Knowing how to do all of that can help you create add-ons with many features. Start creating something awesome!
Frequently Asked Questions (FAQs) about Creating a Firefox Add-On
What are the prerequisites for creating a Firefox add-on?
Before you start creating a Firefox add-on, you need to have a basic understanding of web technologies such as HTML, CSS, and JavaScript. You also need to install Firefox on your computer and set up a text editor for coding. Familiarity with JSON (JavaScript Object Notation) is also beneficial as the manifest file of the add-on is written in JSON format.
How can I test my Firefox add-on during development?
Firefox provides an about:debugging page where you can load and test your add-on. You can access this page by typing about:debugging in the Firefox address bar. Click on “This Firefox” and then “Load Temporary Add-on” to load your add-on. Remember, each time you make changes to your add-on, you need to reload it on this page to see the changes.
How can I debug my Firefox add-on?
Firefox Developer Tools can be used to debug your add-on. You can access these tools from the about:debugging page. After loading your add-on, click on “Inspect” to open the developer tools. You can use the Console to view logs, the Debugger to step through your JavaScript code, and the Inspector to examine and modify your HTML and CSS.
How can I publish my Firefox add-on?
Once you have developed and tested your add-on, you can submit it to Firefox Add-ons site (addons.mozilla.org) for publication. You need to create an account on the site, then click on “Submit a New Add-on” and follow the instructions. Your add-on will be reviewed by the Firefox team before it is published.
How can I update my Firefox add-on after it is published?
To update your add-on, you need to increment the version number in the manifest file and repackage the add-on. Then, you can submit the updated add-on to the Firefox Add-ons site. The users of your add-on will receive the update automatically.
Can I use third-party libraries in my Firefox add-on?
Yes, you can use third-party JavaScript libraries in your add-on. However, you need to include the library files in your add-on package and reference them in your scripts.
How can I create a user interface for my Firefox add-on?
You can create a user interface for your add-on using HTML, CSS, and JavaScript. The user interface can be a popup that opens when the user clicks on the add-on icon, or a full-page interface that opens in a new tab.
How can I store data in my Firefox add-on?
You can use the storage API provided by Firefox to store data in your add-on. The storage API allows you to store data in different scopes, such as local (stored on the user’s computer) and sync (synchronized across all instances of the add-on installed by the user).
How can I make my Firefox add-on interact with web pages?
You can use content scripts to interact with web pages. Content scripts are JavaScript files that run in the context of web pages and can read and modify the DOM of the web pages.
How can I handle events in my Firefox add-on?
You can use event listeners to handle events in your add-on. For example, you can listen for a click event on the add-on icon, or a change event on a storage area. You can define the event listeners in your background scripts or content scripts.
 Shahed Nasser
I am a full-stack developer passionate about learning something new every day, then sharing my knowledge with the community.


