
In this tutorial, you’ll learn how to build a form-handling service for your Jamstack website or single page application (SPA) using Cloudlflare Workers.
With Jamstack technology, HTML code is rendered at build time and then deployed to edge servers. This allows very fast load times for end users. In addition, businesses benefit by paying much significantly lower hosting fees.
One issue with Jamstack technology is how to deal with site features that can only be implemented with server-side technologies. For example, form handling is relatively easy if you have access to a server-side technology like PHP, where you can just use mail(<to>, <from>, <message>) to collect and send mail data.
Of course, Jamstack sites aren’t left out in the cold. You can run back-end applications on a Jamstack site using serverless computing. But you’ll need to implement a microservice architecture in your back-end development. Serverless computing requires that you build your logic into loosely coupled, independently deployable services.
Serverless computing can be a lot more cost-effective than renting private servers often needed for running back-end apps. An added bonus of serverless computing is that you can start to create more complicated workflows using further services (such as using services like Airtable to store form data).
For this tutorial, you’ll learn how to build and deploy a form-handling service for a React front-end SPA. Technically, any front-end framework will do. We’ll use Cloudflare Workers to develop our serverless function. Before we start working on the code, let’s first have an overview of why we’ll be using this technology stack. (If you’d rather get to the hands-on part straight away, jump to the project section.)
About Third-party Form-handling Services
There’s already a good number of API form-handling services that provides the features we need. These include:
The features they offer include:
- email notification
- spam blockage
- integration with other services through Zapier
- dashboard data view
- file upload and storage
- CSV export
That’s a lot of value that frees you from having to build such a service yourself. Also, it only takes about five minutes or less to integrate the service with an existing web application. Most platforms offer a free plan that gives you about 50 to 100 free submissions per month with about 100MB of file storage.
Paid plans start from $9 a month with 1,000 submissions and 1GB of file upload storage. If you’re using the service to capture leads, the price is quite fair. However, if you’re using it for a different purpose — such as collecting massive amounts field data — it can get expensive quickly.
This is where building your own form-handling service can be advantageous. There are several benefits, which include:
- lower cost per form submission
- implementation of custom security policies
- unlimited integrations with other services
- reduction in latency, since you have control of how and where the service is hosted
- ability to add new features not currently offered by a form-handling provider
In regards to lower cost per submission, transaction email service providers such as SendGrid and Mailgun currently have an offer that allows you to send between 3,000 to 5,000 emails per month for free. The former’s offer is permanently free, while the latter’s offer only lasts for three months.
This, of course, is already too much email for anyone’s inbox. You’d probably want to send form data straight to your database or an application service designed to handle that data. If that’s the case, you’ll probably pay less than 10 dollars per a million submissions.
This pricing I’ve estimated is based on combined average pricing for major serverless computing and serverless database offerings. If you need file storage, you can get 250 Gigabytes of Linode Object Storage for $5 per month. You actually get so much more value when you spend the time to build the service yourself.
I hope those are enough reasons. If not, then learn to build just for the fun of it. You can apply the knowledge gained in other areas. In the next section, we’ll look into why we chose to build our own service with Cloudflare Workers.
About Cloudflare Workers
The first serverless computing platform to be introduced was Google App Engine, which was launched in 2008. However, the first commercially successful serverless offering was AWS Lambda, which was introduced by Amazon in 2014. Later, in 2016, Google introduced a second serverless offering known as Google Cloud Functions. IBM Cloud Functions and Azure Functions followed soon after.
While all these services provide the benefits of running back-end code at a significantly lower cost, most do suffer from a problem known as cold start. This is where an idle container hosting your function takes anywhere from 1 to 10+ seconds to respond to a request. There are many workarounds that have been documented to improve the situation, but not to solve it entirely.
Cloudflare Workers is the latest entry into the serverless computing market. The company has solved the cold start problem where idle serverless functions experience 0 millisecond boot time to respond to requests. They’ve achieved this by leveraging V8 runtime to execute serverless functions instead of running them in a Node.js environment. This guide explains more on how it works.
In addition, Cloudflare is an Edge computing platform. This basically means code is executed on servers nearest to end users. This greatly reduces network latency even further, and makes your application response instant.
Hopefully I’ve now convinced you that Cloudlflare Workers is the way to go. So let’s start building.
About the Project
The source code for the completed projects are included in the following links:
- Cloudflare form UI: React single page application
- Cloudflare form service: Cloudflare Workers application
We’ll go through building the Workers application step by step in this tutorial. Then we’ll download and configure the completed SPA (linked above) to connect to our completed Workers project.
We won’t be building the UI. We’ll deploy the application and test it with the Workers application that we’re going to build. The following section describes all the prerequisites needed to follow along with the tutorial.
Prerequisites
This tutorial is intended for intermediate to advanced Node.js developers. I’ll assume you’re familiar with ES6+ notation and REST APIs. You’ll need the following setup in your development environment:
- Node.js
- Visual Studio Code
- the VS Code REST Client extension
The REST Client extension is a more convenient tool for testing REST interfaces as opposed to using external applications.
Accounts Setup
In this section, we’ll set up all the service accounts we need to build our email-handling worker. Take note of all the API tokens and other IDs that we’ll use later on in the development process.
1. Custom Domain
In order to follow along this tutorial, it’s highly recommended that you have access to a custom domain and an email address using that domain. However, you can manage to get the code working using a sandbox domain and the free subdomain that Cloudflare gives you when you sign up. Do note that credit card information is required when setting up a custom domain on Mailgun.
Having a custom domain will allow you to:
- deploy your Cloudflare projects on a custom domain
- gain access to your deployed Workers logs in real time
- send authentic emails that won’t end up in the spam box
If you don’t have access to a custom domain, I strongly suggest you purchase a new domain from FastComet. The reason I recommend them is because they’ll give you a free Lite Email package which you can use to set up your custom domain email address. Most providers will charge you extra for email hosting.
In the next section, we’ll set up a Mailgun account.
2. Mailgun Setup
Mailgun is an Email API service that allows developers integrate email functionality into their apps via APIs. We’ll use their REST API interface to send and email from our Workers application to a recipient. Basically this means we only need to use Fetch or Axios to send an email. Use the following guide to set up your Mailgun account:
- Head over to the sign up page and create a new account using the free plan.
- Verify your account using an email address and an SMS code sent to your phone.
- On Mailgun’s dashboard, go to Sending > Domains and you’ll find a sandbox domain has been created for you. This is a free domain provided for you to test the sending of emails.
- With a sandbox domain, you’re only allowed to send an email to an authorized recipient. On the current dashboard’s right sidebar, you’ll find a form where you can provide the email address of a recipient. Add one now. This will be the email address that will receive the emails sent from the Workers application that we’ll be building.
- An email will be sent to the authorized recipient’s inbox. Click confirm to complete step 4.
- On the sandbox’s Overview page, click on API > Select button.
- Next, select the curl tab. Take note of your
API Keyand theAPI base URL. - Send a test email using the cURL command provided for the sandboxed domain. Ensure that you replace the relevant fields with your API tokens and your authorized email recipient.
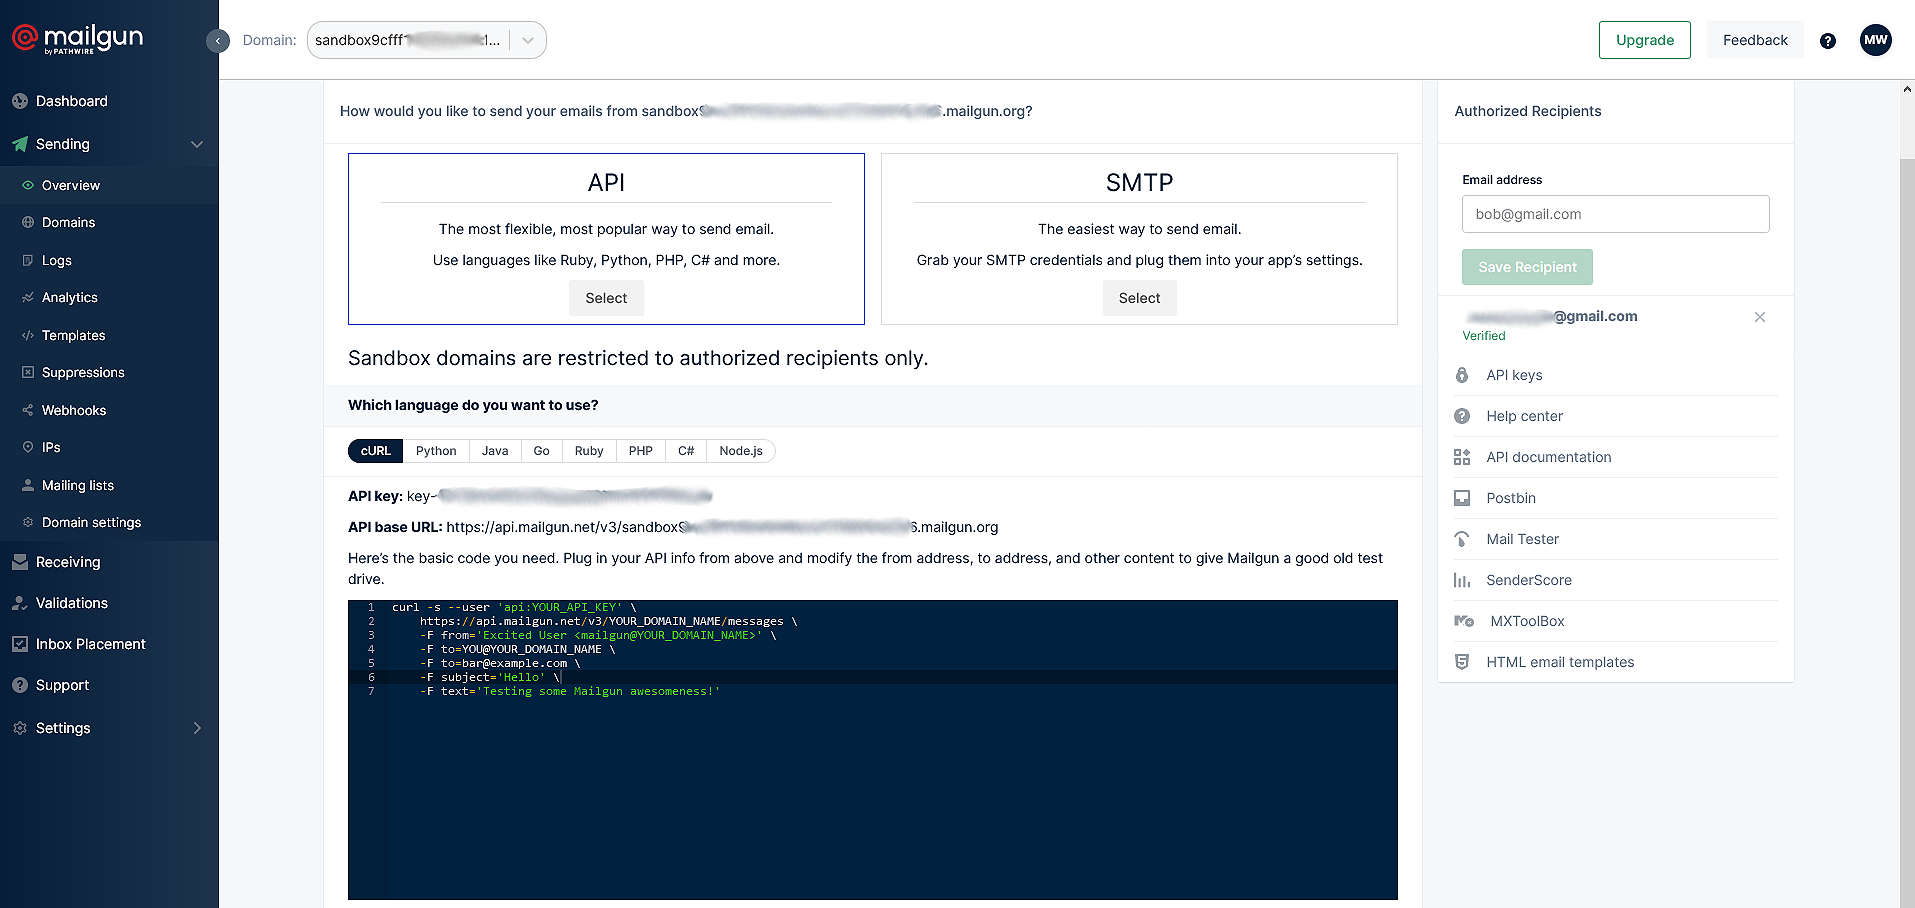
Here’s a quick example of how you can send yours:
curl -s --user 'api:key-0303d350c68aa534560ed0838bca66e' \
  https://api.mailgun.net/v3/sandbox9cfff108345efd4a15fd76.mailgun.org/messages \
  -F from='John Doe <john.doe@gmail.com>' \
  -F to=jane.doe@gmail.com \
  -F subject='Hello' \
  -F text='Message sent using Mailgun service'
If successful, you should receive output like that shown below:
{
  "id": "<20210406124818.1.7CAD4673034EEB0E@sandbox9cfff108345efd4a15fd76.mailgun.org>",
  "message": "Queued. Thank you."
}
You should also receive an email either on your authorized recipient’s inbox or spam box. If this happens, you’ve successfully set up your Mailgun account.
If you’d like to use a custom domain as your sending domain, do note that credit card information is required. You can follow the instructions here to learn how to set that one up. Using a custom domain allows you to unlock sending limits, and also to have your email source validated such that they’ll always end up on users’ inbox and not the spam box.
At the end of this section, you should have access to the following:
- an API KEY: for example,
api:key-0303d350c68aa534560ed0838bca66e - an API BASE URL: for example,
https://api.mailgun.net/v3/sandbox9cfff108345efd4a15fd76.mailgun.org - a FROM_EMAIL_ADDRESS: use any Gmail address or a custom domain address that you ‘ve registered with Mailgun
- a TO_EMAIL_ADDRESS: an authorized recipient
Do note that the API key is also found under Settings > API Keys > Private API key.
3. Cloudflare Workers Setup
To get started, simply sign up for a Cloudflare Workers account. Follow the instructions provided:
- enter email address and password
- choose a subdomain for your account
- choose a plan: select free
- verify your email address
Next, install and configure Wrangler CLI, which you’ll use to develop Workers projects:
# Install wrangler CLI globally
npm install -g @cloudflare/wrangler

# Confirm version
wrangler --version

# Login to your Workers account
wrangler login

# Confirm login status
wrangler whoami
In case the login command fails for you, there are a few workarounds which have been documented on this GitHub issue. These are the steps that worked for my machine:
Execute
wrangler loginagain in the terminal.As soon as the Authorize page loads, Press F12 to open the Inspector, then switch it to Network tab.
Click on the
Authorize Wranglerbutton and wait till says “Wrangler is now authorized”.Under the Network tab within the Inspector console, locate the last POST request. Click on it to highlight it.
A Request tab should appear. Click on it to access it. There should be some JSON data. The property “key” is the API token. Copy it.
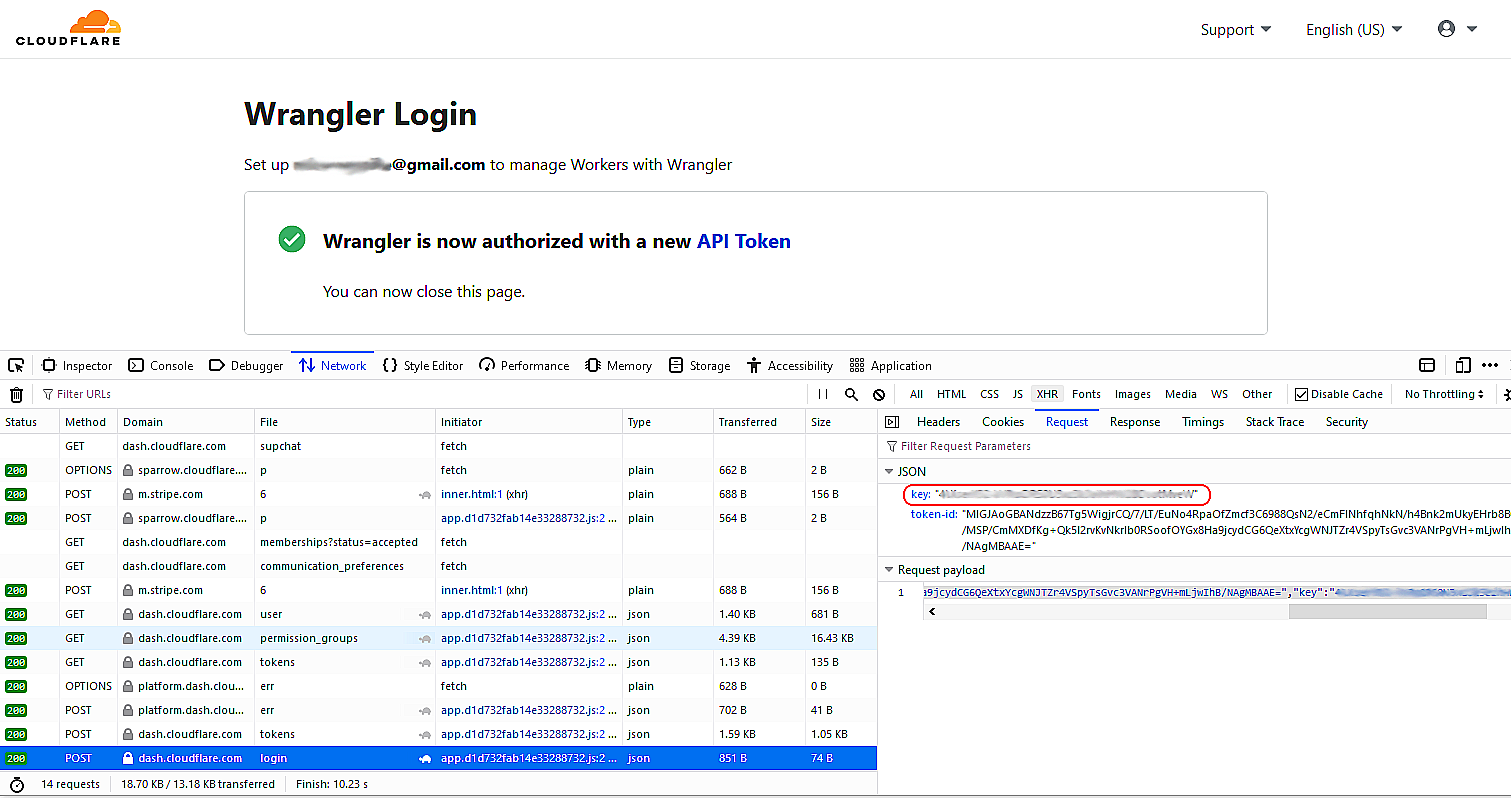
Go back to the terminal and use ctrl + c to cancel the last command. Execute the command
wrangler config. You’ll be asked to enter your API token. Paste the key you just copied, then press enter. It should return a “Successfully configured” message.Confirm authentication was successful by executing
wrangler whoami.
In the next subsection, we’ll look at how to add a custom domain to your Cloudflare account. If you don’t have one, simply skip to the “Project Development” section, where we can continue without one.
Custom Domain Setup on Cloudflare
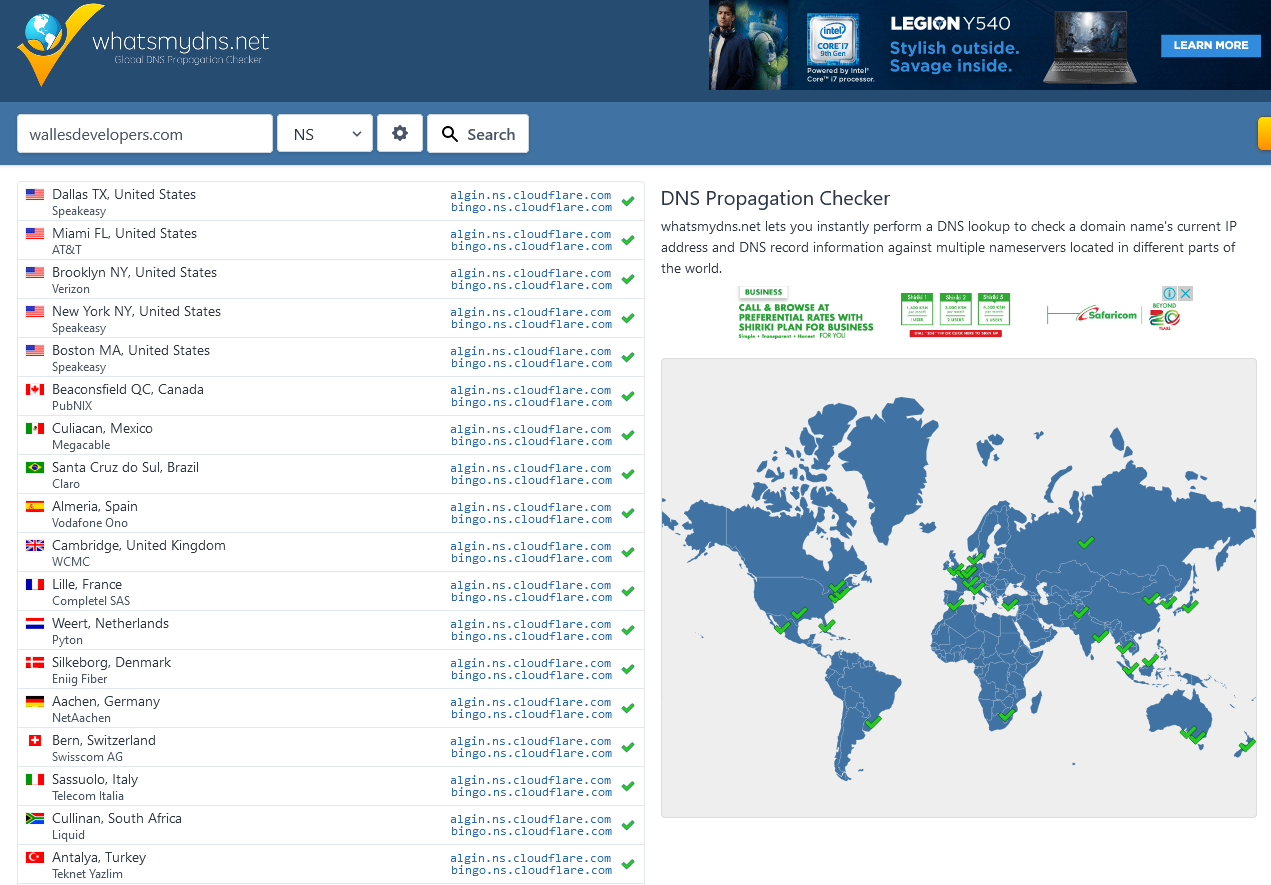
If you have a custom domain, you’ll be able to access real-time logs of your Workers application. To set it up, simply follow thies instructions:
Add your website (custom domain) to Cloudflare: instructions here
Change your domain nameservers to Cloudflare: instructions here.
Adding your custom domain in Cloudflare will also enable you to publish your Workers application to a custom domain. We’ll see how to do this in a later section. Take note that changing domain servers takes effect within a minute, though you’ll be informed it takes 24 hours. You can confirm the status by using the global DNS checker.
Download the Cloudflared binary : download links here. Extract the binary and place it in your
$PATHenvironment variable.Authenticate Cloudflared command: instructions here for using
cloudflared tunnel logincommand.
Once you’ve completed the above setup, you’ll be able to run the command wrangler tail to stream your published Workers application logs in real time.
Project Development
In this section, we’ll do the actual actual coding. You should have the following tokens and ids:
- MAILGUN API KEY
- MAILGUN API BASE URL
- FROM EMAIL ADDRESS
- TO EMAIL ADDRESS
- Cloudflare account ID
- Cloudflare zone ID (available under your custom domain dashboard in Cloudflare)
1. Generate Project
In this step, we’ll generate our Workers project. Simply execute the following commands in a terminal:
# Scaffold your Workers project
wrangler generate cloudflare-form-service

# Install package dependencies
cd cloudflare-form-service
npm install

# Open in VS Code
code .
Next, update wrangler.toml and provide your account_id:
name = "cloudflare-form-service"
type = "javascript"
account_id = "<place your account id here></place>"
workers_dev = true
route = ""
zone_id = ""
After saving your changes, open package.json, and overwrite the scripts section the following:
{
  "scripts": {
    "dev": "wrangler dev",
    "preview": "wrangler preview",
    "format": "prettier --write \"**/*.{js,css,json,md}\""
  },
}
It’s handy having these commands set here so that you can easily launch them in VS Code. You can launch the dev command or simply execute npm run dev in your terminal. This should start the dev server, which should take a few seconds.
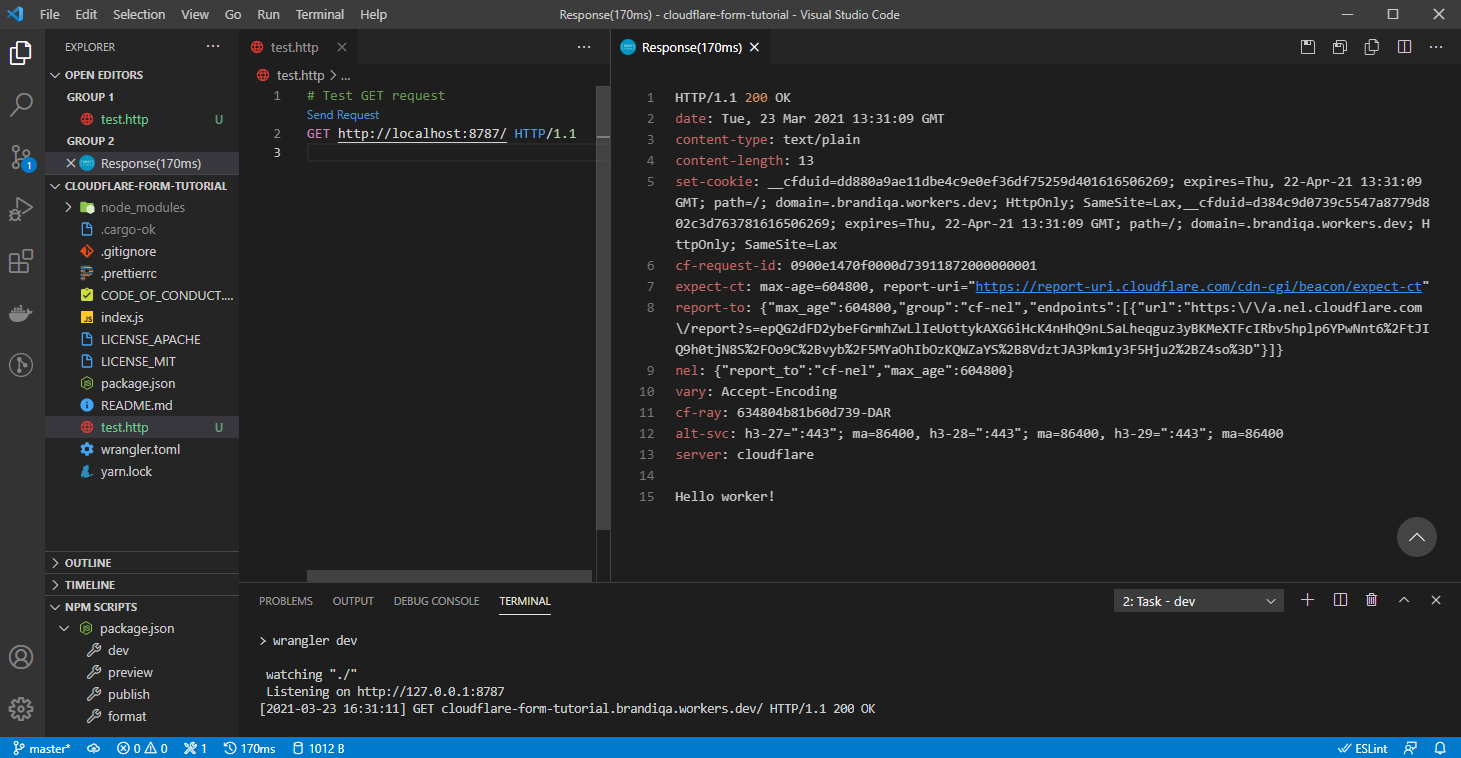
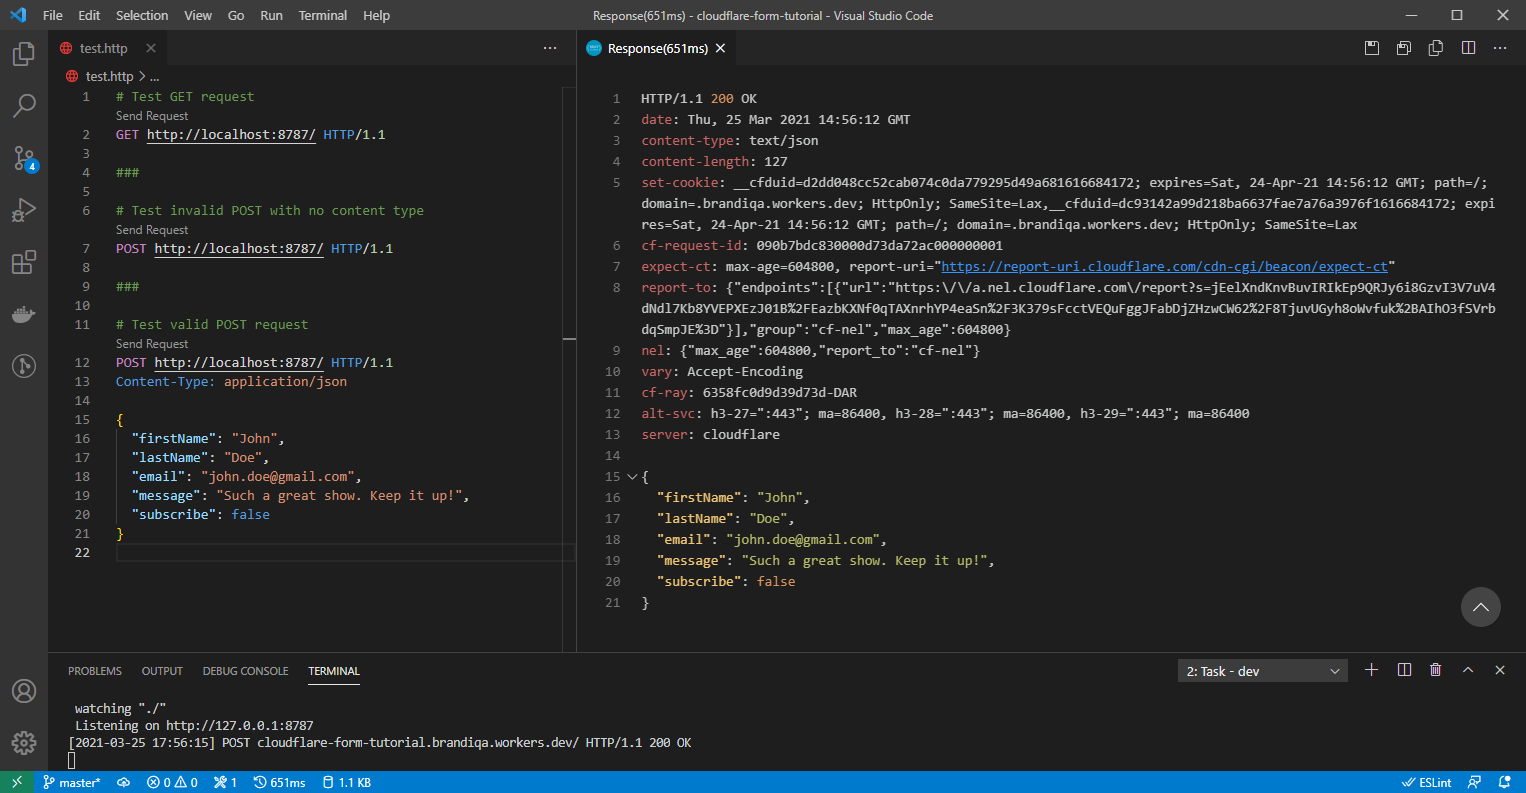
Create the file test.http and insert the following commands:
# Test GET request
GET http://localhost:8787/ HTTP/1.1

###
After saving, there should be a clickable “Send Request” link that appears in test.http file, right above the GET command. This feature is powered by the REST Client extension. Click on it to run the request. A new tab should open displaying the response. Take note of the roundtrip time displayed on the tab title.
In the next step, we’ll start writing code for handling POST requests.
2. Handling POST Requests
Let’s take a look at our current Workers code. Open index.js:
addEventListener('fetch', event => {
  event.respondWith(handleRequest(event.request))
})
/**
 * Respond with hello worker text
 * @param {Request} request
 */
async function handleRequest(request) {
  return new Response('Hello worker!', {
    headers: { 'content-type': 'text/plain' },
  })
}
Currently, our Workers application is listening for any Request type and passing it to the Response handler, which returns the text message “Hello worker!”
We’ll make the following changes:
- define a specific response handler for POST requests
- define a function for converting form data into a JavaScript object
- block all other request types by returning a 404 message
Overwrite the current index.js with the following changes:
addEventListener('fetch', event => {
  event.respondWith(handleRequest(event.request))
})

async function handleRequest(request) {
  if (request.method === 'POST') {
    return handlePostRequest(request)
  } else {
    return new Response('Object Not Found', {
      statusText: 'Object Not Found',
      status: 404,
    })
  }
}


/**
 * Return body data in JSON format
 * @param {Request} request
 */
async function readRequestBody(request) {
  const { headers } = request
  const contentType = headers.get('content-type')
  if (!contentType) {
    throw 'Content type has not been set!'
  }
  if (contentType.includes('application/json')) {
    const body = await request.json()
    return body
  } else if (contentType.includes('form')) {
    const formData = await request.formData()
    let body = {}
    for (let entry of formData.entries()) {
      body[entry[0]] = entry[1]
    }
    return JSON.stringify(body)
  } else {
    throw 'Content type not recognized!'
  }
}

/**
 * Handle JSON POST data
 * @param {Request} request
 */
async function handlePostRequest(request) {
  let json

  // Read form data
  try {
    json = await readRequestBody(request)
  } catch (error) {
    return new Response(error, {
      headers: { 'content-type': 'text/plain' },
      statusText: error,
      status: 500,
    })
  }

  // Send response
  return new Response(JSON.stringify(json), {
    headers: { 'content-type': 'text/json' },
    status: 400,
  })
}
Next, append the following HTTP commands in test.http:
# Test invalid POST with no content type
POST http://localhost:8787/ HTTP/1.1

###

# Test valid POST request
POST http://localhost:8787/ HTTP/1.1
Content-Type: application/json

{
  "firstName": "John",
  "lastName": "Doe",
  "email": "john.doe@gmail.com",
  "message": "Such a great show. Keep it up!",
  "subscribe": false
}

###
Make sure to use ### to separate each HTTP command. Start the dev server using wrangler dev or npm run dev command. Run each URL. You should expect the following results:
- GET request: returns 404 error message
- POST request with no content type: returns 400 error message about content type
- Valid POST request: simply returns the POST JSON data we submitted
Currently, we’re not performing any validation on the JSON data that comes with POST request. Let’s fix that in the next step.
3. Schema Validation
In order to validate data in JSON formats, we’ll use JSON Schema, an open standard that’s used to define the structure of your data. Schema definitions are run against data using validation tools to check if the structure is compliant. If not, a list of validation errors is returned. You can learn more about the basics of JSON Schema here.
We’ll start by installing @cfworker/json-schema, a JSON Schema validator that can run in the Workers environment. As mentioned earlier, serverless execution environments generally lack some APIs required to support a full Node.js environment. So the team at Cloudflare Workers built one that can run on their platform. It’s based on ajv, a JSON validator for Node.js.
Execute the following command to install the package:
npm install @cfworker/json-schema
Since we need to use the import statement, we need to change our Workers build type from “JavaScript” to “webpack”. This is done in wrangler.toml:
...
type = "webpack"
...
Next, let’s create a script named validator.js that will contain our schema definition and validation logic. Insert the following code:
import { Validator } from '@cfworker/json-schema'

const validator = new Validator(
  {
    type: 'object',
    required: ['firstName', 'lastName', 'email', 'message', 'subscribe'],
    properties: {
      firstName: { type: 'string' },
      lastName: { type: 'string' },
      email: { type: 'string', format: 'email' },
      message: { type: 'string' },
      subscribe: { type: 'boolean' },
    },
  },
  '2019-09', // draft version
  false, // stop processing after the first error
)

function validate(input) {
  const { valid, errors } = validator.validate(input)

  // reformat errors object for display
  const errs = errors.map(error => ({
    type: error.keyword,
    message: error.error,
  }))

  return {
    valid, // boolean for validation status
    errors: errs, // list of validation errors
  }
}

export default validate
Next, we’ll import and make use of the validate function in our handlePostRequest function. Open index.js and update accordingly:
import validate from './validator'

async function handlePostRequest(request) {
  let json

  // Read form data
  try {
    json = await readRequestBody(request)
  } catch (error) {
    return new Response(error, {
      headers: {
        'content-type': 'text/plain',
      },
      statusText: error,
      status: 500,
    })
  }

  // Validate json inputs
  const results = validate(json)
  // Return 400 Error Response for invalid post request
  if (!results.valid) {
    return new Response(JSON.stringify(results), {
      headers: {
        'content-type': 'text/json',
      },
      status: 400,
    })
  }

  // Send response
  return new Response(JSON.stringify(json), {
    headers: {
      'content-type': 'text/json',
    },
    status: 200,
  })
}
To test this new functionality, we’ll add a couple more HTTP commands. Simply add this to test.http file:
# Test invalid POST request - check missing data inputs
POST http://localhost:8787/ HTTP/1.1
Content-Type: application/json

{
  "firstName": "John"
}

###

# Test invalid POST request - check invalid types
POST http://localhost:8787/ HTTP/1.1
Content-Type: application/json

{
  "firstName": "John",
  "lastName": "Doe",
  "email": "john.doe",
  "message": "Such a great show. Keep it up!",
  "subscribe": "false"
}

###
Finally, make sure wrangler dev server is running, then execute all the HTTP commands. Below is an example of an expected failing validation response:
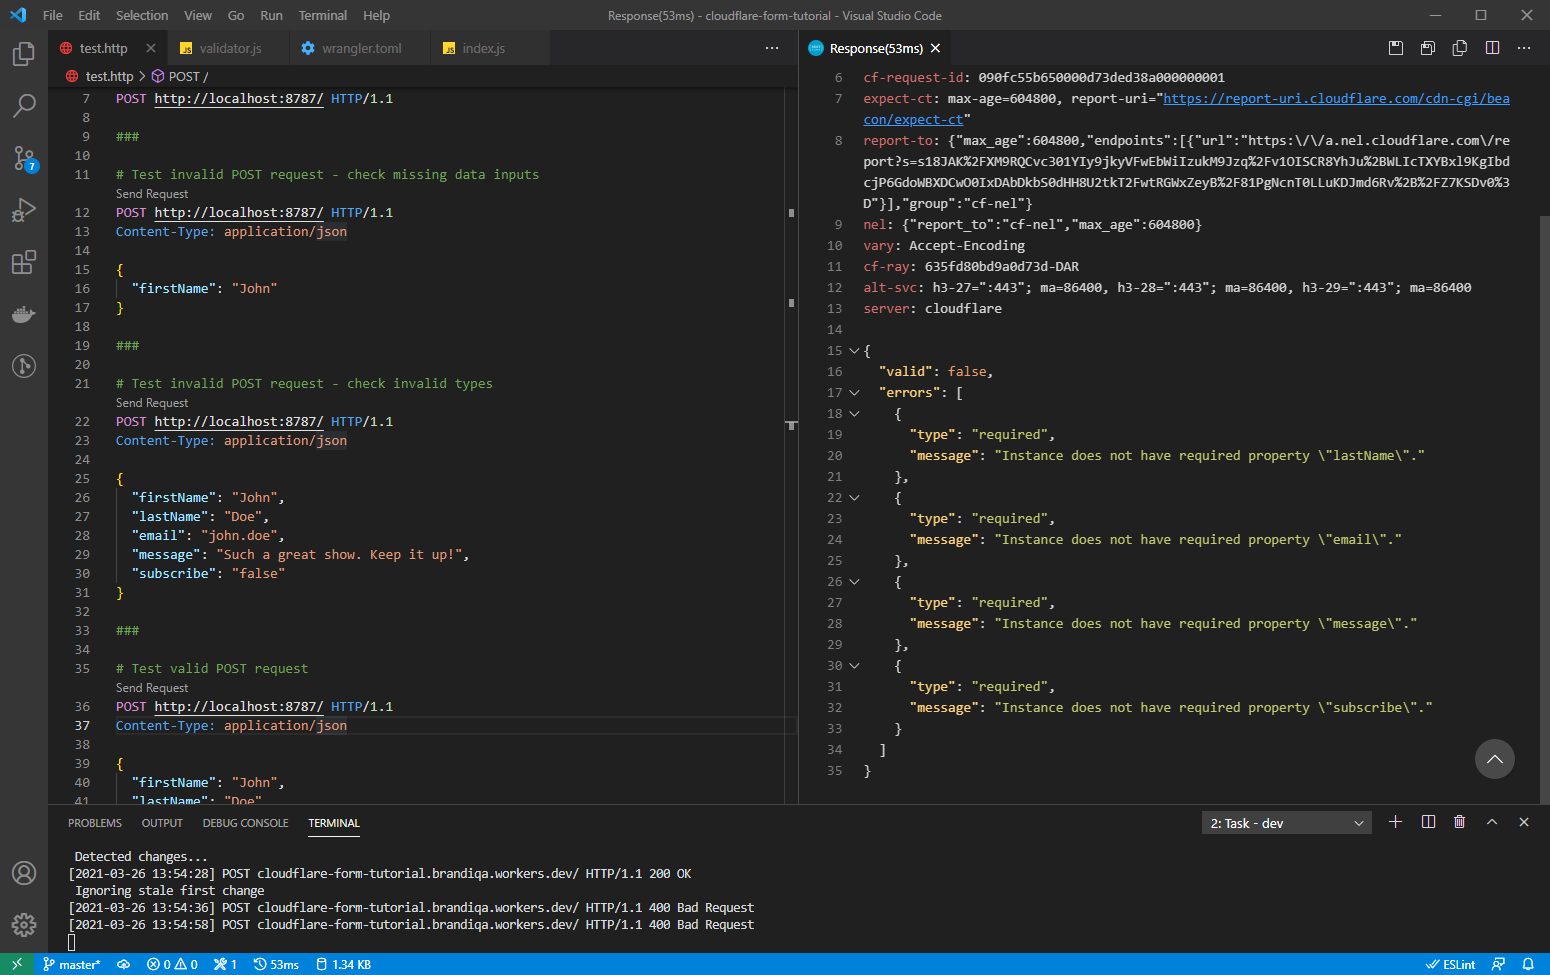
For the valid POST request, this should perform as before — that is, return the request JSON data in its response. In the next section, we’ll integrate the email service Mailgun.
Email Integration
Building a Workers application that can send emails is quite easy. We don’t need to install any new package for this. We’ll simply use Mailgun’s REST API service. First, create the file email-service.js and insert the following code:
import htmlTemplate from './email-html-template.js'
import textTemplate from './email-text-template.js'

// Convert Javascript data object to a format that can be sent using HTTP
function urlEncodeObject(obj) {
  return Object.keys(obj)
    .map(k => encodeURIComponent(k) + '=' + encodeURIComponent(obj[k]))
    .join('&')
}

function sendMail(json) {
  const data = {
    to: TO_EMAIL_ADDRESS,
    from: FROM_EMAIL_ADDRESS,
    subject: 'New Contact: Online Guest Book',
    text: textTemplate(json),
    html: htmlTemplate(json),
  }

  const dataUrlEncoded = urlEncodeObject(data)
  const opts = {
    method: 'POST',
    headers: {
      Authorization: 'Basic ' + btoa('api:' + MAILGUN_API_KEY),
      'Content-Type': 'application/x-www-form-urlencoded',
      'Content-Length': dataUrlEncoded.length.toString(),
    },
    body: dataUrlEncoded,
  }

  return fetch(`${MAILGUN_API_BASE_URL}/messages`, opts)
}

export default sendMail
The sendMail function first collects all the information needed to construct an email. Using URL encoding, the information is encoded into an URL format that can be sent over the Internet. If you look at the information collected, you may have noticed that we’re accessing a number of constant variables that we haven’t declared. These are environment variables that get injected by Cloudflare when we run our script. There are two ways of declaring them:
- Using
wrangler secret put <name>command. Running this will upload the environment variable straight to your Workers application’s settings. It will also automatically encrypt the value. - The second option is to first publish your application using the
wrangler publishcommand. Next, on dash.cloudflare.com, navigate to Dashboard > Workers > Click on “cloudflare-form-service” > Settings > Environment Variables. This where you can key in all the required variables needed for theemail-servicescript to run. You can leave the values plain if you’d like to edit them later, or click the encrypt button to secure the tokens.
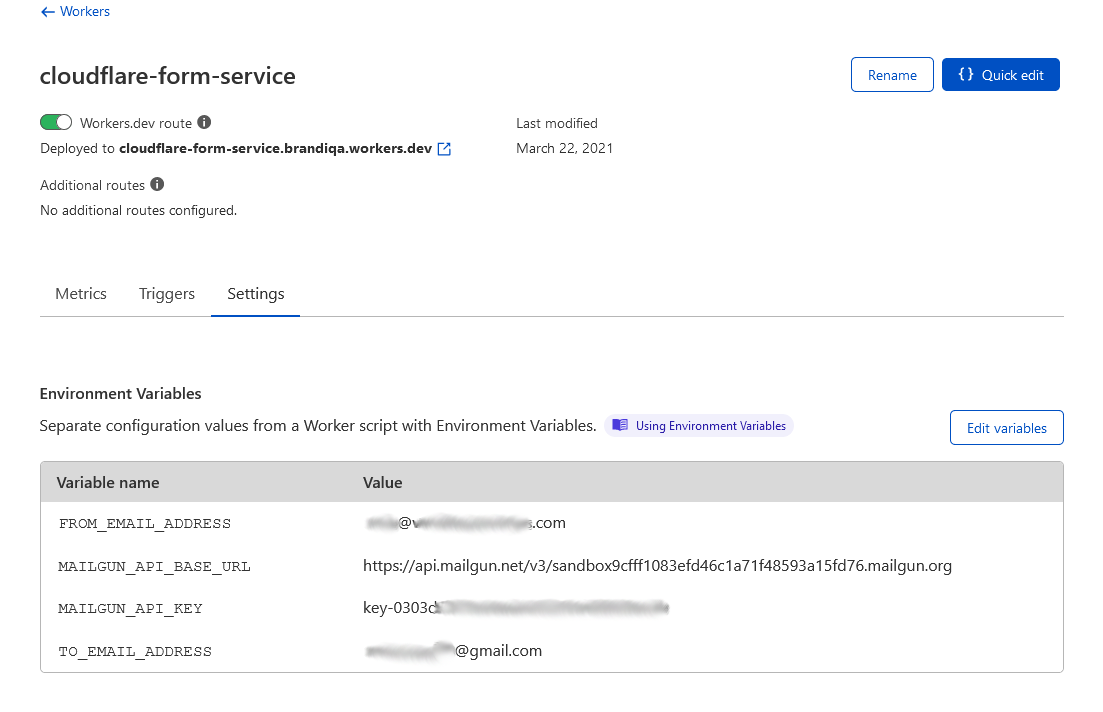
In the example above, I’ve left mine unencrypted so that I can change later. However, it’s highly recommended you use the wrangler CLI to set up your environment variables. Do note this will get reset later once we start defining our staging and production environments.
Next, we need to create HTML and text templates. These are required to format our email to make the data presentable.
Create the file email-text-template.js and insert the following code:
const template = data => {
  return `
    Online Guest Book Contact
    --------------------------
    First Name : ${data.firstName}
    Last Name  : ${data.lastName}
    Email      : ${data.email}
    Message    : ${data.message}
    Subscribed : ${data.subscribed ? 'Yes' : 'No'}
`
}

export default template
Create the file email-html-template.js and insert the following code:
const template = data => {
  return `
  <!DOCTYPE html>
  <html lang="en">
    <head>
      <meta charset="UTF-8" />
      <meta http-equiv="X-UA-Compatible" content="IE=edge" />
      <meta name="viewport" content="width=device-width, initial-scale=1.0" />
      <title>Email Template</title>
      <link
        rel="stylesheet"
        href="https://unpkg.com/modern-css-reset/dist/reset.min.css"
      />
      <style>
        body {
          background: #eee;
          color: #111827;
          display: flex;
          align-items: center;
          justify-content: center;
          min-height: 100vh;
          font-family: sans-serif;
        }
        div.container {
          background: #f9fafb;
          border-radius: 1rem;
          padding: 4rem;
        }
        .inline {
          display: flex;
          margin-top: 1.2rem;
        }
        .field {
          margin-bottom: 1rem;
        }
        .label {
          color: #374151;
          font-weight: bold;
        }
        .value {
          color: #374151;
          font-family: 'Courier New', Courier, monospace;
        }
      </style>
    </head>
    <body>
      <div class="container">
        <h1>Online Guest Book Contact</h1>
        <div class="inline">
          <div class="field">
            <div class="label">First Name</div>
            <div class="value">${data.firstName}</div>
          </div>
          <div class="field" style="margin-left:2rem">
            <div class="label">Last Name</div>
            <div class="value">${data.lastName}</div>
          </div>
        </div>
        <div class="field">
          <div class="label">Email</div>
          <div class="value">${data.email}</div>
        </div>
        <div class="field">
          <div class="label">Message</div>
          <div class="value">${data.message}</div>
        </div>
        <div class="field">
          <div class="label">Subscribed</div>
          <div class="value">${data.subscribed ? 'Yes' : 'No'}</div>
        </div>
      </div>
    </body>
  </html>
`
}

export default template
Finally, update index.js as follows:
...
import sendMail from './email-service'

async function handlePostRequest(request){
  ...
  // Send response
   try {
    const result = await sendMail(json)
    if (result.status == 200) {
      return new Response(
        JSON.stringify({ message: 'Message succesfully sent' }),
        {
          headers: { 'content-type': 'text/json' },
        },
      )
    } else {
      return new Response(
        JSON.stringify({ message: 'Message submission failed!', result }),
        {
          headers: { 'content-type': 'text/json' },
          status: 400,
        },
      )
    }
  } catch (error) {
    return new Response(error, {
      headers: { 'content-type': 'text/plain' },
      statusText: 'An error occurred',
      status: 500,
    })
  }
}
Here’s a link for the complete index.js file if you’re unsure where to place this new code block. The new code block is simply passing data from request.json to the sendMail function, then waiting for a response. If it’s a success, a success message is sent. Otherwise, an error message is sent back. The catch block is for sending any other error message that we may not anticipate.
Launch wrangler dev server and re-execute all the HTTP commands in test.http. Everything should work like before except the “Test valid POST request” test. When executed, you should get the following JSON response:
{
  "message": "Message succesfully sent"
}
You should be receiving an email almost instantly. Check your inbox for something like this:
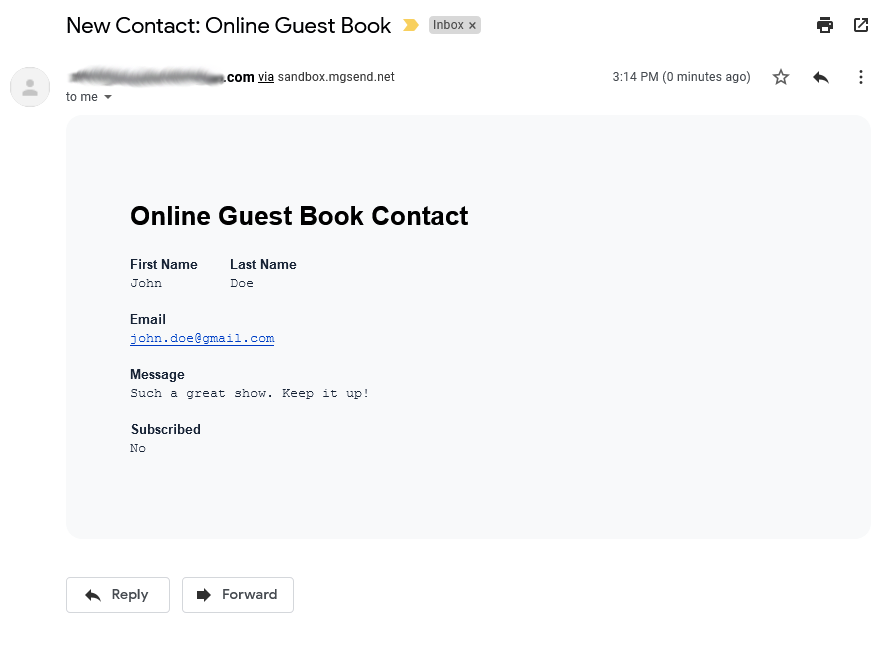
If you’re using a sandbox for your sending domain, the email will likely head straight to your spam folder. Go there, locate it and confirm that you’ve received your email. In the next section, we’ll look at how to add CORS headers to our API responses.
Adding CORS to Response Headers
CORS (cross-origin resource sharing) is an API security feature implemented in browsers that ensures web applications have the right permissions to access information from a server. So far, we’ve only been using non-browser tools to perform Worker API requests without any issues. Also, performing an API request between one server and another doesn’t bring up any CORS-related issue. However, once we deploy our React application and try querying our Workers’ API using a browser request, we’ll be met with CORS errors.
To fix this, we need to do open index.js in our Workers application and add the following right after the import statements:
const corsHeaders = {
  'Access-Control-Allow-Origin': '*',
  'Access-Control-Allow-Headers': 'Content-Type',
  'Access-Control-Allow-Methods': 'POST',
  'Access-Control-Max-Age': '86400',
}
Next, we need to handle CORS preflight requests, which is a mechanism that browsers use to check the CORS protocols and the specific methods and headers that our server supports. This type of request is done using the OPTIONS method. Update the handleRequest function as follows:
async function handleRequest(request) {
  if (request.method === 'POST') {
    return handlePostRequest(request)
  } else if (request.method === 'OPTIONS') {
    return new Response('OK', { headers: corsHeaders })
  } else {
    return new Response('Object Not Found', {
      statusText: 'Object Not Found',
      status: 404,
    })
  }
}
Finally, for each response returned in the code, append or add the CORS headers, ...corsHeaders, like so:
return new Response('OK', { headers: corsHeaders }) // <-- Add like this or...
...
return new Response(
  JSON.stringify({ message: 'Message succesfully sent' }),
  {
    headers: { 'content-type': 'text/json', ...corsHeaders }, // <-- Append like this
  },
)
Make sure each returned response has the corsHeaders. Otherwise, you’ll encounter CORS errors when testing the Form User Interface. See the complete index.js for clarification. Once you finish, your Workers application will be CORS ready and should work with any web browser without any issue.
In the next section, we’ll look at deploying our Workers application.
Project Deployment
In this section, we’ll look into how to deploy our Workers application. We’ll first start with using Workers’ free subdomain, then later use a custom domain. We’ll also set up staging and production environments.
Deploy Form Handling Workers Service
Deploying your Workers application to Cloudflare servers is quite simple. All you have to do is execute this command:
wrangler publish
Next, append the following HTTP commands in test.http:
###

#-----------------------#
#                       |
# PUBLISHED HTTP TESTS  |
#                       |
#-----------------------#

# Test GET request
GET cloudflare-form-service.<subdomain>.workers.dev/ HTTP/1.1

###

# Test invalid POST request - check missing data inputs
POST cloudflare-form-service.<subdomain>.workers.dev/ HTTP/1.1
Content-Type: application/json

{
  "firstName": "John"
}

###

# Test valid POST request on published URL
POST cloudflare-form-service.<subdomain>.workers.dev/ HTTP/1.1
Content-Type: application/json

{
  "firstName": "John",
  "lastName": "Doe",
  "email": "john.doe@gmail.com",
  "message": "Such a great show. Keep it up!",
  "subscribe": false
}
Make sure to replace the term <subdomain> with the subdomain name you used to register your Cloudlflare Workers account. After saving, run each of the new requests to ensure you receive the expected responses. If you have a good internet connection, each published request should complete in under a second. However, the “valid post request” test should take slightly longer than second, since there’s a small delay caused by the email API request occurring within the handlePostRequest function.
IMPORTANT: if you don’t have a custom domain, simply skip to the “Deploy Form User Interface” section and follow along from there.
Currently, our Workers application is running on Cloudflare’s workers.dev domain. If you’d like to publish this on your custom domain, we’ll need to set up a couple of environments first. Actually, it’s not necessary to do this, but it’s good practice having separate environments for testing and production.
With Worker Environments, your application will be deployed to multiple places using the same code but with different environment variables. The environments we’ll set up will be called staging and production. Each will have its own unique URL, which can be accessed as follows:
- production:
https://cloudflare-form-service.<subdomain>.workers.dev - staging:
https://cloudflare-form-service-staging.<subdomain>.workers.dev
Update your wrangler.toml as follows:
name = "cloudflare-form-service-dev"
type = "webpack"
account_id = "<ACCOUNT_ID>"

[env.staging]
name = "cloudflare-form-service-staging"
workers_dev = true

[env.production]
name = "cloudflare-form-service"
workers_dev = false
route = "https://contact-form-worker.example.com/"
zone_id = "<ZONE_ID>"
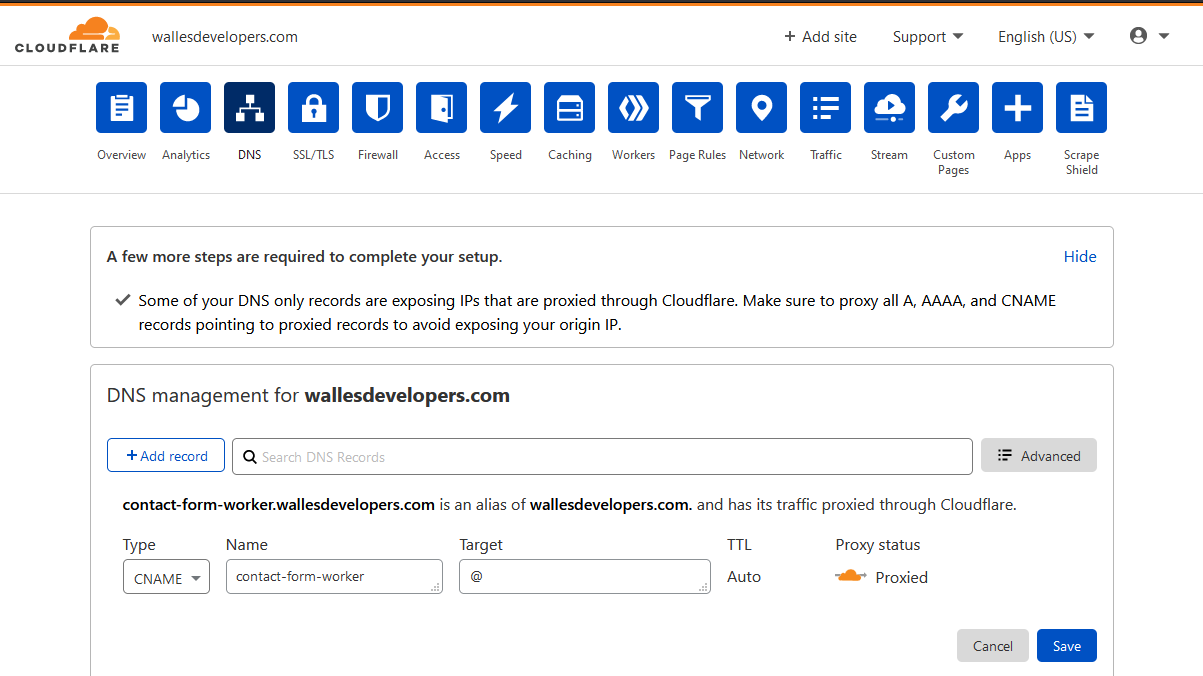
Replace all the IDs with your tokens and example.com with your custom domain. You may notice that we’ve specified a subdomain in route that actually doesn’t exist. We’ll set that up right now. Simply go to your main Cloudflare dashboard, then click on the DOMAIN you added. Click the DNS tab, then create a new record as follows:
- Type: CNAME
- Name: contact-form-worker
- Target: @
See an example below.
After clicking the Save button, you’ll need to publish your production environment using the following command:
wrangler publish -e production
Using the route defined in wrangler.toml, our production environment URL — cloudflare-form-service.<subdomain>.workers.dev — will be mapped to contact-form-worker.example.com. Since we just published our application to a new environment, you’ll have to re-upload your environment application keys again using the following commands:
wrangler secret put TO_EMAIL_ADDRESS --env production
wrangler secret put FROM_EMAIL_ADDRESS --env production
wrangler secret put MAILGUN_API_KEY --env production
wrangler secret put MAILGUN_API_BASE_URL --env production
Finally, add the following HTTP commands to test your application at your custom domain:
###

# Test GET request
GET contact-form-worker.example.com/ HTTP/1.1

###

# Test invalid POST request - check missing data inputs
POST contact-form-worker.example.com/ HTTP/1.1
Content-Type: application/json

{
  "firstName": "John"
}

###

# Test valid POST request on published URL
POST contact-form-worker.example.com/ HTTP/1.1
Content-Type: application/json

{
  "firstName": "John",
  "lastName": "Doe",
  "email": "john.doe@gmail.com",
  "message": "Such a great show. Keep it up!",
  "subscribe": false
}
Replace all example.com with your actual custom domain. Run all the new tests and ensure that they all return the expected responses. In the next section, we’ll supply you with front-end code you can use to test your production Workers application.
Deploy Form User Interface
We can’t complete our Workers form handling server without testing it with a real application. I’ve built out a Cloudflare Form UI you can use to test your Workers service. In order to run it locally, you need first to install dependencies, then create an .env file and place the URL of your Workers application:
VITE_FORM_ENDPOINT_URL=<place your workers application URL here>
Next, you run your application locally using the npm run dev command. Alternatively, you can deploy it to a platform such as:
The build settings are:
- Build command:
npm run build - Build folder:
dist
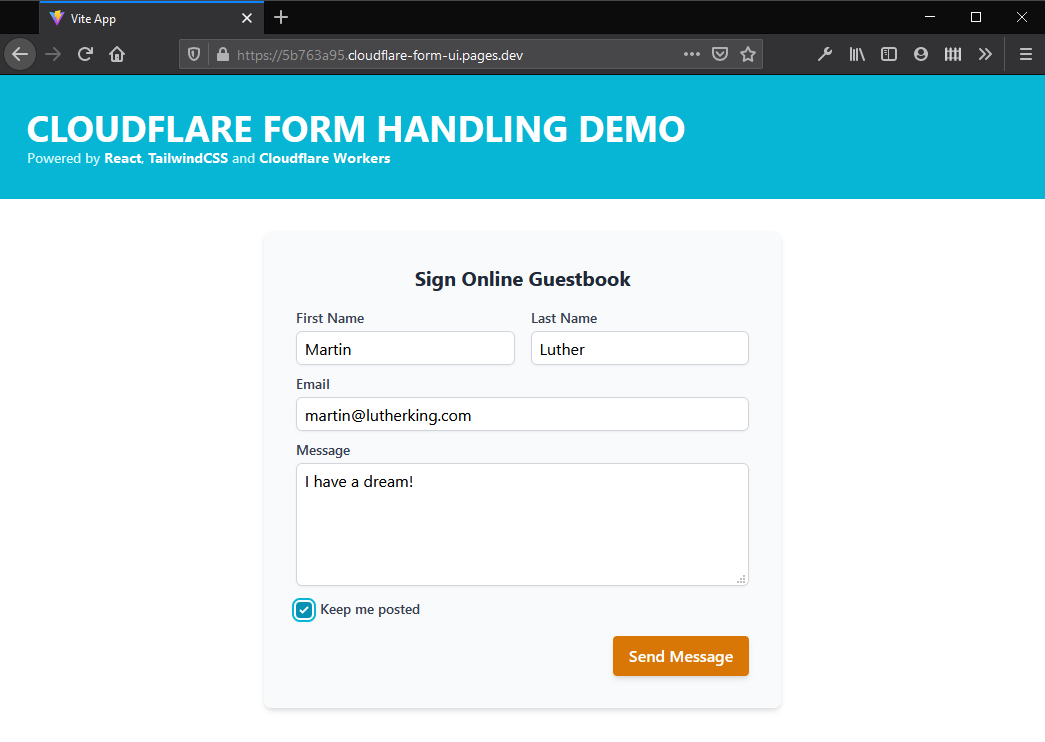
Ensure that you upload the required environment variable VITE_FORM_ENDPOINT_URL as well. Below is a screenshot of the Form User Interface deployed on Cloudflare Pages.
In case you encounter a fail message, make sure that:
- all your Workers responses have the CORS headers
- you’ve executed
wrangler publishon your Workers application project - environment variables have been set
Summary
I hope you’ve learned how to build and deploy your own form-handling service with email notifications using serverless functions. The time spent working on this can help you save tremendously on all your form processing needs. There are many more serverless features we haven’t looked into, such as:
The latter two services allow execution of serverless functions for much longer than ten milliseconds. There’s actually no time limit provided you don’t exceed limits that would interfere with other services. While Cloudflare Workers may not be the ideal platform for hosting traditional back-end code, they do present many opportunities for building back-end solutions that aren’t easy or possible to do with monolithic platforms.
Frequently Asked Questions (FAQs) about JAMstack Form Handling with Cloudflare Workers
What is JAMstack and why is it important for web development?
JAMstack is a modern web development architecture based on client-side JavaScript, reusable APIs, and prebuilt Markup. It is important for web development because it allows developers to create fast, secure, and scalable websites. It also simplifies the development process by separating the frontend and backend, making it easier to manage and update.
How does Cloudflare Workers contribute to JAMstack form handling?
Cloudflare Workers is a serverless computing platform that allows you to write and deploy code at the edge of Cloudflare’s network. It contributes to JAMstack form handling by providing a way to process form submissions without needing a traditional server-side setup. This makes it possible to handle forms on static websites, which is a common challenge in JAMstack development.
What are the benefits of using Cloudflare Workers for form handling?
Using Cloudflare Workers for form handling offers several benefits. It allows you to process form submissions at the edge, which can significantly reduce latency and improve user experience. It also provides a serverless environment, which means you don’t have to manage or maintain any servers. Additionally, it offers built-in security features to protect your data.
How do I set up a form handling with Cloudflare Workers?
Setting up form handling with Cloudflare Workers involves several steps. First, you need to create a new worker in the Cloudflare dashboard. Then, you need to write a script to handle form submissions, which includes parsing the form data and sending it to a database or email service. Finally, you need to deploy your worker and update your form to submit to the worker’s URL.
Can I use Cloudflare Workers with any JAMstack site?
Yes, you can use Cloudflare Workers with any JAMstack site. It is platform-agnostic, which means it can work with any static site generator or frontend framework. However, you need to make sure your site is hosted on Cloudflare’s network to use Cloudflare Workers.
What are the alternatives to Cloudflare Workers for form handling?
There are several alternatives to Cloudflare Workers for form handling, including serverless functions, third-party form services, and traditional server-side setups. However, each of these options has its own pros and cons, and the best choice depends on your specific needs and circumstances.
How does Cloudflare Workers compare to other serverless platforms?
Cloudflare Workers stands out from other serverless platforms in several ways. It offers lower latency due to its edge computing model, it has a simpler pricing structure, and it provides built-in security features. However, it may not have as many features or integrations as some other platforms.
How much does it cost to use Cloudflare Workers for form handling?
The cost of using Cloudflare Workers for form handling depends on your usage. Cloudflare offers a free tier with limited requests per day, and paid plans start at $5 per month. You are also charged for the compute time your workers use, which is measured in CPU seconds.
Can I use Cloudflare Workers for other tasks besides form handling?
Yes, you can use Cloudflare Workers for a wide range of tasks besides form handling. This includes things like routing requests, manipulating responses, performing A/B testing, and more. The possibilities are virtually limitless, as you can run any code that can be compiled to WebAssembly.
What are the limitations of using Cloudflare Workers for form handling?
While Cloudflare Workers offers many benefits for form handling, there are also some limitations. For example, there is a limit on the size of the form data you can process, and you may need to use a third-party service to store the data. Additionally, while Cloudflare Workers is relatively easy to use, it does require some knowledge of JavaScript and serverless architecture.
 Michael Wanyoike
I write clean, readable and modular code. I love learning new technologies that bring efficiencies and increased productivity to my workflow.