Flaky Tests: Getting Rid Of A Living Nightmare In Testing

Email Newsletter
Weekly tips on front-end & UX.
Trusted by 200,000+ folks.


 Flexible CMS. Headless & API 1st
 Register!
There is a fable that I think about a lot these days. The fable was told to me as a child. It’s called “The Boy Who Cried Wolf” by Aesop. It is about a boy who tends the sheep of his village. He gets bored and pretends that a wolf is attacking the flock, calling out to the villagers for help — only for them to disappointedly realize that it is a false alarm and leave the boy alone. Then, when a wolf actually appears and the boy calls for help, the villagers believe it is another false alarm and do not come to the rescue, and the sheep end up getting eaten by the wolf.
The moral of the story is best summarized by the author himself:
“A liar will not be believed, even when he speaks the truth.”
A wolf attacks the sheep, and the boy cries for help, but after numerous lies, no one believes him anymore. This moral can be applied to testing: Aesop’s story is a nice allegory for a matching pattern that I stumbled upon: flaky tests that fail to provide any value.
Front-End Testing: Why Even Bother?
Most of my days are spent on front-end testing. So it shouldn’t surprise you that the code examples in this article will be mostly from the front-end tests that I’ve come across in my work. However, in most cases, they can be easily translated to other languages and applied to other frameworks. So, I hope the article will be useful to you — whatever expertise you might have.
It’s worth recalling what front-end testing means. In its essence, front-end testing is a set of practices for testing the UI of a web application, including its functionality.
Starting out as a quality-assurance engineer, I know the pain of endless manual testing from a checklist right before a release. So, in addition to the goal of ensuring that an application remains error-free during successive updates, I strived to relieve the workload of tests caused by those routine tasks that you don’t actually need a human for. Now, as a developer, I find the topic still relevant, especially as I try to directly help users and coworkers alike. And there is one issue with testing in particular that has given us nightmares.
The Science Of Flaky Tests
A flaky test is one that fails to produce the same result each time the same analysis is run. The build will fail only occasionally: One time it will pass, another time fail, the next time pass again, without any changes to the build having been made.
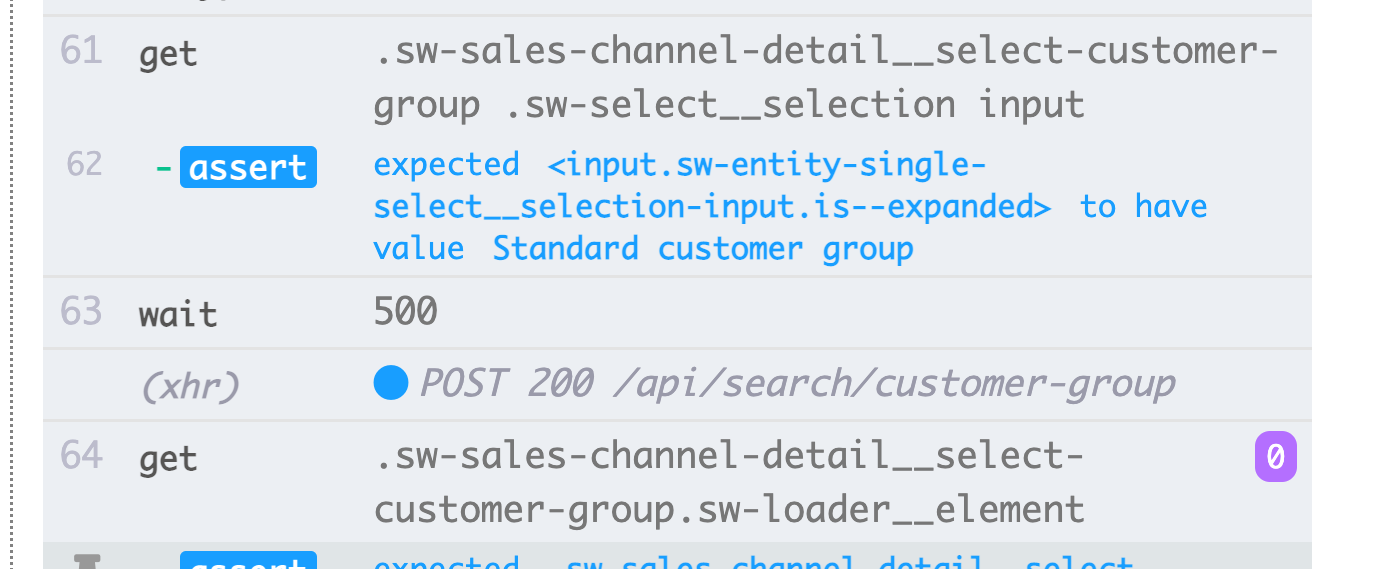
When I recall my testing nightmares, one case in particular comes into my mind. It was in a UI test. We built a custom-styled combo box (i.e. a selectable list with input field):
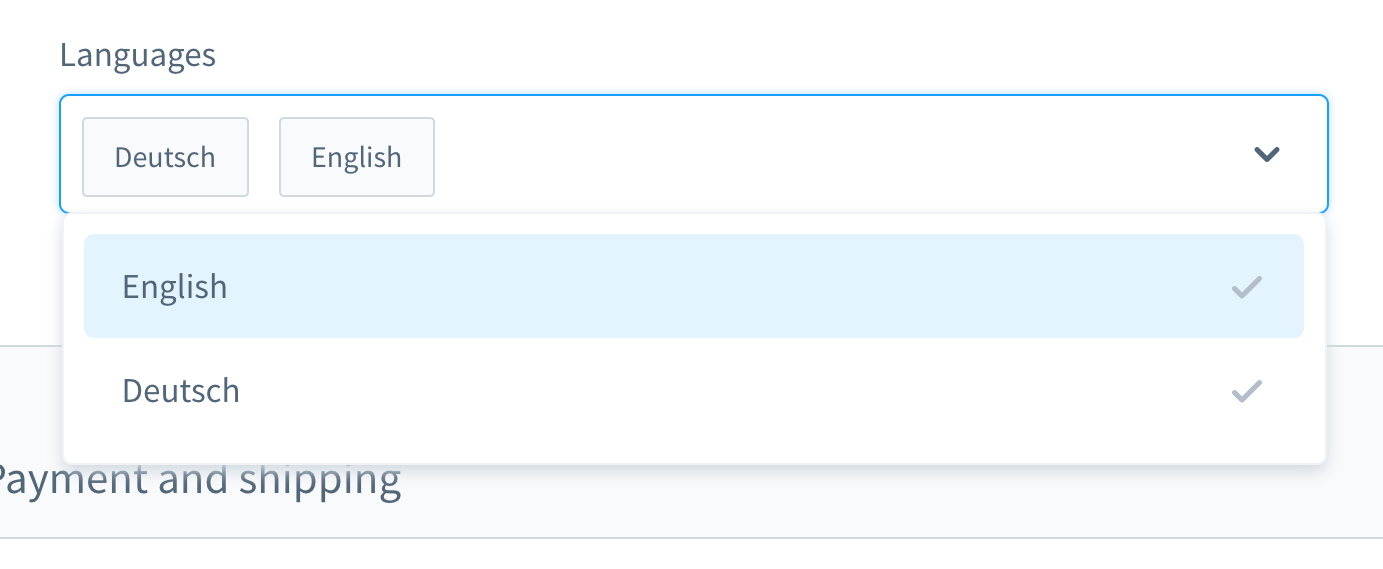
With this combo box, you could search for a product and select one or more of the results. Many days, this test went fine, but at some point, things changed. In one of the approximately ten builds in our continuous integration (CI) system, the test for searching and selecting a product in this combo box failed.
The screenshot of the fail shows the results list not being filtered, despite the search having been successful:
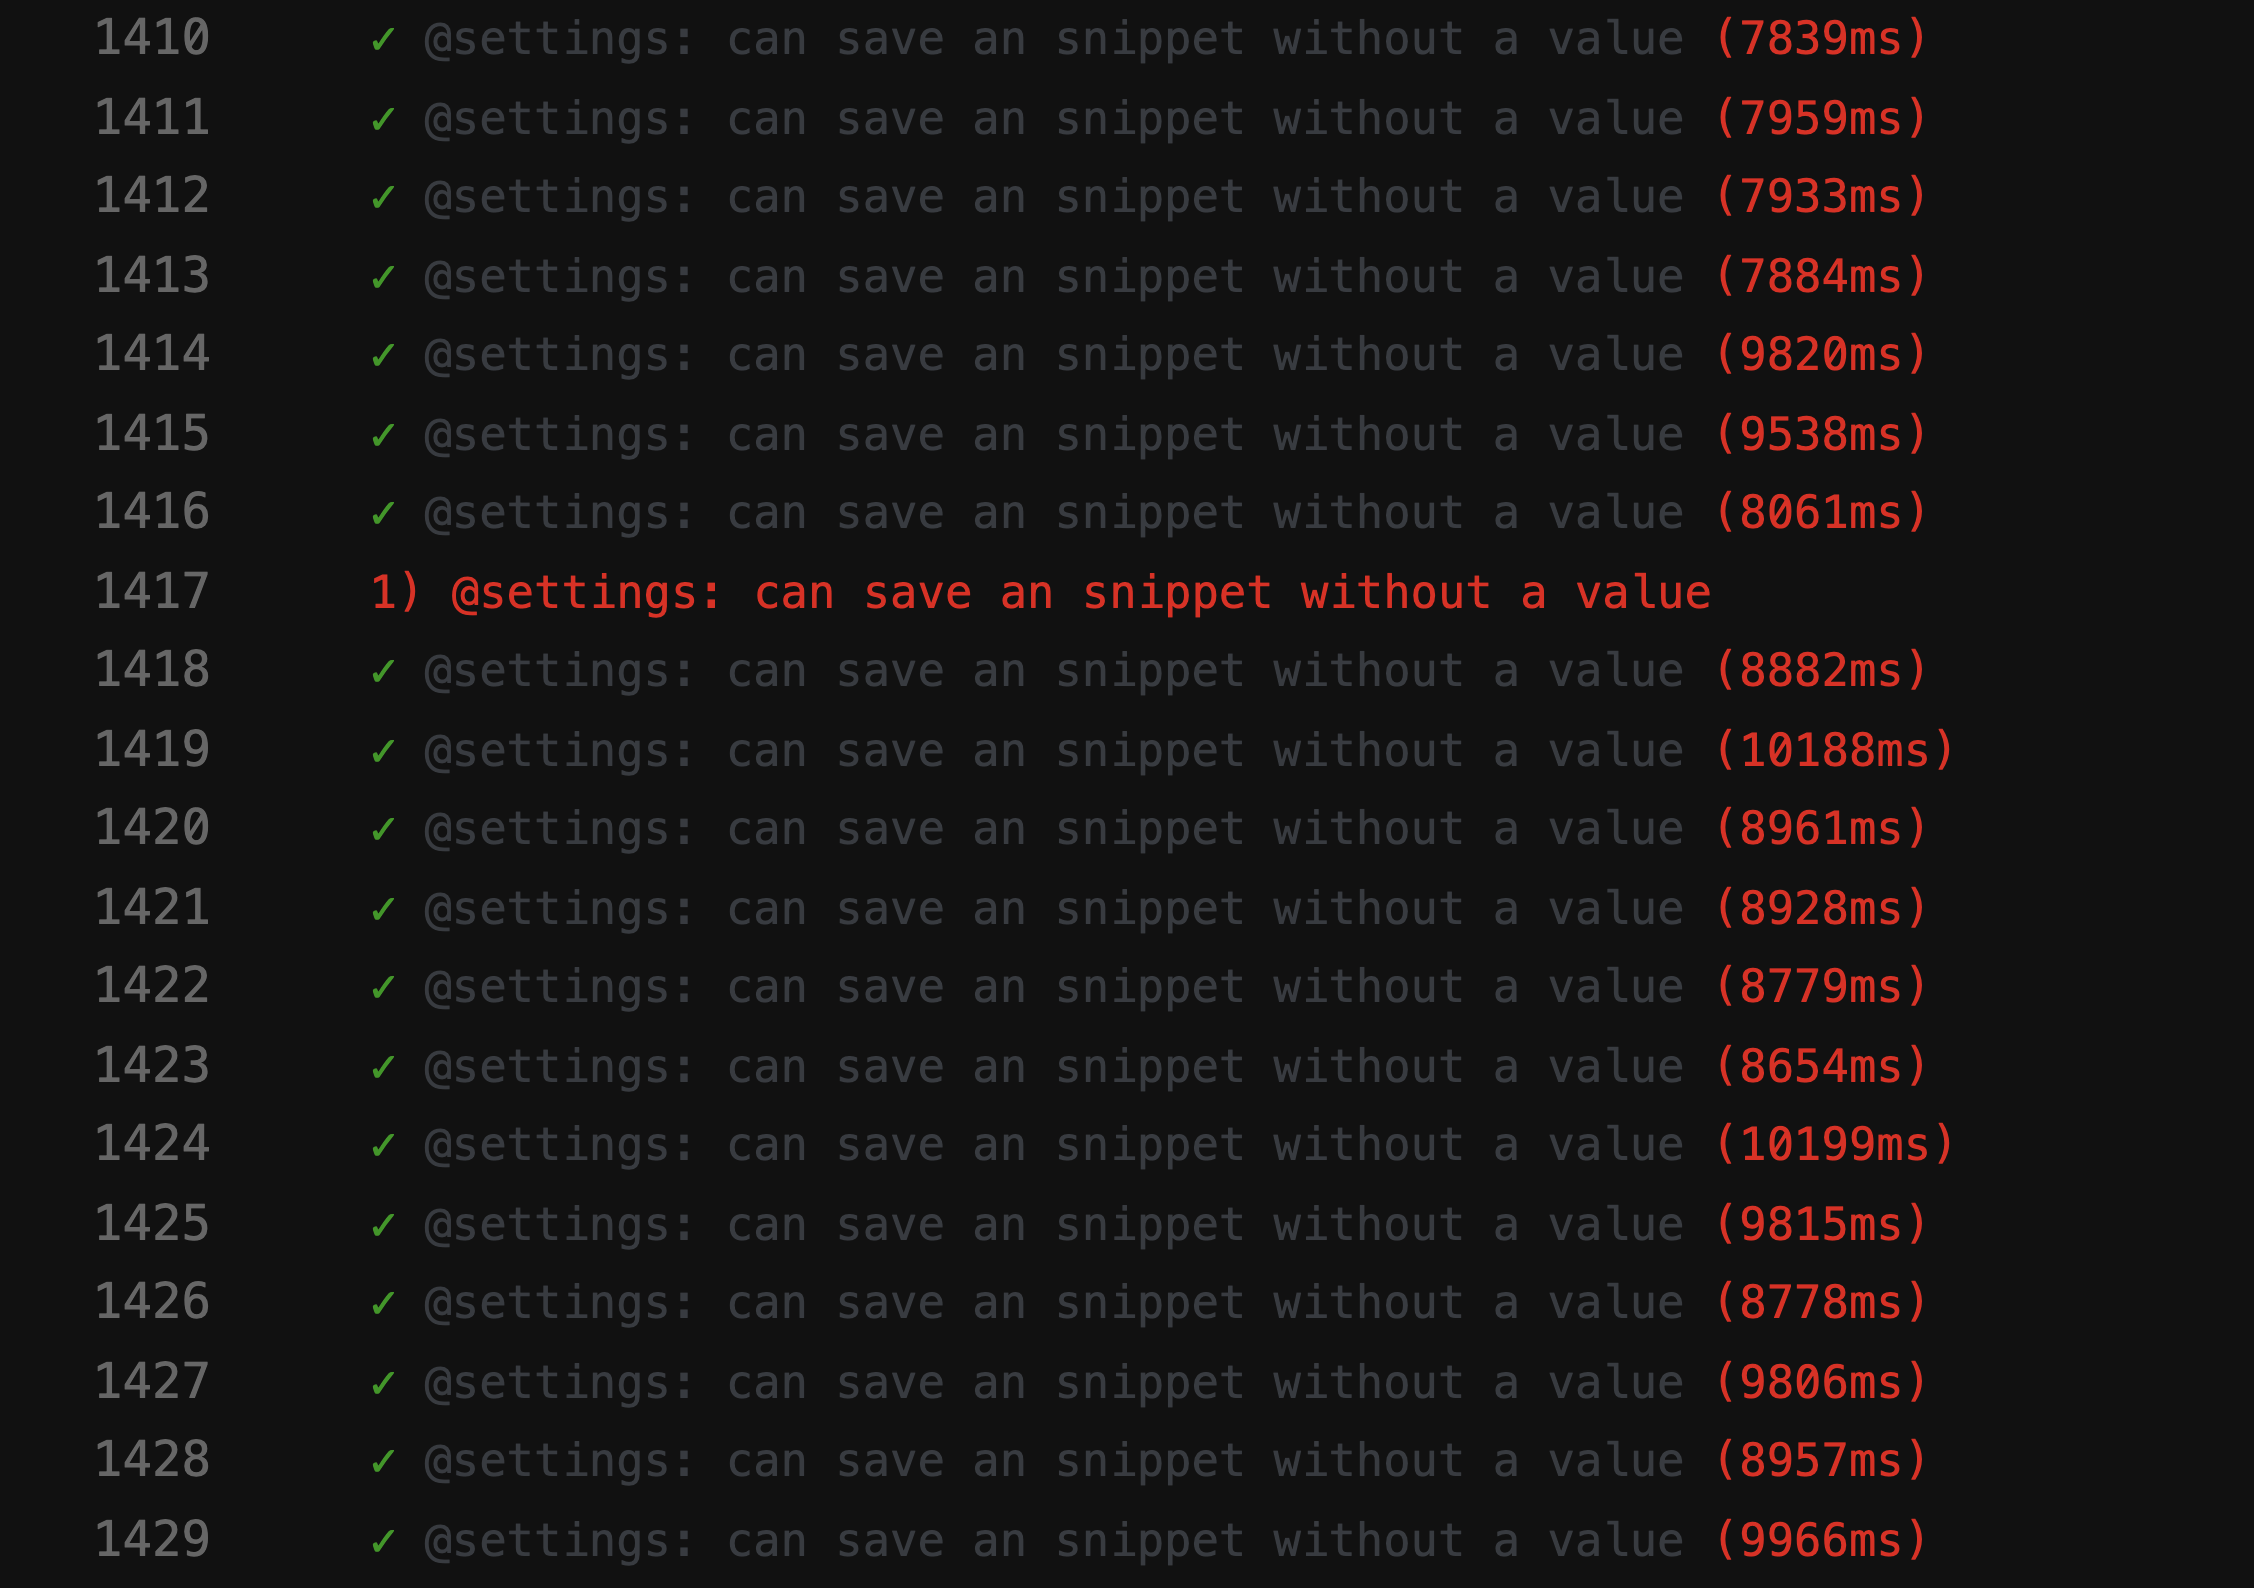
A flaky test like this can block the continuous deployment pipeline, making feature delivery slower than it needs to be. Moreover, a flaky test is problematic because it is not deterministic anymore — making it useless. After all, you wouldn’t trust one any more than you would trust a liar.
In addition, flaky tests are expensive to repair, often requiring hours or even days to debug. Even though end-to-end tests are more prone to being flaky, I’ve experienced them in all kinds of tests: unit tests, functional tests, end-to-end tests, and everything in between.
Another significant problem with flaky tests is the attitude they imbue in us developers. When I started working in test automation, I often heard developers say this in response to a failed test:
“Ahh, that build. Nevermind, just kick it off again. It will eventually pass, somewhen.”
This is a huge red flag for me. It shows me that the error in the build won’t be taken seriously. There is an assumption that a flaky test is not a real bug, but is “just” flaky, without needing to be taken care of or even debugged. The test will pass again later anyway, right? Nope! If such a commit is merged, in the worst case we will have a new flaky test in the product.
The Causes
So, flaky tests are problematic. What should we do about them? Well, if we know the problem, we can design a counter-strategy.
I often encounter causes in everyday life. They can be found within the tests themselves. The tests might be suboptimally written, hold wrong assumptions, or contain bad practices. However, not only that. Flaky tests can be an indication of something far worse.
In the following sections, we’ll go over the most common ones I have come across.
1. Test-Side Causes
In an ideal world, the initial state of your application should be pristine and 100% predictable. In reality, you never know whether the ID you’ve used in your test will always be the same.
Let’s inspect two examples of a single fail on my part. Mistake number one was using an ID in my test fixtures:
{
   "id": "f1d2554b0ce847cd82f3ac9bd1c0dfca",
   "name": "Variant product",
}
Mistake number two was searching for a unique selector to use in a UI test and thinking, “Ok, this ID seems unique. I’ll use it.”
<!-- This is a text field I took from a project I worked on -->
<input type="text" id="sw-field--f1d2554b0ce847cd82f3ac9bd1c0dfca" />
However, if I’d run the test on another installation or, later, on several builds in CI, then those tests might fail. Our application would generate the IDs anew, changing them between builds. So, the first possible cause is to be found in hardcoded IDs.
The second cause can arise from randomly (or otherwise) generated demo data. Sure, you might be thinking that this “flaw” is justified — after all, the data generation is random — but think about debugging this data. It can be very difficult to see whether a bug is in the tests themselves or in the demo data.
Next up is a test-side cause that I’ve struggled with numerous times: tests with cross-dependencies. Some tests may not be able to run independently or in a random order, which is problematic. In addition, previous tests could interfere with subsequent ones. These scenarios can cause flaky tests by introducing side effects.
However, don’t forget that tests are about challenging assumptions. What happens if your assumptions are flawed to begin with? I’ve experienced these often, my favorite being flawed assumptions about time.
One example is the usage of inaccurate waiting times, especially in UI tests — for example, by using fixed waiting times. The following line is taken from a Nightwatch.js test.
// Please never do that unless you have a very good reason!
// Waits for 1 second
browser.pause(1000);
Another wrong assumption relates to time itself. I once discovered that a flaky PHPUnit test was failing only in our nightly builds. After some debugging, I found that the time shift between yesterday and today was the culprit. Another good example is failures because of time zones.
False assumptions do not stop there. We can also have wrong assumptions about the order of data. Imagine a grid or list containing multiple entries with information, such as a list of currencies:
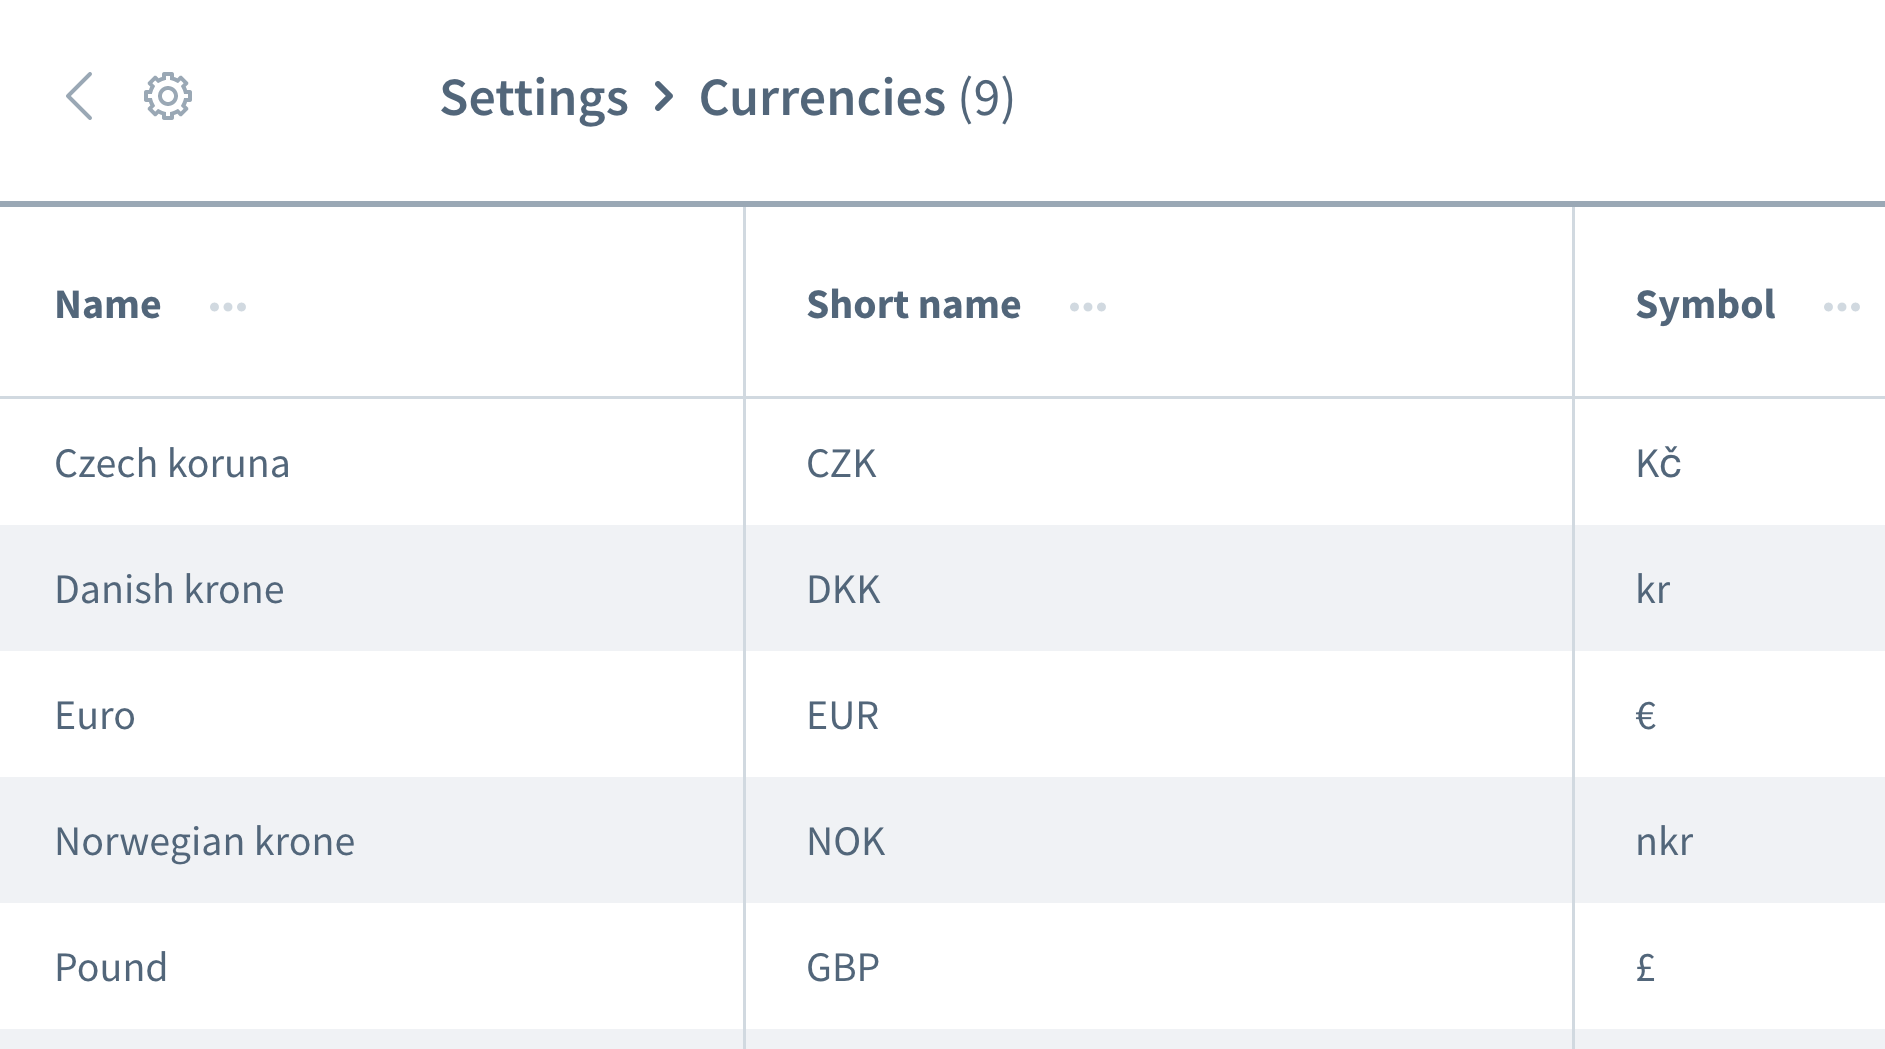
We want to work with the information of the first entry, the “Czech koruna” currency. Can you be sure that your application will always place this piece of data as the first entry every time your test is executed? Could it be that the “Euro” or another currency will be the first entry on some occasions?
Don’t assume that your data will come in the order you need it. Similar to hardcoded IDs, an order can change between builds, depending on the design of the application.
2. Environment-Side Causes
The next category of causes relates to everything outside of your tests. Specifically, we’re talking about the environment in which the tests are executed, the CI- and docker-related dependencies outside of your tests — all of those things you can barely influence, at least in your role as tester.
A common environment-side cause is resource leaks: Often this would be an application under load, causing varying loading times or unexpected behavior. Large tests can easily cause leaks, eating up a lot of memory. Another common issue is the lack of cleanup.
Incompatibility between dependencies gives me nightmares in particular. One nightmare occurred when I was working with Nightwatch.js for UI testing. Nightwatch.js uses WebDriver, which of course depends on Chrome. When Chrome sprinted ahead with an update, there was a problem with compatibility: Chrome, WebDriver, and Nightwatch.js itself no longer worked together, which caused our builds to fail from time to time.
Speaking of dependencies: An honorable mention goes to any npm issues, such as missing permissions or npm being down. I experienced all of these in observing CI.
When it comes to errors in UI tests due to environmental problems, keep in mind that you need the whole application stack in order for them to run. The more things that are involved, the more potential for error. JavaScript tests are, therefore, the most difficult tests to stabilize in web development, because they cover a large amount of code.
3. Product-Side Causes
Last but not least, we really have to be careful about this third area — an area with actual bugs. I’m talking about product-side causes of flakiness. One of the most well-known examples is the race conditions in an application. When this happens, the bug needs to be fixed in the product, not in the test! Trying to fix the test or the environment will have no use in this case.
Ways To Fight Flakiness
We have identified three causes of flakiness. We can build our counter-strategy on this! Of course, you will already have gained a lot by keeping the three causes in mind when you encounter flaky tests. You will already know what to look for and how to improve the tests. However, in addition to this, there are some strategies that will help us design, write, and debug tests, and we will look at them together in the following sections.
Focus On Your Team
Your team is arguably the most important factor. As a first step, admit that you have a problem with flaky tests. Getting the whole team’s commitment is crucial! Then, as a team, you need to decide how to deal with flaky tests.
During the years I worked in technology, I came across four strategies used by teams to counter flakiness:
- Do nothing and accept the flaky test result.
Of course, this strategy is not a solution at all. The test will yield no value because you cannot trust it anymore — even if you accept the flakiness. So we can skip this one pretty quickly. - Retry the test until it passes.
This strategy was common at the start of my career, resulting in the response I mentioned earlier. There was some acceptance with retrying tests until they passed. This strategy doesn’t require debugging, but it is lazy. In addition to hiding the symptoms of the problem, it will slow down your test suite even more, which makes the solution not viable. However, there might be some exceptions to this rule, which I’ll explain later. - Delete and forget about the test.
This one is self-explanatory: Simply delete the flaky test, so that it doesn’t disturb your test suite anymore. Sure, it will save you money because you won’t need to debug and fix the test anymore. But it comes at the expense of losing a bit of test coverage and losing potential bug fixes. The test exists for a reason! Don’t shoot the messenger by deleting the test. - Quarantine and fix.
I had the most success with this strategy. In this case, we would skip the test temporarily, and have the test suite constantly remind us that a test has been skipped. To make sure the fix doesn’t get overlooked, we would schedule a ticket for the next sprint. Bot reminders also work well. Once the issue causing the flakiness has been fixed, we’ll integrate (i.e. unskip) the test again. Unfortunately, we will lose coverage temporarily, but it will come back with a fix, so this will not take long.
These strategies help us deal with test problems at the workflow level, and I’m not the only one who has encountered them. In his article, Sam Saffron comes to the similar conclusion. But in our day-to-day work, they help us to a limited extent. So, how do we proceed when such a task comes our way?
Keep Tests Isolated
When planning your test cases and structure, always keep your tests isolated from other tests, so that they’re able to be run in an independent or random order. The most important step is to restore a clean installation between tests. In addition, only test the workflow that you want to test, and create mock data only for the test itself. Another advantage of this shortcut is that it will improve test performance. If you follow these points, no side effects from other tests or leftover data will get in the way.
The example below is taken from the UI tests of an e-commerce platform, and it deals with the customer’s login in the shop’s storefront. (The test is written in JavaScript, using the Cypress framework.)
// File: customer-login.spec.js
let customer = {};

beforeEach(() => {
    // Set application to clean state
    cy.setInitialState()
      .then(() => {
        // Create test data for the test specifically
        return cy.setFixture('customer');
      })
}):
The first step is resetting the application to a clean installation. It’s done as the first step in the beforeEach lifecycle hook to make sure that the reset is executed on every occasion. Afterwards, the test data is created specifically for the test — for this test case, a customer would be created via a custom command. Subsequently, we can start with the one workflow we want to test: the customer’s login.
Further Optimize The Test Structure
We can make some other small tweaks to make our test structure more stable. The first is quite simple: Start with smaller tests. As said before, the more you do in a test, the more can go wrong. Keep tests as simple as possible, and avoid a lot of logic in each one.
When it comes to not assuming an order of data (for example, when dealing with the order of entries in a list in UI testing), we can design a test to function independent of any order. To bring back the example of the grid with information in it, we wouldn’t use pseudo-selectors or other CSS that have a strong dependency on order. Instead of the nth-child(3) selector, we could use text or other things for which order does not matter. For example, we could use an assertion like, “Find me the element with this one text string in this table”.
Wait! Test Retries Are Sometimes OK?
Retrying tests is a controversial topic, and rightfully so. I still think of it as an anti-pattern if the test is blindly retried until successful. However, there’s an important exception: When you can’t control errors, retrying can be a last resort (for example, to exclude errors from external dependencies). In this case, we cannot influence the source of the error. However, be extra careful when doing this: Don’t become blind to flakiness when retrying a test, and use notifications to remind you when a test is being skipped.
The following example is one I used in our CI with GitLab. Other environments might have different syntax for achieving retries, but this should give you a taste:
test:
    script: rspec
    retry:
        max: 2
        when: runner_system_failure
In this example, we are configuring how many retries should be done if the job fails. What’s interesting is the possibility of retrying if there is an error in the runner system (for example, the job setup failed). We are choosing to retry our job only if something in the docker setup fails.
Note that this will retry the whole job when triggered. If you wish to retry only the faulty test, then you’ll need to look for a feature in your test framework to support this. Below is an example from Cypress, which has supported retrying of a single test since version 5:
{
    "retries": {
        // Configure retry attempts for 'cypress run`
        "runMode": 2,
        // Configure retry attempts for 'cypress open`
        "openMode": 2,
    }
}
You can activate test retries in Cypress’ configuration file, cypress.json. There, you can define the retry attempts in the test runner and headless mode.
Using Dynamic Waiting Times
This point is important for all kinds of tests, but especially UI testing. I can’t stress this enough: Don’t ever use fixed waiting times — at least not without a very good reason. If you do it, consider the possible outcomes. In the best case, you will choose waiting times that are too long, making the test suite slower than it needs to be. In the worst case, you won’t wait long enough, so the test won’t proceed because the application is not ready yet, causing the test to fail in a flaky manner. In my experience, this is the most common cause of flaky tests.
Instead, use dynamic waiting times. There are many ways to do so, but Cypress handles them particularly well.
All Cypress commands own an implicit waiting method: They already check whether the element that the command is being applied to exists in the DOM for the specified time — pointing to Cypress’ retry-ability. However, it only checks for existence, and nothing more. So I recommend going a step further — waiting for any changes in your website or application’s UI that a real user would also see, such as changes in the UI itself or in the animation.
This example uses an explicit waiting time on the element with the selector .offcanvas. The test would only proceed if the element is visible until the specified timeout, which you can configure:
// Wait for changes in UI (until element is visible)
cy.get(#element).should('be.visible');
Another neat possibility in Cypress for dynamic waiting is its network features. Yes, we can wait for requests to occur and for the results of their responses. I use this kind of waiting especially often. In the example below, we define the request to wait for, use a wait command to wait for the response, and assert its status code:
// File: checkout-info.spec.js

// Define request to wait for
cy.intercept({
    url: '/widgets/customer/info',
    method: 'GET'
}).as('checkoutAvailable');

// Imagine other test steps here...

// Assert the response’s status code of the request
cy.wait('@checkoutAvailable').its('response.statusCode')
  .should('equal', 200);
This way, we’re able to wait exactly as long as our application needs, making the tests more stable and less prone to flakiness due to resource leaks or other environmental issues.
Debugging Flaky Tests
We now know how to prevent flaky tests by design. But what if you’re already dealing with a flaky test? How can you get rid of it?
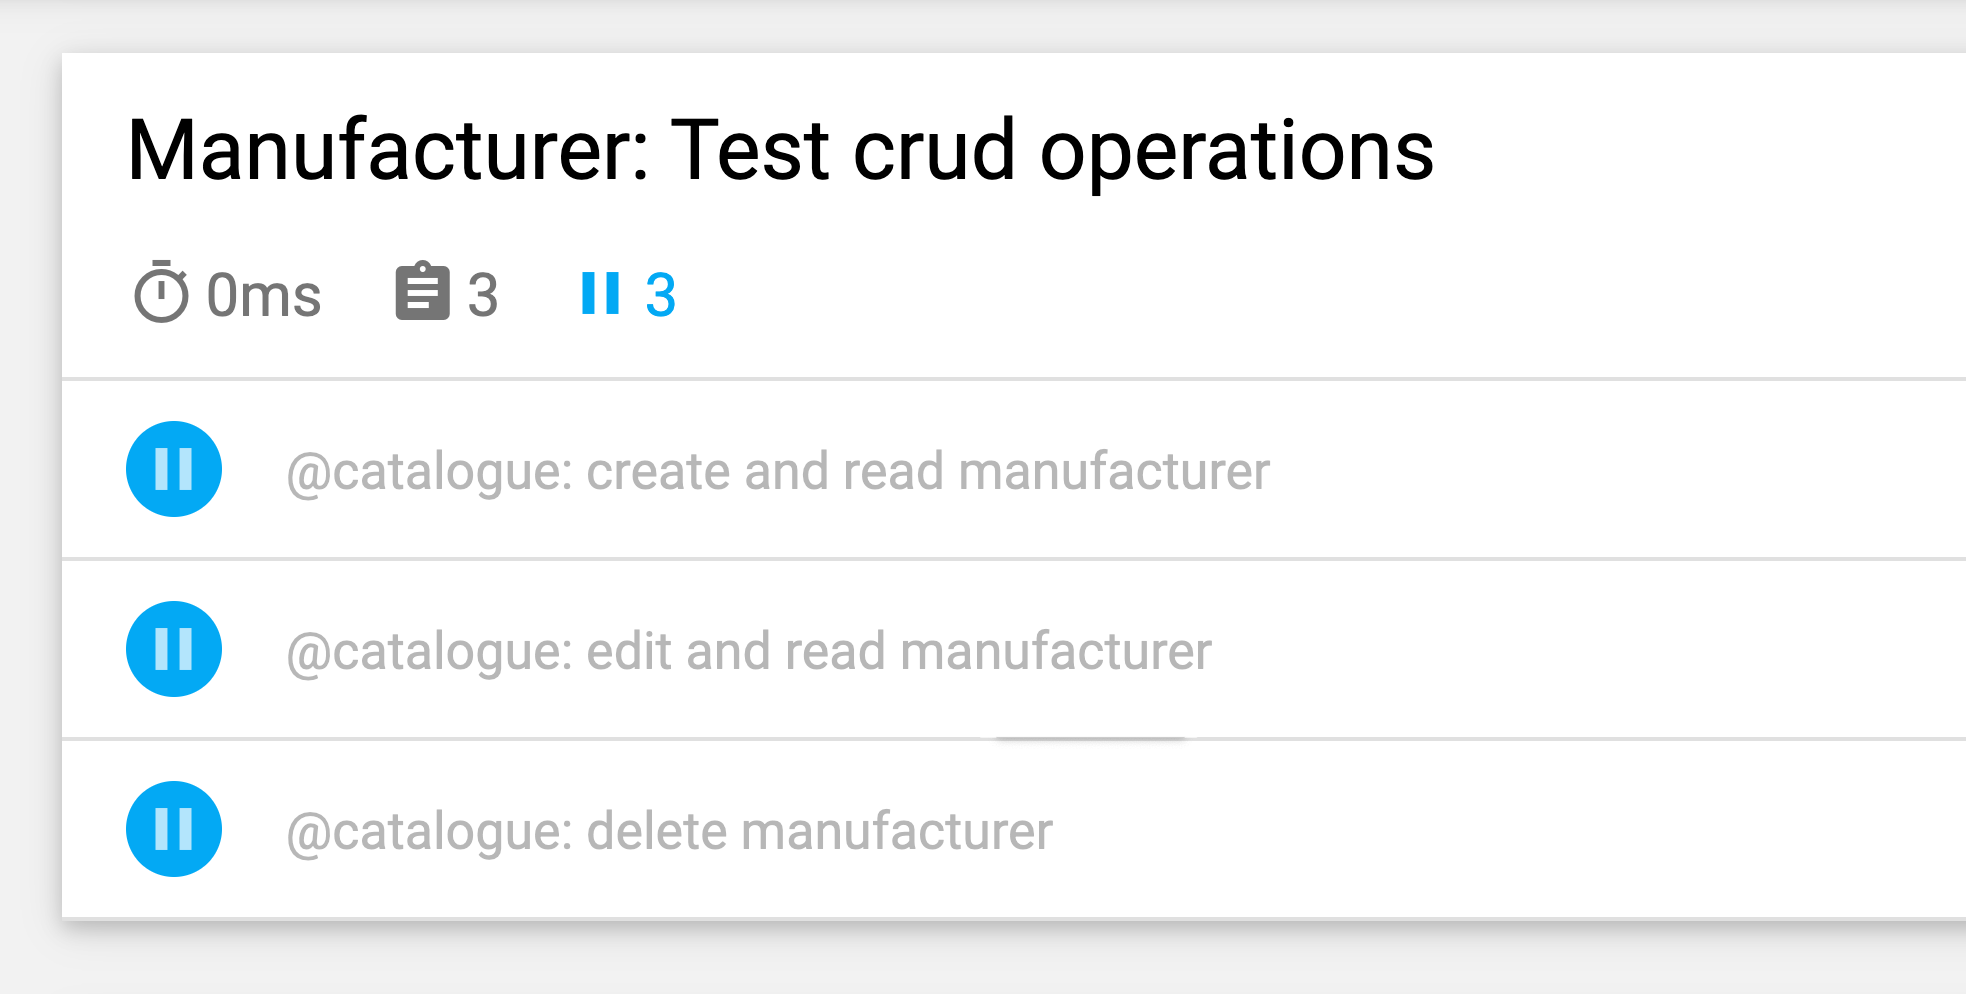
When I was debugging, putting the flawed test in a loop helped me a lot in uncovering flakiness. For example, if you run a test 50 times, and it passes every time, then you can be more certain that the test is stable — maybe your fix worked. If not, you can at least get more insight into the flaky test.
// Use in build Lodash to repeat the test 100 times
Cypress._.times(100, (k) => {
    it(`typing hello ${k + 1} / 100`, () => {
        // Write your test steps in here
    })
})
Getting more insight into this flaky test is especially tough in CI. To get help, see whether your testing framework is able to get more information on your build. When it comes to front-end testing, you can usually make use of a console.log in your tests:
it('should be a Vue.JS component', () => {
    // Mock component by a method defined before
    const wrapper = createWrapper();


    // Print out the component’s html
    console.log(wrapper.html());

    expect(wrapper.isVueInstance()).toBe(true);
})
This example is taken from a Jest unit test in which I use a console.log to get the output of the HTML of the component being tested. If you use this logging possibility in Cypress’ test runner, you can even inspect the output in your developer tools of choice. In addition, when it comes to Cypress in CI, you can inspect this output in your CI’s log by using a plugin.
Always look at the features of your test framework to get support with logging. In UI testing, most frameworks provide screenshot features — at least on a failure, a screenshot will be taken automatically. Some frameworks even provide video recording, which can be a huge help in getting insight into what is happening in your test.
Fight Flakiness Nightmares!
It’s important to continually hunt for flaky tests, whether by preventing them in the first place or by debugging and fixing them as soon as they occur. We need to take them seriously, because they can hint at problems in your application.
Spotting The Red Flags
Preventing flaky tests in the first place is best, of course. To quickly recap, here are some red flags:
- The test is large and contains a lot of logic.
- The test covers a lot of code (for example, in UI tests).
- The test makes use of fixed waiting times.
- The test depends on previous tests.
- The test asserts data that is not 100% predictable, such as the use of IDs, times, or demo data, especially randomly generated ones.
If you keep the pointers and strategies from this article in mind, you can prevent flaky tests before they happen. And if they do come, you will know how to debug and fix them.
These steps have really helped me regain confidence in our test suite. Our test suite seems to be stable at the moment. There could be issues in the future — nothing is 100% perfect. This knowledge and these strategies will help me to deal with them. Thus, I will grow confident in my ability to fight those flaky test nightmares.
I hope I was able to relieve at least some of your pain and concerns about flakiness!
Further Reading
If you want to learn more on this topic, here are some neat resources and articles, which helped me a lot:
- Articles about “flake,” Cypress.io
- “Retrying Your Tests Is Actually a Good Thing (If Your Approach Is Right),” Filip Hric, Cypress.io
- “Test Flakiness: Methods for Identifying and Dealing With Flaky Tests,” Jason Palmer, Spotify R&D Engineering
- “Flaky Tests at Google and How We Mitigate Them,” John Micco, Google Testing Blog


