


Node.js, a cross-platform JavaScript runtime environment for servers and applications, offers many benefits. Low memory usage, good performance, and a large ecosystem of packages, which currently number about 475,000, have made Node.js a popular choice for building web servers, REST APIs, real-time network applications (e.g. chat, games), and even cross-platform desktop apps.
If you haven’t already gotten started with Node.js, perhaps it’s time. Check out my Node.js explainer to learn how Node.js works its magic. In this article, we’ll step through installing Node.js and the NPM package manager, spinning up a simple web server, and using the Node.js cluster module to take advantage of multiple CPU cores.
We’ll also look at installing additional Node.js modules and other JavaScript packages using the NPM package manager. And we’ll dip a toe into using a Node.js framework, in this case Koa, to create more feature-rich and flexible Node.js servers.
Let’s get started.
How to install Node.js and NPM
Begin by browsing to https://nodejs.org:
 Node.js Foundation
Click on the button for the LTS (long-term support) download, unless you know that you need some new feature in the current release. Exactly how the downloaded installer will look may vary among operating systems, but on a Mac it looks like this at the beginning:
 IDG
IDGOnce the installation is complete, it looks like this:
 IDG
IDGNow you should make sure that both Node.js andNPM installed properly. Open a command-line shell (Terminal on a Mac; Command Prompt on Windows) and check the installed versions of both:
$ node —version
v6.11.3

$ npm —version
3.10.10
If you get errors that say that Node.js or NPM was not found, try restarting your shell application or rebooting your computer. If that doesn’t work, you may have to edit your $PATH (Mac and Linux) or PATH (Windows) and restart again.
Both Node.js and NPM match the intended versions in the Terminal screenshot above, so I’m ready to move along and actually develop something with Node.js. Let’s start with something that’s easy to build with pure Node.
You’ll need a code editor or IDE, preferably one that supports JavaScript and Node.js such as Sublime Text, Visual Studio Code, Brackets, Atom, or WebStorm.
Node.js example: A simple web server
To start really simply, let’s steal a simple example from the Node.js site. Copy the code and paste it into your code editor (I’m using Visual Studio Code, but any editor that saves plain text will suffice), then save it as example.js.
const http = require(‘http’);

const hostname = ‘127.0.0.1’;
const port = 3000;

const server = http.createServer((req, res) => {
   res.statusCode=200;
   res.setHeader(‘Content-Type’, ‘text/plain’);
   res.end(‘Hello World\n’);
});

server.listen(port, hostname, () => {
   console.log(`Server running at http://${hostname}:${port}/`);
});
Open a shell in the directory where you saved the file, and run the file from your command line:
$ node example.js
Server running at http://127.0.0.1:3000/
In my case, I used the Terminal window in Visual Studio Code. I could almost as easily have switched to an independent shell window.
Now browse to the URL listed by the server:
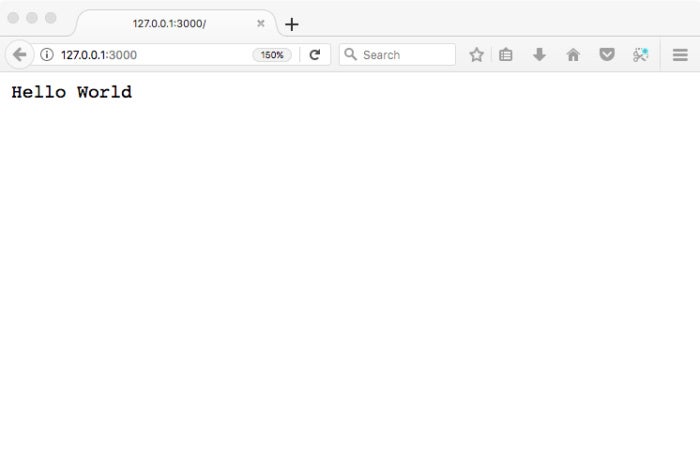 IDG
IDGPress Control-C in the Terminal to stop the Node server.
Before going on, let’s tear apart the code.
const http = require(‘http’);
Line 1 uses require, which is how you load modules in Node.js. The statement is loading the Node.js http module, which supplies the createServer method called in lines 6 through 10 and the listen method called in lines 12 through 14. The “fat arrow” operator => in lines 6 and 12 is a shorthand to create anonymous Lambda functions, which are frequently used in Node.js apps.
const server = http.createServer((req, res) => {
  res.statusCode = 200;
  res.setHeader(‘Content-Type’, ‘text/plain’);
  res.end(‘Hello World\n’);
});
The res argument to createServer() in line 6 is used to build the response; the req argument contains the incoming HTTP request, which is ignored in this code. The res.end method sets the response data to ‘Hello World\n’ and tells the server that it is all done creating the response.
server.listen(port, hostname, () => {
  console.log(`Server running at http://${hostname}:${port}/`);
});
The server closure produced by the server.listen() method tells the server to listen for requests on the defined host (127.0.0.1, e.g. localhost) and port (3000). The closure produced by the createServer() method handles the requests when they come in on the defined host and port.
The idea that JavaScript closures are defined as event handlers is one of the most subtle and powerful parts of Node.js, and is a key to Node’s asynchronous non-blocking architecture. Node.js hides its event loop, but always reverts to handling events when not otherwise engaged. In addition, JavaScript closures use much less memory than alternative ways of handling multiple client connections, such as spawning threads or forking processes.
Node.js example: A multi-process web server
Apart from only printing “Hello World,” the example above runs in only one thread, meaning that it can only use one core of the host computer. There are times when you will have many cores that you would like to devote to a server.
The official example for the Node cluster module shows how to fix that. As before, we’ll steal the code and run it. Browse to the Node.js cluster documentation, copy the code, paste it into your code editor or IDE, and save it as server.js.
const cluster = require(‘cluster’);
const http = require(‘http’);
const numCPUs = require(‘os’).cpus().length;

if (cluster.isMaster) {
   console.log(`Master ${process.pid} is running`);

   // Fork workers.
   for (leti=0; i<numCPUs; i++) {
      cluster.fork();
   }

   cluster.on(‘exit’, (worker, code, signal) => {
      console.log(`worker ${worker.process.pid} died`);
   });
} else {
   // Workers can share any TCP connection
   // In this case it is an HTTP server
   http.createServer((req, res) => {
      res.writeHead(200);
      res.end(`hello world from ${process.pid}\n`);
   }).listen(8000);

   console.log(`Worker ${process.pid} started`);
}
When you execute node server.js from your command line, the log will display the process IDs for the master and worker processes. There should be as many workers as your computer has logical cores—eight for my MacBook Pro with its Core i7 processor, which has four hardware cores and hyper-threading.
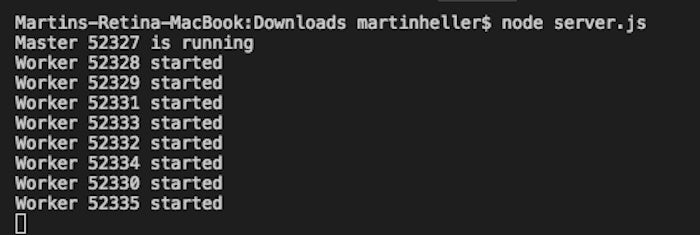 IDG
IDGIf you browse to localhost:8000 or to 127.0.0.1:8000, you’ll see “hello world” displayed. You can press Control-C in the terminal window to stop the Node server processes.
const cluster = require(‘cluster’);
const http = require(‘http’);
const numCPUs = require(‘os’).cpus().length;
Lines 1 and 2 should look familiar from the last example. Line 3 is a little different. Instead of simply requiring the os module, it also calls the cpus() member function and returns the length of the array returned, which is the number of CPUs. The array itself and the os module link are then unreachable, and may be garbage collected by the JavaScript engine at a later time.
if (cluster.isMaster) {
   console.log(`Master ${process.pid} is running`);

   // Fork workers.
   for (let i = 0; i < num CPUs; i++) {
      cluster.fork();
   }

   cluster.on(‘exit’, (worker, code, signal) => {
      console.log(`worker ${worker.process.pid} died`);
   });
}
Line 5 starts a block that only runs for the master process. It logs its PID, forks on worker per available CPU, and creates a closure to handle and log cluster exit events.
} else {
   // Workers can share any TCP connection
   // In this case it is an HTTP server
   http.createServer((req, res) => {
      res.writeHead(200);
      res.end(‘hello world\n’);
   }).listen(8000);

   console.log(`Worker ${process.pid} started`);
The block starting at line 16 is only run by worker processes. This code should look familiar from the previous example: It creates a web server that responds to any request with “hello world.”
It’s clear from the output we saw above that this code ran eight times on my machine, creating eight web server workers sharing the parent process’ TCP connection on port 8000. But how does the system share the load among them?
The documentation says that the Node.js cluster module uses a modified round-robin algorithm by default, except on Windows. The algorithm is controlled by the cluster.schedulingPolicy property.
How do we know that this works? Let’s test it. It will only take changing one line of code. Edit line 21 to read:
res.end(`hello world from ${process.pid}\n`);Notice that you not only have to add from ${process.pid}, but you also have to change the delimiters from single quotes to back ticks, so that JavaScript will perform variable substitution on the string.
Save the file, stop any previous running instance, and run it again. You might think that every time you refresh your browser client, the returned process ID will change, but you’d be wrong. The browser is too smart, and we haven’t marked the webpage as one that expires, so the browser will cache the response the first time it runs and keep displaying the same number. It will do that even if you create multiple browser tabs or pages pointing to the same URL. However, you can see that the round-robin dispatching from the master works by running multiple browsers simultaneously, in this case Chrome, Safari, and Opera:
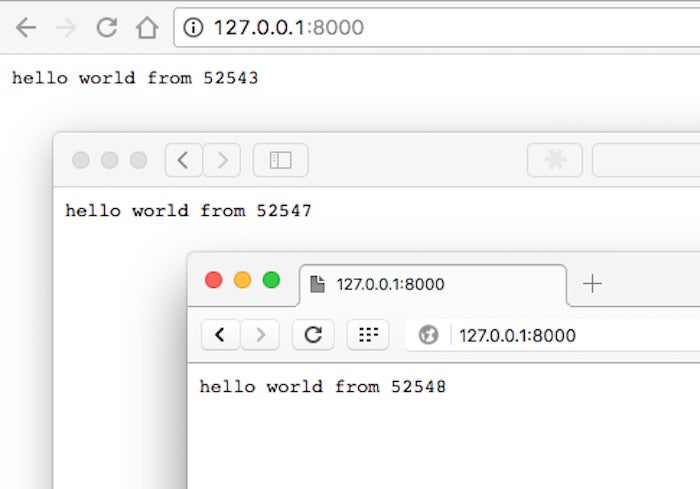 IDG
IDGIf you’re familiar with other web servers, you might expect to see a scheme for routing requests, and for maintaining persistent state to preserve each user’s login and environment in Node. Alas, Node doesn’t have that built-in. Fear not: There are numerous web frameworks built on top of Node.js that do everything you’d expect.
How to install a Node.js module with NPM
To make use of most Node modules, you basically just install the module from the NPM registry, either globally or in a project directory, and then require() it from your code. Often a project depends on multiple NPM modules and keeps that list in its project.json file. Instead of installing each dependency from the command line, you can install them all at once, often after checking out the project from its GitHub repository:
$ <some project checkout into the my_project folder>
$ cd my_project
$ npm install
Not every NPM package works exactly that way. Some, including React, have “factory” apps to create starter apps as one of their installation options.
$ npm install -g create-react-app
$ cd ~/work
$ create-react-app my-app
$ cd my-app/
$ npm start
It’s not unusual for tools to be installed globally. For example, the Angular command-line tool Ng installs globally. You then run it locally to create an app in a folder.
$ npm install -g @angular/cli
$ cd ~/work
$ ng new my-app
Angular happens to have another installation method that looks more like the standard pattern. That’s for the Angular QuickStart seed:
$ git clone https://github.com/angular/quickstart.git quickstart
$ cd quickstart
$ npm install
The package.json file in the quickstart folder tells npm install to fetch almost the same list of dependencies as the CLI installation.
Node.js example: A Koa web server
While both React and Angular are part of the Node.js ecosystem, and need Node.js and NPM for development, they are not specifically Node.js frameworks—they can run in a browser. I covered dozens of actual Node.js frameworks in InfoWorld’s “Complete guide to Node.js frameworks.”
For example, Express is the original fleshed-out Node web server, handling the web application, HTTP requests and responses, routing, and middleware. A newer option, Koa, uses generators instead of callbacks for middleware.
You install Koa with the standard pattern inside your app folder:
$ npm install koa
Below is the code for the Koa “Hello World” app, which you can save and run as in the previous examples.
const Koa = require(‘koa’);
const app = new Koa();

// x-response-time

app.use(async (ctx, next) => {
   const start = Date.now();
   await next();
   const ms = Date.now() -start;
   ctx.set(‘X-Response-Time’, `${ms}ms`);
});

// logger

app.use(async (ctx, next) => {
   const start = Date.now();
   await next();
   const ms = Date.now() -start;
   console.log(`${ctx.method}${ctx.url} - ${ms}`);
});

// response

app.use(async ctx => {
   ctx.body = ‘Hello World’;
});

app.listen(3000);
There’s a difference between middleware generators as used by Koa and callbacks as used by Express and other Node.js frameworks. Many callback implementations simply pass control through series of functions until one returns, while Koa yields “downstream,” then control flows back “upstream.”
In the example above, the x-response-time “wraps” the response generator, with the await next() statement marking the call. Use of this asynchronous function is more flexible than explicit function calls, as it makes it easy to insert another generator into the sequence, for example a web logger between the timer and the response.
You might come across older Koa code that uses yield next instead of await next(). The difference is that Koa now supports ES2015 and async functions. The flow of control amounts to the same thing: It moves to the next handler in the chain at the yield next call, and then returns when all handlers are done.