
- What We Mean by CI and Feature Flags
- Why CI Is So Powerful
- How Feature Flags Aid Continuous Integration
- Outline of Our Sample Project
- Achieving CI
- Setting Up Feature Flags for Our Project
- Implement the Feature Flag
- Work on a Bug
- Remote Config
- Other Things to Think About
- Frequently Asked Questions (FAQs) about Using Feature Flags in Continuous Integration
A lot has been written about the benefits of achieving true Continuous Integration (CI) into production systems. This tutorial will demonstrate a simple workflow that achieves CI. We’ll be using Feature Flags and Remote Config to avoid the need for feature branches in Git, as well as any sort of test or staging environments. The two main tools we’ll use to demonstrate this approach are Netlify and Bullet Train.
What We Mean by CI and Feature Flags
Continuous Integration is a method of development in which developers are able to constantly release their code. Developers push their new features as they finish development, at which point they are automatically tested and released immediately into a live environment.
Feature flags provide a way of gating these new features from a remote control panel allowing you to turn them off and on at will without making any changes to your code. This allows you to develop a feature, and release it into production without actually changing anything from a user’s point of view.
Why CI Is So Powerful
Integrating code in smaller chunks and in a more frequent manner allows development teams to pick up issues a lot quicker, as well as getting new features to users as quickly as possible. CI also removes the need for any large releases where a team of engineers need to stay awake until the wee hours of the night to minimise disruption to their users.
How Feature Flags Aid Continuous Integration
Feature flags provide an additional layer of confidence when releasing new features. By wrapping new features in a feature flag, the developers and product team are able to quickly enable or disable their features as required. Let’s say we introduce a new feature into production but we can immediately see that there’s a bug in the new code, because of something specific in the production environment that wasn’t evident in testing (let’s face it, it’s happened to everyone… more than once).
Previously, this would have meant a (probably) lengthy and (definitely) painful rollback procedure and a rescheduling of the release for another ungodly hour on another day when the bug has been fixed. Instead, with a toggle of a switch the feature can be turned off for all or a subset of users and the pain is gone. Once the bug is identified and fixed, a patch release can be deployed, and the feature can be re-enabled.
Outline of Our Sample Project
To demonstrate integrating feature flags and remote config, we’re going to base our initial codebase on the de facto React JS tutorial of a tic-tac-toe game. This is a great tutorial for learning the basics of React, so be sure to check it out if you haven’t already.
Don’t worry if you don’t know React or Javascript well. The concepts we’ll be going over are all about the process and tooling, and not about the code.
Rather than repeat the tutorial from the start, we’re going to start at a point where we’ve got a basic tic-tac-toe game up and running.
At this point we’ll use feature flags and remote configuration to continuously configure, push and deploy new features. To take this concept to an extreme we’ll continuously be pushing to master; no other branches will be used. We’ll introduce a bug (intentionally of course!) and push the fix to master, to demonstrate how dealing with this scenario doesn’t require a full rollback or additional branching.
If you wish to follow along writing code during this tutorial, you can fork the repository here.
Achieving CI
The most common method of automating continuous integration is to have the build process trigger when you push changes to your git repository. Different build tools achieve this in different ways.
We’re going to use Netlify for our project. Netlify lets you connect a Git repository and automatically deploy builds every time you push to a branch.
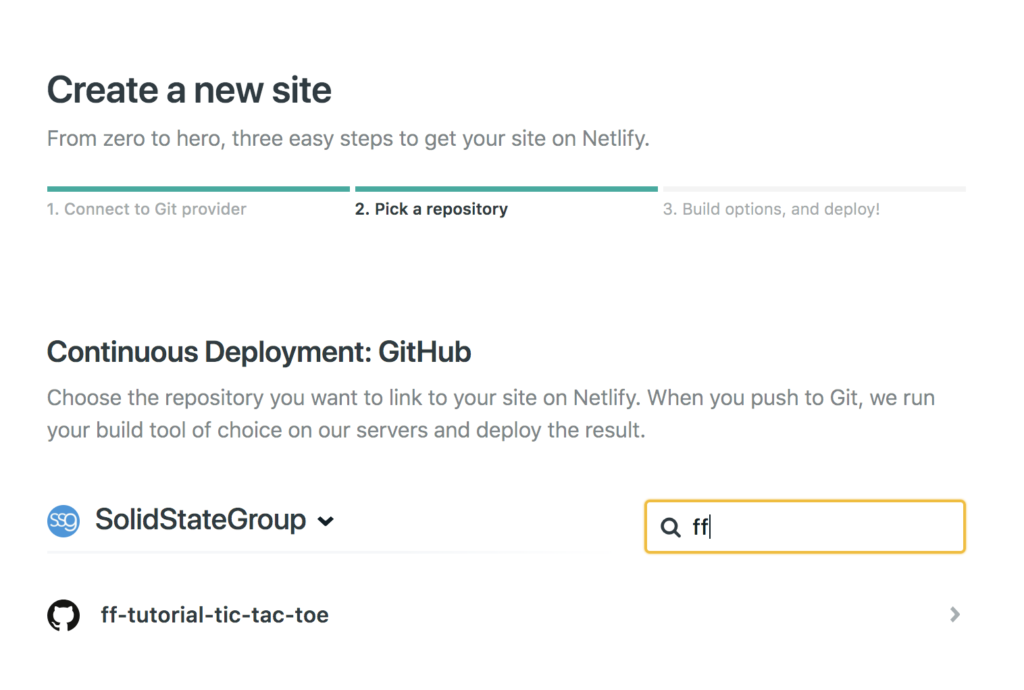
To use Netlify, simply sign up for a free account and select the ‘New site from Git’ option in the top right of the dashboard. Once you’ve connected your GitHub account (or otherwise, if you want to use Bitbucket or GitLab) you should then be presented with the options shown below.
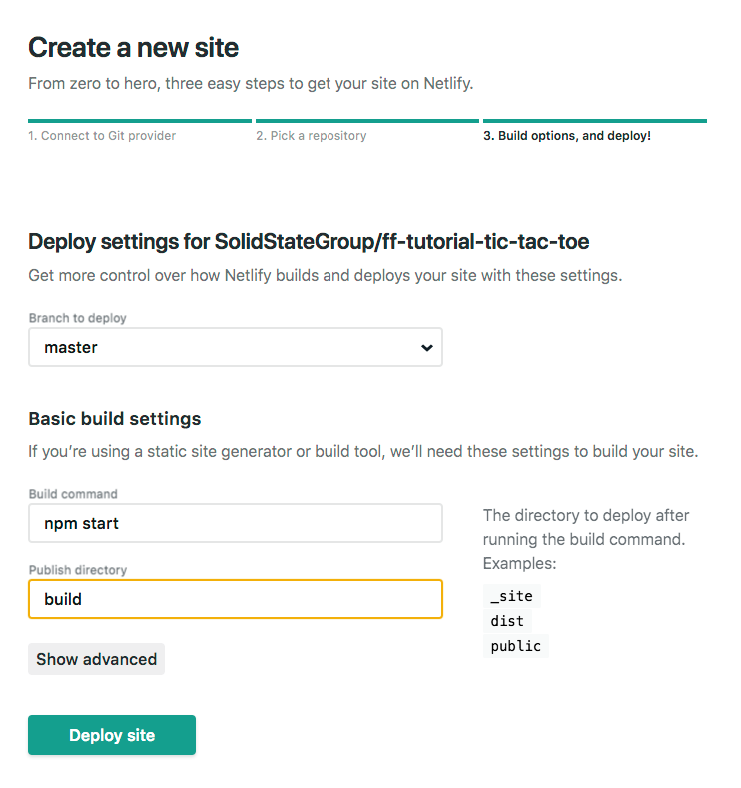
In the next step, configure Netlify to run the application as follows.
Netlify will now go ahead and build your application for you. It will take a few minutes, but once it’s done you should see something like the following:
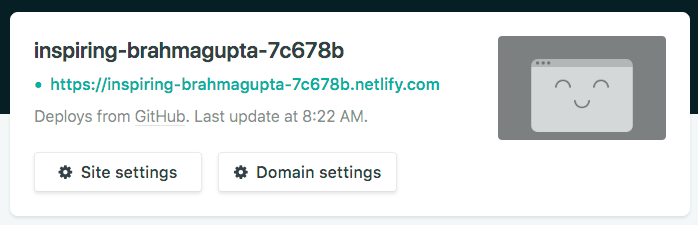
Browsing to that URL should show your Tic Tac Toe game in all its glory.
Setting Up Feature Flags for Our Project
We’re going to use feature flags to control the declaration of a winner in the tic-tac-toe game. To create and manage our feature flags, we’re going to use Bullet Train as it’s currently free, but there are many other feature flag products. We’ll let you pick the one you feel is right.
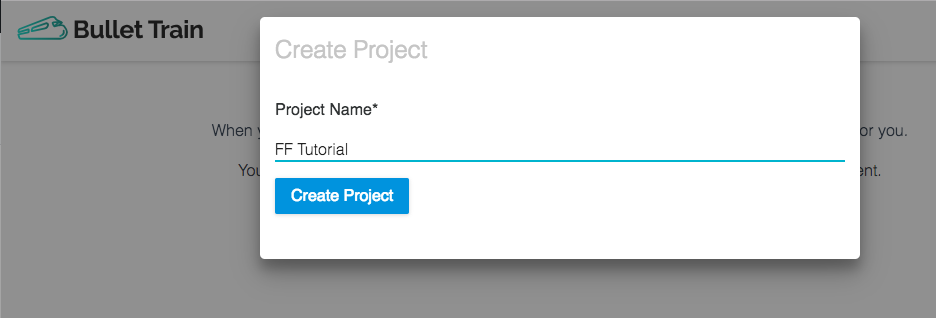
To continue with us, go ahead and create a free account on Bullet Train. Click on the ‘Create Project’ button and create your project. We named ours FF Tutorial.
Next, we need to create a new feature for declaring a winner. Click on the ‘Create your first Feature’ button at the bottom of the next screen to bring up the following form and add in the details.
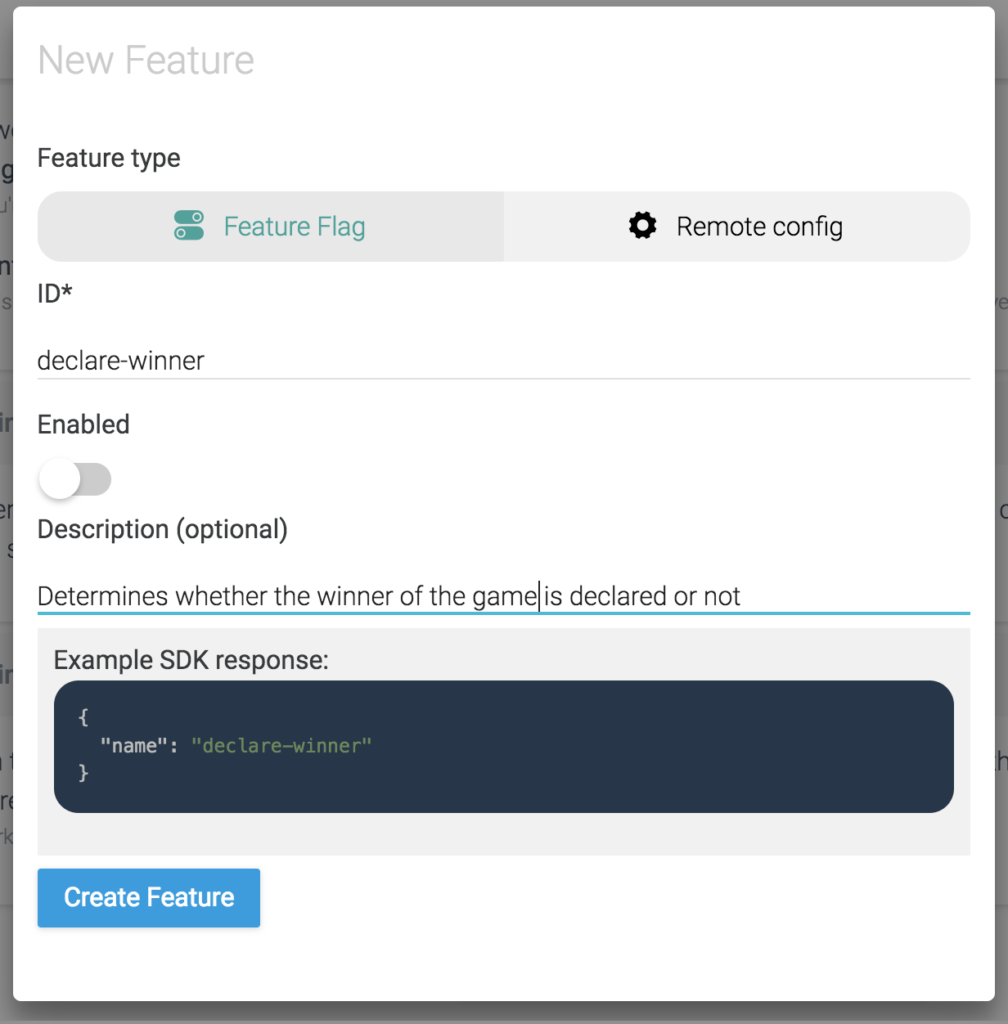
Note that we’ve kept the feature disabled to begin with.
Take note of the two code snippets available beneath the feature, which will help us in the next step.
Implement the Feature Flag
Firstly, let’s get this project running in our development environment. From the command line, navigate to the project folder and run the command npm i to install the necessary dependencies.
Next run npm run dev and head to http://localhost:8080 in your browser. You should see the same tic-tac-toe game that you saw on the Netlify URL.
We are now going to implement our new feature flag into the existing code. Let’s start by installing the Bullet Train client for JavaScript, by opening up another command line and running the following in the project directory:
npm i bullet-train-client --save
Open up the project in your preferred editor and edit ./web/App.js.
Find the calculateWinner(squares) function. This function determines whether there has been a winner or not, based on whether it can find a line of the same shape or not. We are going to have this function return null based on the value of our feature flag so that we can test filling up the board without it declaring a winner.
At the very top of App.js, add the following line:
var declareWinner = true;
Now, let’s initialise our Bullet Train client that we installed earlier. Copy all of code example 2 from the Features page in the Bullet Train interface and paste it just beneath the line you just added.
The environment ID in your code snippet will be the correct environment ID associated with the Development environment in your Bullet Train project. You can check this by browsing to the ‘Environment Settings’ page if you want.
We now need to edit the onChange() function in the bulletTrain.init() function in the code we just pasted in to suit our needs. Replace all of the code in there with one line:
declareWinner = bulletTrain.hasFeature("declare-winner");
You should now have this at the top of your App.js
var declareWinner = true;
import bulletTrain from "bullet-train-client"; //Add this line if you're using bulletTrain via npm

bulletTrain.init({
    environmentID:"<your-environment-id>",
    onChange: (oldFlags,params)=>{ //Occurs whenever flags are changed
        declareWinner = bulletTrain.hasFeature("declare-winner");
    }
});
Scroll down to the calculateWinner(squares) function and at the top, just above the declaration of the lines constant, let’s add the line:
if (!declareWinner) return null;
And that’s it! Our feature flag will now determine whether or not the winner is calculated or not on every render of the game. Refresh your browser and play the game. You can no longer win and instead the entire board can now be filled with Xs and Os.
Go back to the Bullet Train admin and toggle the feature using the switch on the right.
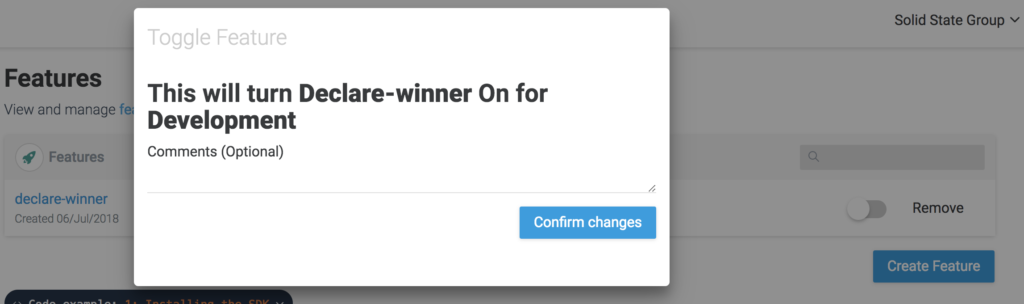
Refresh your browser and the game becomes winnable again. Check out the code for the end of this part here.
Commit and push your code (yes, all on master) and Netlify will automatically deploy your code. Browse to your assigned Netlify URL again and toggle the feature flag to see it working in a production environment. Sweet!
Work on a Bug
We are now going to purposefully introduce a bug into the tic-tac-toe game and show how feature flags can be used to drop a feature that is causing issues.
The feature we’re going to add is selection of who goes first at the start of the game. For that we will add a couple of buttons that only appear at the beginning of the game and prevent clicks on the board from adding a shape.
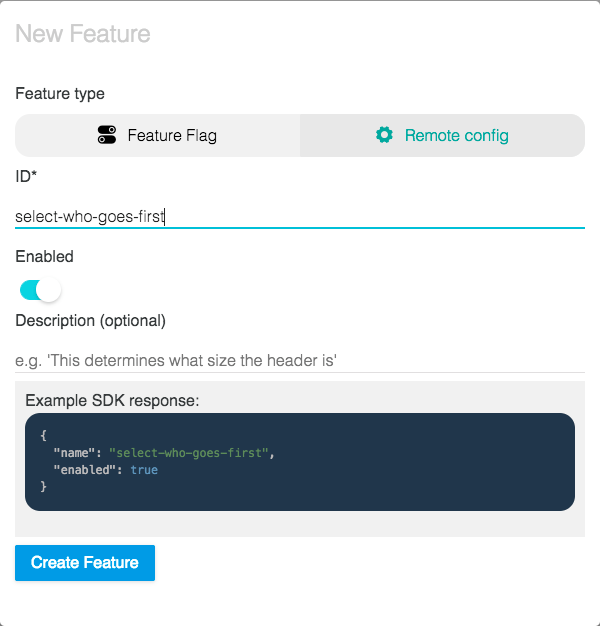
Firstly, let’s set up our feature flag to wrap the new feature. In your Bullet Train project, create a new feature called select-who-goes-first as follows. Let’s leave it disabled to begin with.
Now, let’s add our new feature. In the render() function we’re going to render the buttons, instead of the status, if the game hasn’t started yet. At the top of the return of the render() function, replace the line:
<div className="status">{status}</div>
… with the following code:
{!this.state.selected ? (
    <div>
        Who goes first?
        <button onClick={() => this.setState({selected: true})}>X</button>
        <button onClick={() => this.setState({selected: true, xIsNext: false})}>O</button>
    </div>
) : (
    <div className="status">{status}</div>
)}
Now we want to write the code to control our new feature with the feature flag we created. As before, this needs to go in the bulletTrain.init({...}) function.
First, let’s add the lifecycle function componentDidMount() to the Board component and then move the entire bulletTrain.init({...}) function inside of it, so that we can update the state of the component after the flag is retrieved:
class Board extends React.Component {
    componentDidMount() {
        bulletTrain.init({
            environmentID:"<your-environment-id>",
            onChange: (oldFlags,params)=>{ //Occurs whenever flags are changed
                declareWinner = bulletTrain.hasFeature("declare-winner");
            }
        });
    }

    // [rest of class]
}
If we left bulletTrain.init({...}) outside of the component, we would not be able to call this.setState() and have the component re-render itself from changes to our flags.
Now let’s add the code to control our new feature. We want the application to behave as it did before we added this feature if the flag is disabled. To do that, let’s set the state value for selected to true if the flag is disabled. Add the following line in the bulletTrain.init({...}) method right beneath the declareWinner line.
this.setState({selected: !bulletTrain.hasFeature("select-who-goes-first")});
Let’s go ahead and push that (again, straight into master). Once it’s built, head to your Netlify URL. You should see that nothing has changed — this is because the feature is still disabled in our Bullet Train project.
Head over to Bullet Train and enable the feature.
Brilliant! Now we can see it working, but oh, there’s a bug! It’s possible to start the game without selecting who goes first. If you play the game like this, you can see that the status is never set to show the winner. That’s not right!
Head back over to Bullet Train and disable the feature until we can work out what’s wrong. This is where Bullet Train’s additional features, such as environments and users, come in handy. We won’t go into either of these in this tutorial, but check out the docs for more on using multiple environments or controlling features on a per-user basis.
Back to our bug: there is one more line that we needed to add to the very top of handleClick() to prevent players from starting until the first player has been selected. Add the following at the top of the handleClick() function.
if (!this.state.selected) return;
Turn the feature back on again in Bullet Train and test that in your local environment and you should see that we now prevent the game starting without selecting who goes first. Excellent! Commit that into master again and push it straight to deploy.
Head on over to your Netlify URL and you should see the new feature fixed and working properly.
You can see the final code at the end of this section here.
Remote Config
We are now going to take a look at a slight variation on feature flags, called remote config. Remote config allows you to control more than just whether a feature is on or off — it allows you to change a given value remotely without changing your code. This comes in handy in a lot of different places, for example, if you want to be able to configure some aspect of the styling.
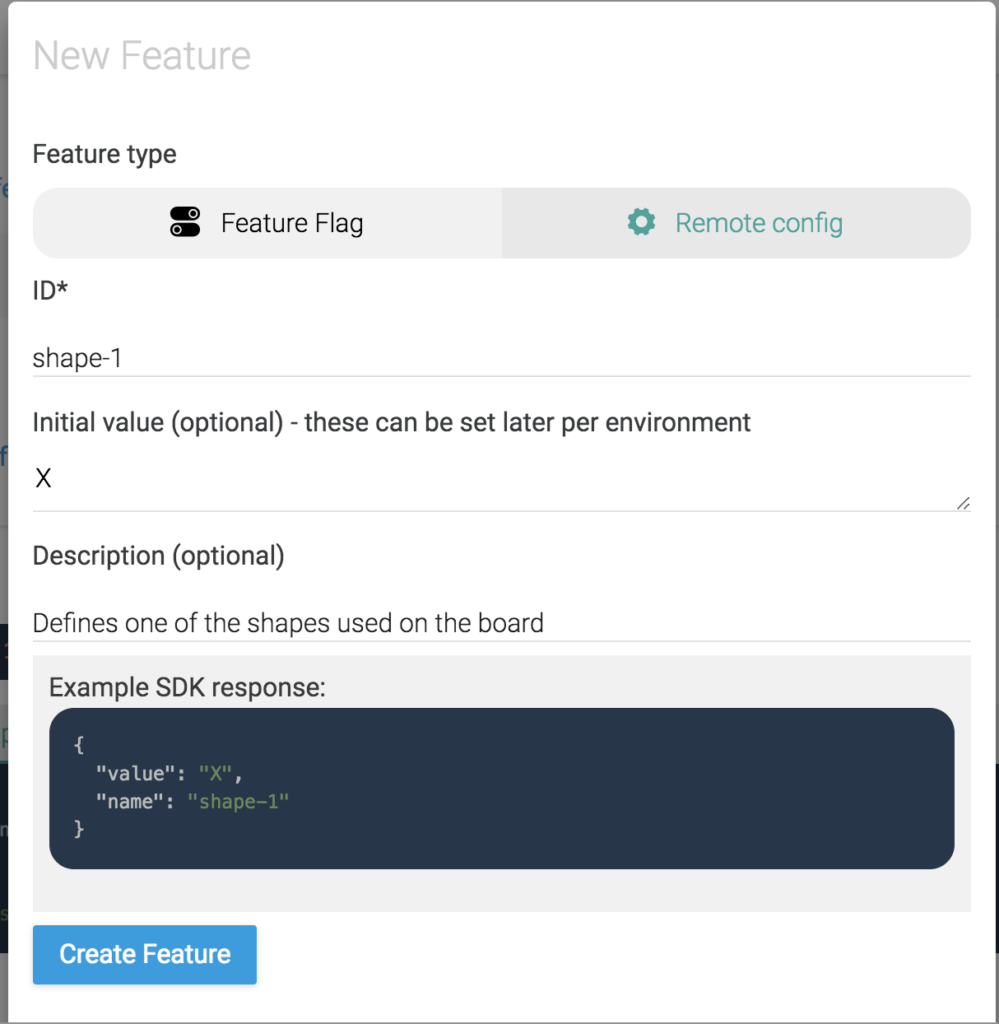
In our tutorial, we’ll be using this to change the shapes used by each player in our game. Let’s create two remote config values for what shapes to use on the board. In your Bullet Train project, click on the ‘Create Feature’ button but this time, select the ‘Remote Config’ tab instead of ‘Feature Flag’. Fill in the data as per the below.

All done! Now back to the code. In our Bullet Train client’s onChange() function we need to retrieve these values and set them to the component’s state. Let’s change our this.setState() call to:
this.setState({
    selected: !bulletTrain.hasFeature("select-who-goes-first"),
    shape1: bulletTrain.getValue("shape-1") || 'X',
    shape2: bulletTrain.getValue("shape-2") || 'O'
});
We now have the two shapes and can replace all static uses throughout App.js of ‘X’ and ‘O’ with the state values instead. There should be 3 instances of each: 1 per shape in handleClick() and 2 per shape in render() (one is in the call to return). Here’s the updated code for the reference in handleClick():
handleClick(i) {
    // ...
    squares[i] = this.state.xIsNext ? this.state.shape1 : this.state.shape2;
    // ...
}
Note that for the instances in the return call in render() you’ll need to wrap the JavaScript in curly braces like this:
<button onClick={() => this.setState({selected: true})}>{this.state.shape1}</button>
Commit this into master and push to your Git repository to see the changes on your Netlify URL. If you’ve done it correctly, the game should play as before with ‘X’ and ‘O’ shapes. Go ahead and change the shapes in the admin to different letters and refresh the page. If all is well you will now be playing with different shapes.
There is a lot more you can achieve with remote config, such as controlling the styling of the entire game or say the dimensions of the board. We added even more remote config values including shape color and square size. You can see the finished code for the game here.
Other Things to Think About
Feature flags shouldn’t be considered to be a golden bullet, however, and they do come with certain caveats.
For example, if you’re using a framework that handles the database schema for you, such as Django or Rails, you’ll need to be careful when implementing feature flags in your models. Using feature flags in your models could result in DB schema mismatches, which may bring parts of your application down.
Similarly, if you’re interacting with a third party API that has certain requirements for its consumers, using feature flags to control aspects of this could cause unexpected errors in your application. Also, vice versa, if your application provides an API for others to consume, using feature flags to control the data models of the API is not advised as it may cause problems down the line for those consumers.
Finally, we used Bullet Train in the tutorial above as it’s free to use at the moment and also open source. There are a number of other products out there doing the same thing or with slightly different variants — you should check all of these out to determine what’s best for you. For example, Launch Darkly and Airship HQ.
Frequently Asked Questions (FAQs) about Using Feature Flags in Continuous Integration
What are the benefits of using feature flags in continuous integration?
Feature flags, also known as feature toggles, provide a way to hide, enable or disable certain features during runtime. In continuous integration, they offer several benefits. Firstly, they allow developers to work on a feature without affecting the main codebase. This means that even if the feature is not fully developed or tested, the overall application remains stable. Secondly, they enable easy testing of features in the production environment. This can be particularly useful for A/B testing or canary releases. Lastly, they provide a way to quickly disable a feature in case of an issue, without having to roll back the entire deployment.
How can I implement feature flags in my React application?
Implementing feature flags in a React application involves a few steps. Firstly, you need to define your feature flags. This can be done in a configuration file or fetched from a remote server. Secondly, you need to create a context to provide these feature flags to your components. This can be done using React’s Context API. Lastly, you need to use these feature flags in your components to conditionally render different parts of your application.
Can I use feature flags for A/B testing?
Yes, feature flags are a great tool for A/B testing. They allow you to expose different features or versions of a feature to different segments of your users. This can be particularly useful for testing the impact of new features on user behavior and engagement.
What are the potential risks of using feature flags and how can I mitigate them?
While feature flags offer many benefits, they also come with potential risks. One of the main risks is code complexity. Having many feature flags can make the code harder to understand and maintain. This can be mitigated by keeping the number of active feature flags to a minimum and removing them once they are no longer needed. Another risk is that of configuration errors. This can be mitigated by using automated testing and monitoring to ensure that feature flags are working as expected.
How can I manage feature flags in a large-scale application?
Managing feature flags in a large-scale application can be challenging. One approach is to use a feature flag management system. These systems provide a central place to define and manage feature flags, and often come with features like user segmentation, A/B testing, and analytics. Another approach is to use a feature flag as a service provider. These providers offer a hosted solution for feature flag management, which can be particularly useful for large-scale applications.
Can feature flags be used in a microservices architecture?
Yes, feature flags can be used in a microservices architecture. They can be particularly useful for coordinating the release of features that span multiple services. However, care must be taken to ensure that feature flags are consistently applied across all services.
How can I use feature flags for canary releases?
Canary releases are a deployment strategy where a new feature or version is released to a small subset of users before being rolled out to everyone. Feature flags can be used to control who has access to the new feature or version. This allows you to monitor the impact of the change and quickly disable it if issues are detected.
Can feature flags be used for dark launching?
Yes, feature flags are a common tool for dark launching. Dark launching is a practice where new features are released to a subset of users before they are made publicly available. This allows you to test the feature in the production environment and gather feedback before the official launch.
How can I test feature flags?
Testing feature flags can be done in a few ways. One approach is to use automated testing to ensure that each feature flag is working as expected. This can involve creating tests for each possible state of the feature flag. Another approach is to use monitoring and analytics to track the impact of feature flags on your application’s behavior and performance.
Can feature flags be used for gradual rollouts?
Yes, feature flags are a great tool for gradual rollouts. They allow you to slowly increase the number of users who have access to a new feature or version. This can be particularly useful for minimizing the impact of potential issues and for monitoring the impact of the change on user behavior and engagement.
 Ben Rometsch
Ben founded London agency Solid State Group and The Hoxton Mix. He’s passionate about coding, starting companies, funding companies and using tech to make the world more enjoyable. He wrote his first web page in 1994, which probably makes him too old.