A sales funnel is an online marketing tool that is built and designed to capture leads from traffic and convert them into customers. They tend to convert 20% to 50% higher than ordinary web pages. A sales funnel typically consists of opt-in pages, order forms, shopping carts, checkout pages and email marketing software. Building such a system is not a walk in the park.
The common way of building a sales funnel today is by purchasing a monthly subscription plan from a sales funnel builder platform. The most popular provider currently charges about $100 to $300. There are other affordable options. However, you may encounter limitations or technical challenges with any provider you work with — some more severe than others.
If you don’t want to pay for a subscription plan, then you will have to build one yourself. Historically, coding your own funnel has been more expensive and time-consuming. However, we are living in 2019. The technology used by web developers today has improved immensely in the last 10 years.
It’s easier and faster to build and deploy a web application. We have tons of third-party providers that allow integrations to their platforms via remote APIs. This allows us to easily implement heavy-duty features without having to write the code ourselves.
The benefits of owning your own funnel code means your business will be more resilient. You can easily switch servers if something doesn’t work out with your provider. You can also easily scale up your online business without meeting major obstacles.
In this tutorial, I’ll show you how to code your own simple sales funnel with Vue that will help you promote a product or service that you are selling to consumers. We’ll build a simple squeeze page funnel for collecting leads for your email list.
Prerequisites
This article assumes that you have at least a solid grasp in:
You’ll need to have a modern version of Node.js and the Vue CLI tool installed in your system. At the time of writing this article, Node v10.15.1 was the current LTS. The current Vue CLI version tool is v3.4.1. My personal recommendation is to use nvm to keep your Node.js environment up-to-date. To install the Vue.js CLI tool, execute the command:
npm install @vue/cli
About the Project
You can access the full source for this project onGitHub. There is also a live demo of this project. We’ll be using Bootstrap-vue as our primary CSS framework. Please make sure to read the docs if you are new to this framework.
For this project, we are going to build a two page funnel consisting of an opt-in page — a.k.a squeeze page — and a thank you page. The setup will look something like this:
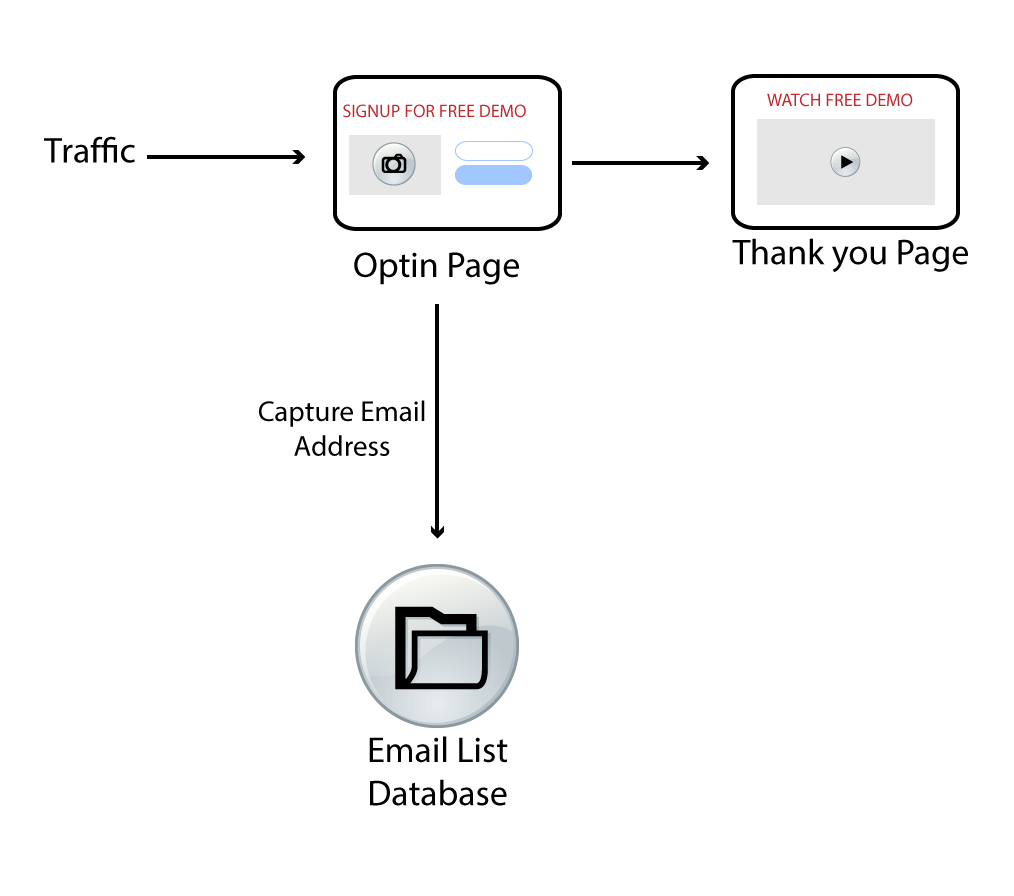
The opt-in page captures a visitor’s email address and saves it to an email list. At the same time, it moves the visitor to the next page. It is that simple. You can even do it using just plain HTML, CSS and JavaScript. Why are we even doing it in Vue.js?
The reason is because we could want to build different types of funnels promoting the same product, or different products. We wouldn’t want to repeat the same code we implemented earlier in another funnel.
Vue.js is the perfect solution that will allow us to build re-usable components that will be easy to maintain and update. In addition, we can package our components and publish it to a npm registry, making it available to all our future funnel projects.
To publish our funnel, we will have to do it in a framework like Nuxt.js. This is because Vue.js is mostly a view layer technology. We can install our sales funnel library in a Nuxt.js project. Nuxt.js is more of a full framework in that it allows code to run both on the server and the client side. It also supports a ton of useful features such as SEO.
Unfortunately, it won’t be possible to perform most of the steps mentioned above in a single tutorial. What we’ll do instead is build the two page funnel. I’ll show you how to design the components such that they are easy to re-use.
This way you can package the project later and install it in another funnel project. I’ll also provide additional links in regards to packaging a Vue.js project and deploying it to a private npm server.
With this plan in mind, let’s move on and start building our funnel library project!
Project Setup
Open a console terminal and create a new Vue project.
vue create vue-sales-funnel
Use the following settings:
- Features: Babel, Router, Linter(optional)
- Router History Mode: Yes
- Linter:
ESlint+ Prettier, Lint on Save, Lint and fix on commit (or choose your preferred options) - config files : In dedicated config files
Next, install Bootstrap-Vue:
cd vue-sales-funnel
npm install vue bootstrap-vue bootstrap
Next open the project in your favorite editor. If you have Visual Studio Code, you can launch it like this:
code .
Update src\main.js as follows:
import Vue from "vue";
import BootstrapVue from "bootstrap-vue";
import App from "./App.vue";
import router from "./router";

import "bootstrap/dist/css/bootstrap.css";
import "bootstrap-vue/dist/bootstrap-vue.css";

Vue.config.productionTip = false;
Vue.use(BootstrapVue);

new Vue({
  router,
  render: h => h(App)
}).$mount("#app");
This should set up the Bootstrap CSS framework in your project. Next, update src\App.js as follows:
<template>
  <div id="app">
    <router-view />
  </div>
</template>
Rename the following files as follows:
src/views/Home.vue=>Optin.vuesrc/views/About.vue=>Thank-you.vue
Replace the existing code in src/views/Optin.vue as follows:
<template>
  <div class="optin">
    <b-row>
      <b-col>
        <p>Squeeze Funnel Page</p>
      </b-col>
    </b-row>
  </div>
</template>

<script>
export default {
  name: "optin"
};
</script>
Update the code in src\router.js as follows:
import Vue from "vue";
import Router from "vue-router";
import Optin from "./views/Optin.vue";
import ThankYou from "./views/Thank-you.vue";

Vue.use(Router);

export default new Router({
  mode: "history",
  base: process.env.BASE_URL,
  routes: [
    {
      path: "/",
      name: "optin",
      component: Optin
    },
    {
      path: "/thank-you",
      name: "thank-you",
      component: ThankYou
    }
  ]
});
You can now fire up your project server using the command npm run serve. Open the browser and check the links localhost:8080 and localhost:8080/thank-you are working as expected. If so, you can proceed to the next section. If not, check your work.
Text Content
The first component that we will build is a Text component. We can easily use <h1> and <p> tags. However, we need preset elements that already have a style applied to them. We need to quickly build a page in 10 minutes or less without thinking about styling.
Delete the component src/components/HelloWorld.vue and create TextComponent.vue in its place. Copy the following code:
<template>
  <div class="text-content" v-bind:style="{ marginTop: topMargin }">
    <h1 class="header" v-if="variant === 'header'">{{ content }}</h1>
    <h2 class="subheader" v-if="variant === 'subheader'">{{ content }}</h2>
    <p class="paragraph" v-if="variant === 'paragraph'" v-html="content"></p>
  </div>
</template>

<script>
export default {
  name: "TextContent",
  props: {
    variant: String,
    content: String,
    topMargin: String
  }
};
</script>

<style scoped>
.header {
  color: rgb(50, 50, 50);
  text-align: center;
}
.subheader {
  font-size: 1.5rem;
  color: rgb(100, 100, 100);
  text-align: center;
}
p {
  color: rgb(124, 124, 124);
}
</style>
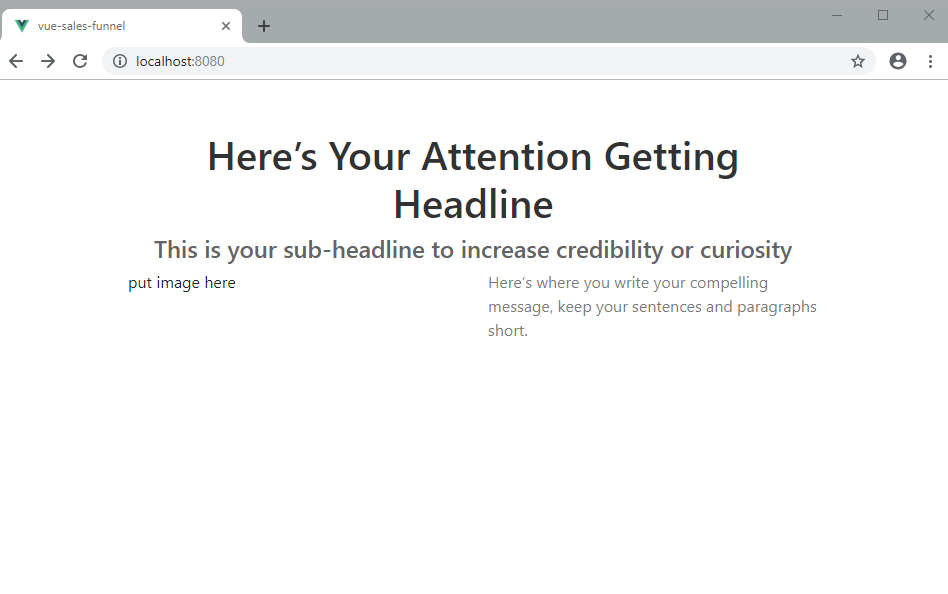
Let’s test it out by making the following changes in src/views/Optin.vue:
<template>
  <div class="optin container">
    <b-row>
      <b-col>
        <TextContent
          variant="header"
          content="Here’s Your Attention Getting Headline"
          topMargin="50px"
        />
        <TextContent
          variant="subheader"
          content="This is your sub-headline to increase credibility or curiosity"
        />
      </b-col>
    </b-row>
    <b-row>
      <b-col>
        put image here
      </b-col>
      <b-col>
        <TextContent
          variant="paragraph"
          content="Here’s where you write your compelling message, keep your sentences and paragraphs short."
        />
      </b-col>
    </b-row>
  </div>
</template>

<script>
import TextContent from "../components/TextComponent";

export default {
  name: "optin",
  components: {
    TextContent
  }
};
</script>
Refresh your page. You should have something like this:
You may have noticed the paragraph tag will render content differently. We are using the v-html attribute to allow users to pass HTML styling such as <strong> and <u>. You can test it out by adding this snippet:
<TextContent
  variant="paragraph"
  content="Use <strong>*bold*</strong>, <u>underline</u> and <i>italics</i> to emphasize important points."
/>
We have built a simple Text Component that comes with pre-built styling. The prop variant is used to determine the type of text tag that needs to be rendered. We also have the prop topMargin which will allow us to easily space the text elements.
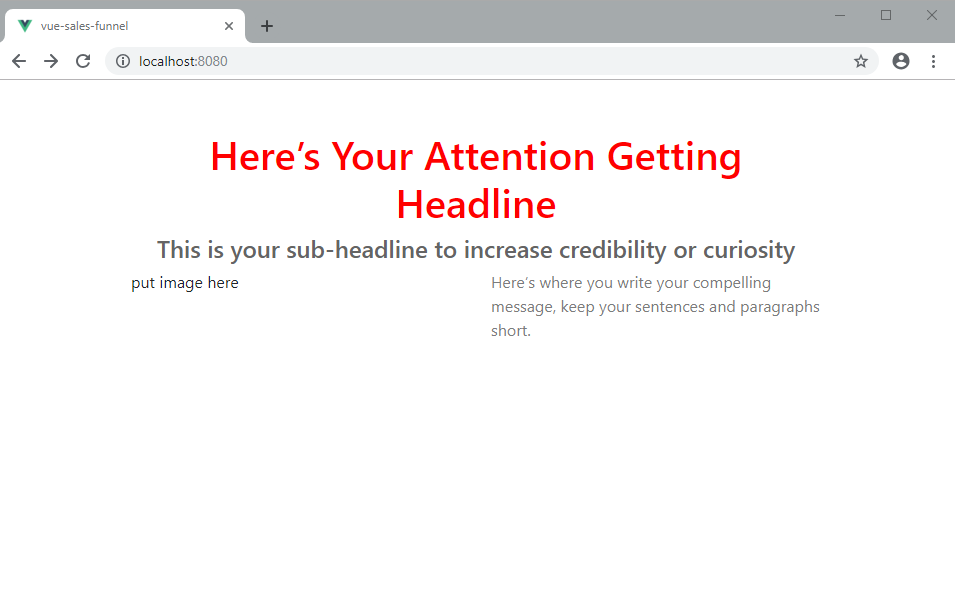
Assuming that test has worked out for you, let’s move on to the next challenge. Let’s assume we need to have different styles for the header and sub-header. We need a way to instruct the TextContent component to change the style. Update the OptinForm.vue code as follows:
<TextContent
  variant="header"
  content="Here’s Your Attention Getting Headline"
  topMargin="50px"
  theme="red"
/>
We have added a new prop called theme. We need to declare this new prop in TextComponent.vue. Update the code as follows:
<template>
  <h1
    class="header"
    v-bind:style="getStyle()"
    v-if="variant === 'header'"
  >
    {{ content }}
  </h1>
</template>

<script>
export default {
  ...
  props: {
    ...
    theme: String
  },
  data: function() {
    return {
      red: { // style object
        color: "red"
      },
      blue: { // style object
        color: "blue"
      }
    };
  },
  methods: {
    getStyle() {
      switch (this.$props.theme) {
        case "red":
          return this.red;
        case "blue":
          return this.blue;
        default:
          break;
      }
    }
  }
};

</script>
When you refresh your page, you should have something like this:
In this example, we have declared multiple style objects, red and blue. Users can specify which theme they want to use. Feel free to add more properties to the style objects and create more style objects.
If you want to go further, you can externalize the style objects so that it’s separate from the code. You can create something like a theme.css file that will be easier to customize.
Let’s now look at the next component.
Opt-in Form
The opt-in form is where the lead capture action happens. We ask visitors to give us their email address in exchange for a valuable resource that will help them.
Create the file src/components/OptinForm.vue and insert the following code:
<template>
  <div class="optin-form">
    <form @submit.prevent="onSubmit">
      <b-form-group>
        <b-form-input
          type="email"
          v-model="form.email"
          size="lg"
          required
          placeholder="Enter email"
        />
      </b-form-group>
      <b-button type="submit" v-bind:variant="submitColor" size="lg" block>{{
        submitText
      }}</b-button>
    </form>
  </div>
</template>

<script>
export default {
  name: "optin-form",
  props: {
    submitText: String,
    submitColor: String
  },
  data() {
    return {
      form: {
        email: ""
      }
    };
  },
  methods: {
    onSubmit() {
      this.$emit("submit", this.form);
    }
  }
};
</script>

<style scoped>
.btn {
  font-weight: bold;
  font-size: 1.5rem;
}
</style>
Go through the code, pay special attention to the props used. To demonstrate how this component is used, simply update src/views/Optin.vue as follows:
<template>
  <b-row style="marginTop:20px">
      <b-col>
        <b-img
          src="https://images.unsplash.com/photo-1483032469466-b937c425697b?ixlib=rb-1.2.1&ixid=eyJhcHBfaWQiOjEyMDd9&auto=format&fit=crop&w=600&q=80"
          fluid
        />
      </b-col>
      <b-col>
        <TextContent
          variant="paragraph"
          content="Here’s where you write your compelling message, keep your sentences and paragraphs short."
        />
        <OptinForm
          submitText="Free Download!"
          submitColor="warning"
          @submit="handleSubmit"
        />
      </b-col>
    </b-row>
</template>

<script>
import TextContent from "../components/TextContent";
import OptinForm from "../components/OptinForm";

export default {
  name: "optin",
  components: {
    TextContent,
    OptinForm
  },
  methods: {
    handleSubmit(form) {
      console.log("Add New Subscriber", form.email);
      this.$router.push({ path: '/thank-you'})
    }
  }
};
</script>
Do note we’ve replaced the “put image here” text with an actual image tag. We’ve also specified a @submit event on the OptinForm component which will be handled by the handleSubmit function. If you look back at the OptinForm.vue code, you’ll notice that an event is fired through this code: this.$emit("submit", this.form);.
And that is how we’ve decoupled the OptinForm.vue component. We can easily write custom code that sends an email address to any email marketing platform of your choice. My current favorite is MailerLite. Here is their API documentation on how to add a new subscriber.
You can use a library like Fetch or Axios to send the information via the REST API. If you are new to this, check out the tutorial Introducing Axios, a Popular, Promise-based HTTP Client.
Refresh your browser and confirm that the opt-in page is working:
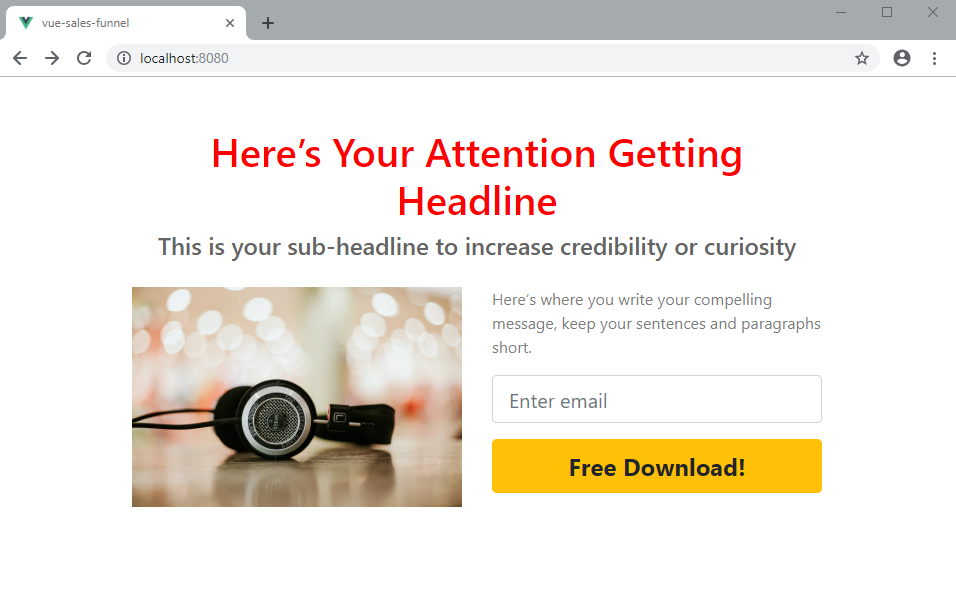
At the moment, we are using HTML validation. Entering a valid email address should quickly navigate you to the thank-you page. At the moment, it doesn’t look like one. Let’s fix that in the next section.
Video Content
Before we populate the Thank-You.vue page, we need to create the src/components/VideoContent.vue component. Insert the following code:
<template>
  <div class="video-content" v-bind:style="{ marginTop: topMargin }">
    <b-embed type="iframe" aspect="16by9" :src="link" allowfullscreen />
  </div>
</template>

<script>
export default {
  name: "video-content",
  props: {
    link: String,
    topMargin: String
  }
};
</script>
The VideoContent component will allow us to embed any video from sites such as YouTube and Vimeo. You’ll have to get an embed link for it to work. The embed URL for YouTube looks something like this:
https://www.youtube.com/embed/xxxxxxxxx
Once you have saved the component, we can now start working on src/views/Thank-you.vue. Replace all existing code with this:
<template>
  <div class="thank-you container">
    <b-row>
      <b-col>
        <TextContent
          variant="header"
          content="Here’s Your Thank You Headline"
          topMargin="50px"
          theme="red"
        />
        <TextContent
          variant="subheader"
          content="This is your sub-headline to increase credibility or curiosity"
        />
      </b-col>
    </b-row>
    <b-row>
      <b-col>
        <VideoContent
          link="https://www.youtube.com/embed/m9q58hSppds"
          topMargin="30px"
        />
      </b-col>
    </b-row>
  </div>
</template>

<script>
import TextContent from "../components/TextContent.vue";
import VideoContent from "../components/VideoContent";

export default {
  name: "thank-you",
  components: {
    TextContent,
    VideoContent
  }
};
</script>
If you refresh the http://localhost:8080/thank-you page, you should have the following view:

Since we are done with that, let’s create one more component that is a bit complicated. This one will go to our Optin page.
Countdown Timer Component
A countdown timer is a popular marketing tool used to create a sense of urgency. It encourages the visitor to take action now before the opportunity expires. There are mainly two types of countdown timers:
- Deadline to a specified date
- A fixed time (usually in an hour or a few minutes) that resets itself everyday or when the session is new
In this case, we’ll focus on building the first use case. We are not going to actually code this timer itself, but grab one from the npm registry. You’ll need to exit the Vue.js server first. Install it as follows:
npm install vuejs-countdown
Next create the file src/components/Countdowntimer.vue and insert the following code:
<template>
  <div class="countdown-timer">
    <Countdown :deadline="endDate"></Countdown>
  </div>
</template>

<script>
import Countdown from "vuejs-countdown";

export default {
  name: "countdown-timer",
  components: { Countdown },
  props: {
    endDate: String
  }
};
</script>

<style>
.countdown-timer {
  padding: 15px;
  text-align: center;
}
.countdown-section {
  display: inline-block;
  margin-right: 25px;
}
.vuejs-countdown .digit {
  display: block;
  border: 4px solid orange;
  color: darkorange;
  padding: 10px;
  border-radius: 100px;
  width: 72px;
  margin-bottom: 10px;
}
.text {
  font-size: 0.7rem;
  font-weight: bold;
  color: gray;
}
</style>
Next, add the CountdownTimer component to the src/views/Optin.vue page:
<template>
  ...
  <b-row>
    <b-col>
      <CountdownTimer endDate="March 3, 2020e" />
      <TextContent
        variant="subheader"
        content="This is offer will soon expire"
      />
    </b-col>
  </b-row>
  ...
</template>

<script>
  import CountdownTimer from "../components/CountdownTimer";
  ...
  components: {
    ...
    CountdownTimer
  },
</script>
After making the changes, you can now start the server. Your page should look like this:
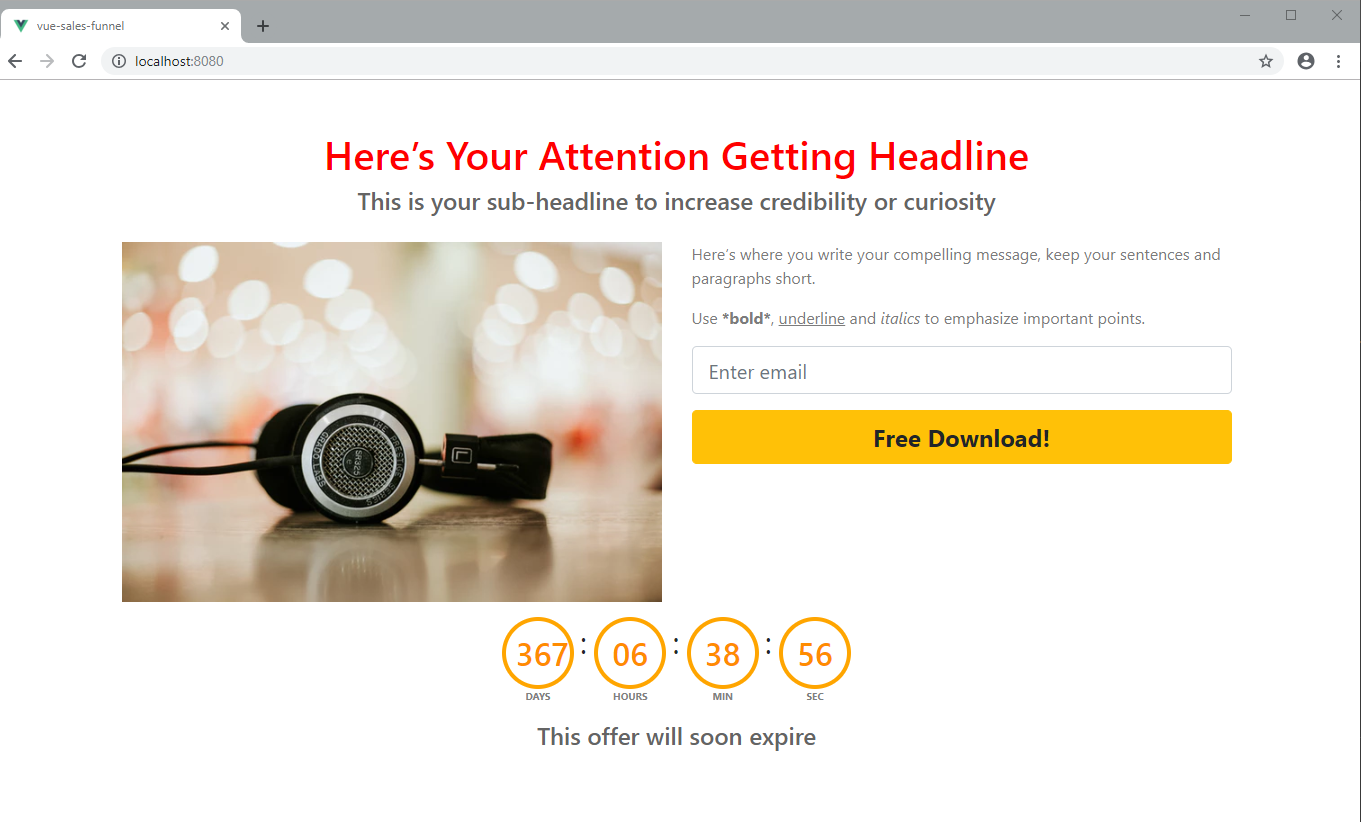
In case yours is not counting down, change the date and make sure it’s set in the future. Let’s now finalize the tutorial.
Packaging and Publishing
So far we’ve made a good base for a sales funnel library. You can keep on adding more components, each with more customizable options. Now is a good time to talk about packaging and launching a production-ready funnel. While it’s possible to run the funnel we just created from our Vue project, it’s best we launch it in a Nuxt.js project.
Here are some useful links that will help you accomplish the tasks we discussed earlier:
Summary
I hope you have learned something useful from this tutorial. As a developer, you have an advantage over non-technical people. You can build and launch your funnels at a fraction of the cost most marketers pay for the entire lifetime when using a funnel building service. This will result in thousands of dollars in savings every year.
In addition, you will be able to sell more of your software products and services as opposed to using a standard website. Let us know via social media if you plan to create an open-source version of a sales funnel builder that will benefit the community.
Frequently Asked Questions (FAQs) on Building a Sales Funnel with Vue
How Can I Integrate MailerLite with Vue.js for My Sales Funnel?
Integrating MailerLite with Vue.js can be done using the MailerLite API. First, you need to install the MailerLite API package using npm. Once installed, you can import it into your Vue.js project and use it to send emails, manage subscribers, and more. You will need your MailerLite API key, which you can find in your MailerLite account settings. Remember to keep this key secure as it gives access to your MailerLite account.
What Are the Benefits of Using Vue.js for My Sales Funnel?
Vue.js is a progressive JavaScript framework that is easy to understand and integrate with other libraries or existing projects. It is also very flexible, allowing you to structure your app the way you want. Vue.js also has a vibrant and supportive community, which means you can find help and resources easily.
How Can I Track Conversions in My Vue.js Sales Funnel?
Tracking conversions in your Vue.js sales funnel can be done using various methods. One common method is using Google Analytics or similar tools. You can also use the MailerLite API to track email opens, clicks, and other metrics.
Can I Use Vue.js for Affiliate Marketing Funnels?
Yes, Vue.js can be used for building affiliate marketing funnels. It allows you to create dynamic and interactive web pages that can improve user experience and increase conversions. You can also integrate it with various affiliate marketing tools and platforms.
How Can I Optimize My Vue.js Sales Funnel for Better Conversions?
Optimizing your Vue.js sales funnel for better conversions involves several steps. First, ensure your funnel is user-friendly and easy to navigate. Second, use A/B testing to find out what works best for your audience. Third, use analytics to track user behavior and make necessary adjustments.
How Can I Use Vue.js to Automate My Sales Funnel?
Vue.js can be used to automate various aspects of your sales funnel. For instance, you can use it to automate email sending, follow-ups, and more. You can also integrate it with automation tools like Zapier for more advanced automation.
Can I Integrate Vue.js with Other Email Marketing Platforms?
Yes, Vue.js can be integrated with various email marketing platforms. This can be done using the platform’s API or through third-party plugins. Some popular email marketing platforms that can be integrated with Vue.js include MailChimp, SendinBlue, and ConvertKit.
How Can I Secure My Vue.js Sales Funnel?
Securing your Vue.js sales funnel involves several steps. First, ensure your code is clean and free from vulnerabilities. Second, use secure protocols like HTTPS. Third, keep your dependencies up-to-date to avoid potential security issues.
Can I Use Vue.js for Mobile Sales Funnels?
Yes, Vue.js can be used for building mobile sales funnels. It is responsive and can adapt to different screen sizes. You can also use it with frameworks like Ionic or Cordova to build native-like mobile apps.
How Can I Improve the Performance of My Vue.js Sales Funnel?
Improving the performance of your Vue.js sales funnel can be done in several ways. First, optimize your code for better performance. Second, use lazy loading to load resources only when needed. Third, use a CDN to deliver your resources faster.
 Michael Wanyoike
I write clean, readable and modular code. I love learning new technologies that bring efficiencies and increased productivity to my workflow.