
In part 7 of this tutorial series on building DApps with Ethereum, we showed how to build the app’s front end, setting up and deploying the UI for this story we’ve been working on.
It’s time to do some deploying and write a few final functions.
This is the eighth part of a series on building decentralized applications using the Ethereum blockchain. The project we’re building is called The Neverending Story. The full project can be found at storydao.bitfalls.com. Its full code is on GitHub.
Here is an outline of the whole series:
- In part 1, we bootstrap two versions of a local blockchain for development: a Ganache version, and a full private PoA version.
- In part 2, we build and deploy our TNS token.
- In part 3, we look at how to compile, deploy, test and verify our custom TNS token, which is compatible with all exchanges and can be used as a regular ERC20 token.
- In part 4, we take the first steps towards developing a Story DAO, covering whitelisting and testing.
- In part 5, we deal with adding content to the story, looking at how to add the ability for participants to buy tokens from the DAO and to add submissions into the story.
- In part 6, we take the DAO to its final form, adding voting, blacklisting/unblacklisting, and dividend distribution and withdrawal, while throwing in some additional helper functions for good measure.
- In part 7, we show how to build the app’s front end, setting up and deploying the UI for this story we’ve been working on.
- In this final part, we look at the final steps of deploying the app and writing a few final functions.
Suicide
Something could go very, very wrong and the whole DAO somehow get destroyed — either through hacks of bad and hastily written code, or through the inability to make long loops due to too many participants. (Too many voters on a proposal might as well break the system; we really didn’t put any precaution in place for that!) Just in case this happens, it might be useful to have the equivalent of a “big red button”. First, let’s upgrade our StoryDao:
function bigRedButton() onlyOwner external {
    active = false;
    withdrawToOwner();
    token.unlockForAll();
}
Then, let’s make it possible to unlock all the tokens at once in our Token contract:
/**
@dev unlocks the tokens of every user who ever had any tokens locked for them
*/
function unlockForAll() public onlyOwner {
    uint256 len = touchedByLock.length;
    for (uint256 i = 0; i < len; i++) {
        locked[touchedByLock[i]] = 0;
    }
}
Naturally, we need to add this new list of addresses into the contract:
address[] touchedByLock;
And we need to upgrade our increaseLockedAmount function to add addresses to this list:
/**
@dev _owner will be prevented from sending _amount of tokens. Anything
beyond this amount will be spendable.
*/
function increaseLockedAmount(address _owner, uint256 _amount) public onlyOwner returns (uint256) {
    uint256 lockingAmount = locked[_owner].add(_amount);
    require(balanceOf(_owner) >= lockingAmount, "Locking amount must not exceed balance");
    locked[_owner] = lockingAmount;
    touchedByLock.push(_owner);
    emit Locked(_owner, lockingAmount);
    return lockingAmount;
}
We should also update the required interface of the token inside the StoryDao contract to include this new function’s signature:
// ...
    function getUnlockedAmount(address _owner) view public returns (uint256);
    function unlockForAll() public;
}
With the active-story block we added before (inability to run certain functions unless the story’s active flag is true), this should do the trick. No one else will be able to waste money by sending it to the contract, and everyone’s tokens will get unlocked.
The owner doesn’t get the ether people submitted. Instead, the withdrawal function becomes available so people can take their ether back, and everyone’s taken care of.
Now our contracts are finally ready for deployment.
What about selfdestruct?
There’s a function called selfdestruct which makes it possible to destroy a contract. It looks like this:
selfdestruct(address);
Calling it will disable the contract in question, removing its code from the blockchain’s state and disabling all functions, all while sending the ether in that address to the address provided. This is not a good idea in our case: we still want people to be able to withdraw their ether; we don’t want to take it from them. Besides, any ether sent straight to the address of a suicided contract will get lost forever (burned) because there’s no way to get it back.
Deploying the Contract
To deploy the smart contracts fully, we need to do the following:
- deploy to mainnet
- send tokens to StoryDAO address
- transfer ownership of Token contract to StoryDao.
Let’s go.
Mainnet Deployment
To deploy to mainnet, we need to add a new network into our truffle.js file:
mainnet: {
  provider: function() {
    return new WalletProvider(
      Wallet.fromPrivateKey(
        Buffer.from(PRIVKEY, "hex")), "https://mainnet.infura.io/"+INFURAKEY
    );
  },
  gasPrice: w3.utils.toWei("20", "gwei"),
  network_id: "1",
},
Luckily, this is very simple. It’s virtually identical to the Rinkeby deployment; we just need to remove the gas amount (let it calculate it on its own) and change the gas price. We should also change the network ID to 1 since that’s the mainnet ID.
We use this like so:
truffle migrate --network mainnet
There’s one caveat to note here. If you’re deploying on a network you previously deployed on (even if you just deployed the token onto the mainnet and wanted to deploy the StoryDao later) you might get this error:
Attempting to run transaction which calls a contract function, but recipient address XXX is not a contract address
This happens because Truffle remembers where it deployed already-deployed contracts so that it can reuse them in subsequent migrations, avoiding the need to re-deploy. But if your network restarted (i.e. Ganache) or you made some incompatible changes, it can happen that the address it has saved doesn’t actually contain this code any more, so it will complain. You can get around this by resetting migrations:
truffle migrate --network mainnet --reset
Send tokens to StoryDao address
Get the address of the token and the address of the StoryDao from the deployment process.
Then just use MEW as previously described to send the tokens.
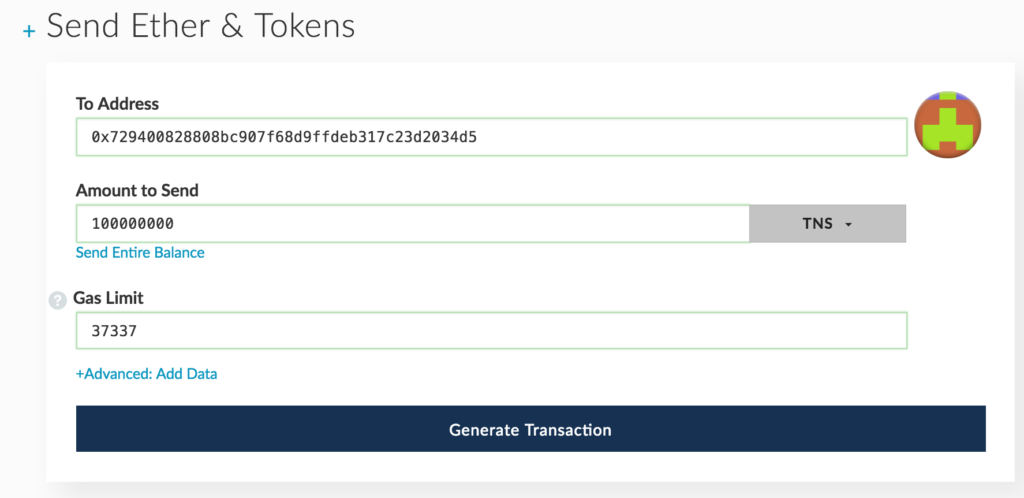
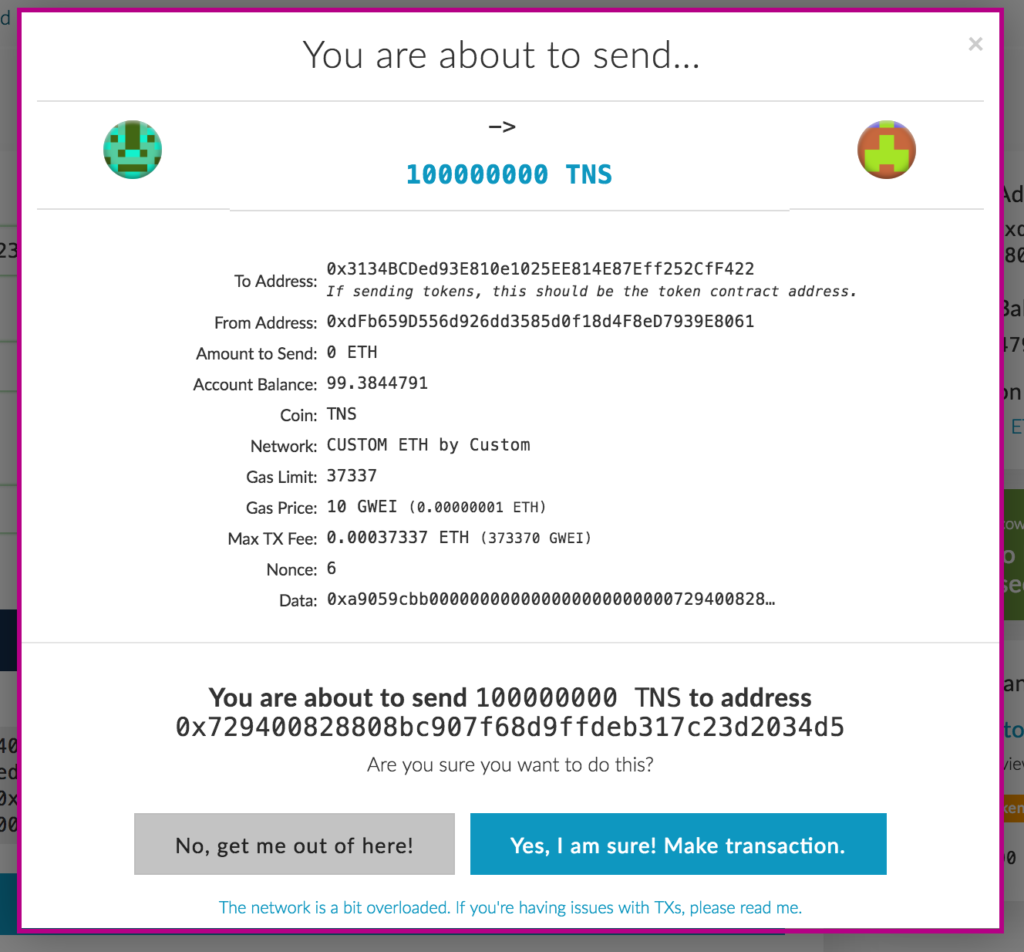
If you get Out of Gas errors, just increase the gas limit. Remember: the rest of the unused gas always gets refunded, so there’s no fear of losing any more money than your transaction costs (sending the tokens should be under 40000 gas).
Transfer ownership of token to StoryDao
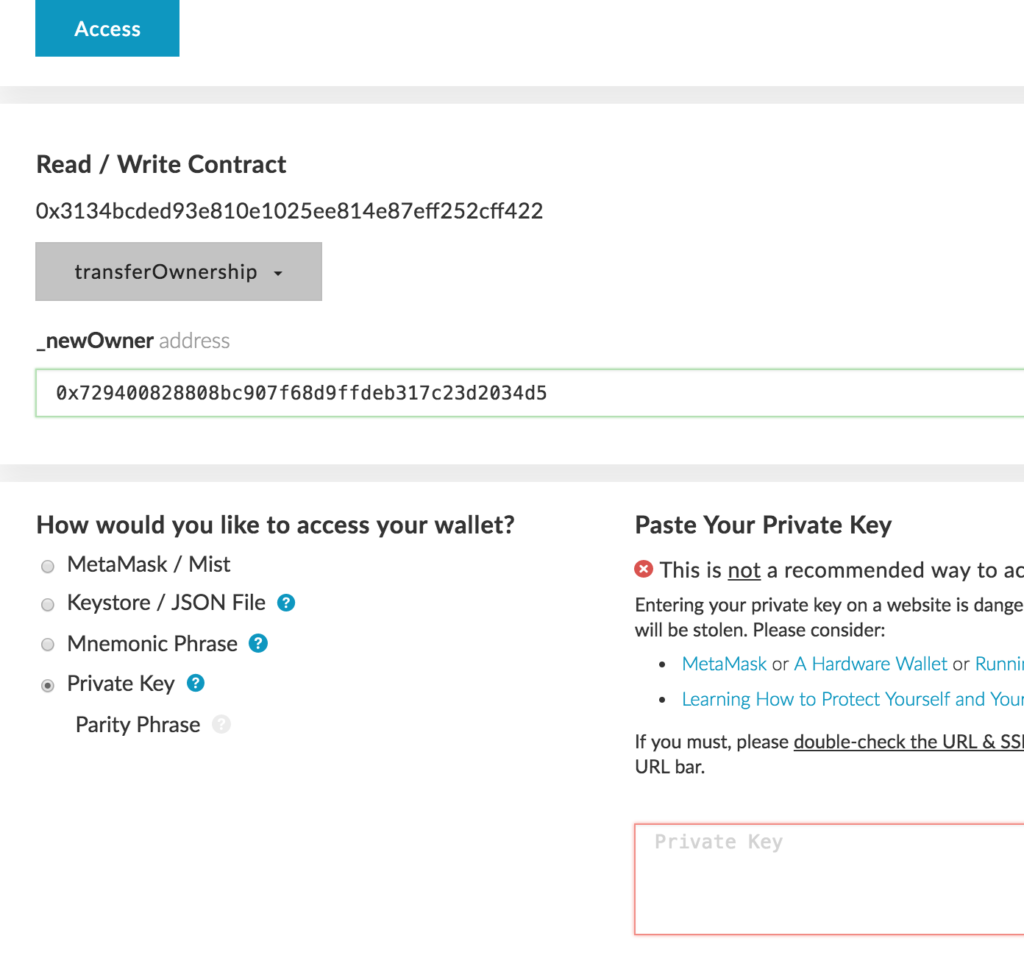
To transfer ownership, we need to call the transferOwnership function on the token. Let’s load the token into MEW. In the Contracts screen, we enter the address and the contract’s ABI (grab it from the /build folder). Clicking Access will then let us access the functions in that contract in a menu from which we select transferOwnership.
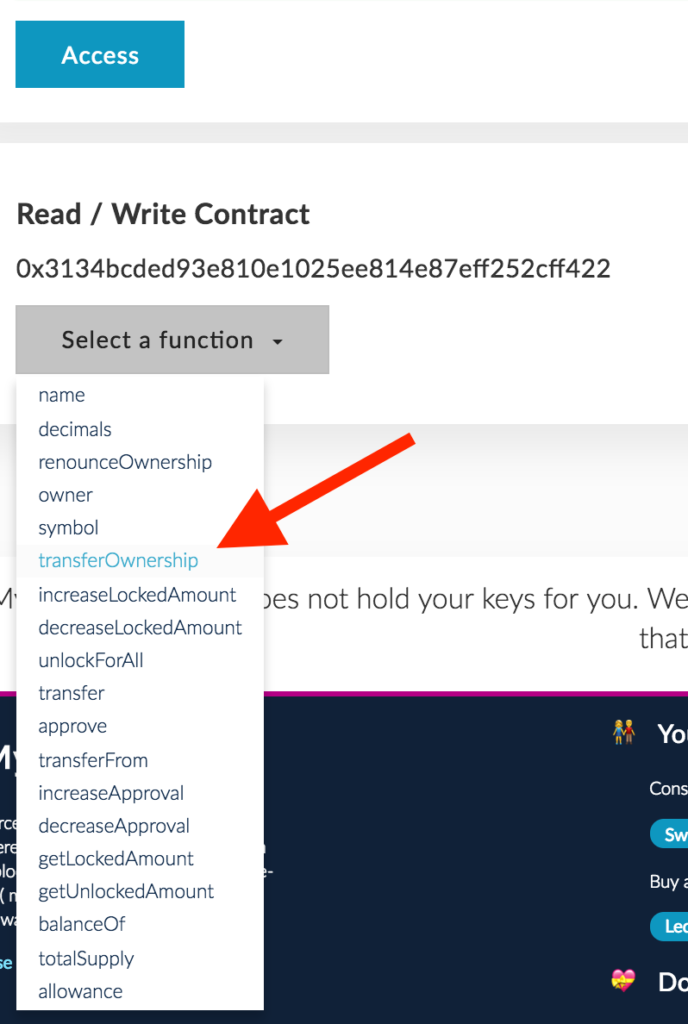
Tip: it’s enough to only include the ABI of the functions you intend to call: it doesn’t have to be the whole ABI of the token! You could just include the ABI of the transferOwnership function and it would be fine!
We then select the new owner (the address of the deployed StoryDao) and unlock the current owner’s wallet (the same wallet we previously sent tokens from).
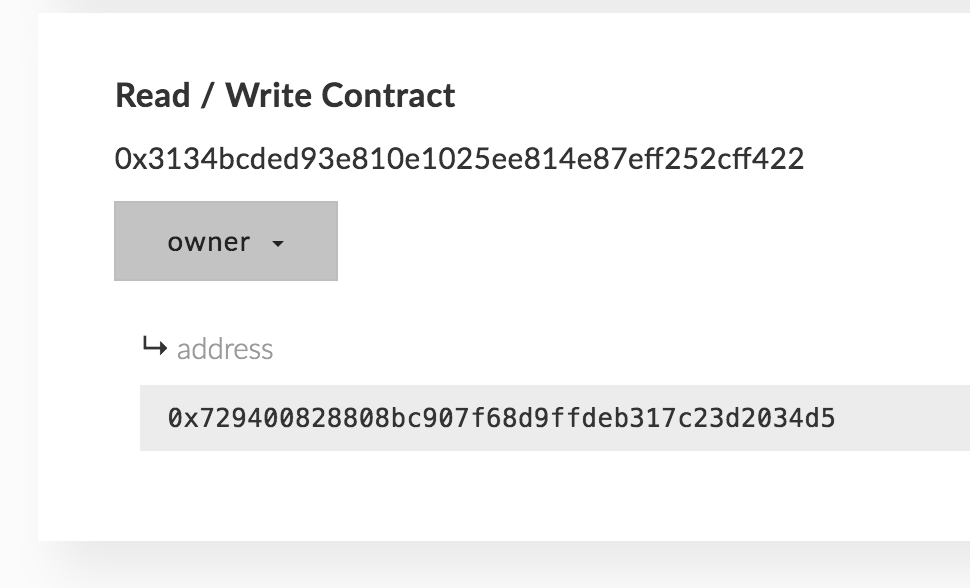
After writing this change, we can inspect the read-only function owner in the token contract (same menu as transferOwnership). It should show the new owner now.
To make sure that the StoryDao address actually has the tokens, we can select the balanceOf function and enter the StoryDao’s address into the _owner field, then click on Read:
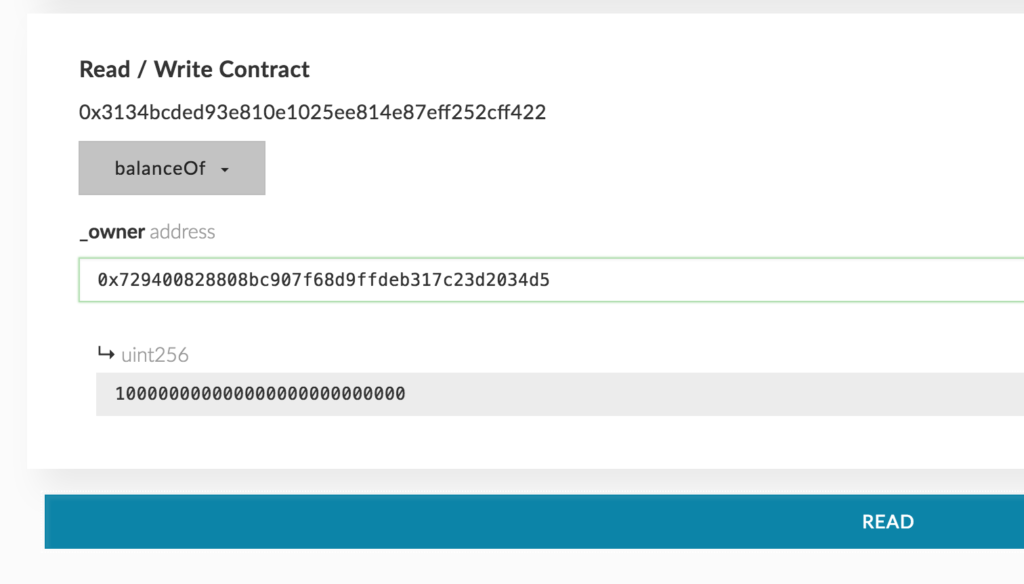
Indeed, 100 million tokens are in the StoryDao address.
Tip: we could have done the token sending and ownership transferring as part of the deployment step as well. Try figuring out how in a test environment.
Verification
As per part 3 of this series, it would benefit us greatly to verify the contracts of both the DAO and the Token on Etherscan. That green checkmark can go a long way.
Follow the instructions in that part to get your contracts verified. Note that, during the verification step, you’ll now have to mark the optimizer as active, since we’re optimizing our code for cheaper deployment!
Deploying to the Web
To deploy the web UI of StoryDao, follow the instructions from the “regular” web development world. Since, in this case, it’s all static code, you can even host it on GitHub Pages or something similar.
Read about some of the options here.
Once the page is up, configure the UI to use the addresses of contracts we got from the migration step. Alternatively, register ENS names for the token and the StoryDao, and you can keep the web UI static and fixed, hardcoding the addresses, and then only change the Ethereum address those ENS names are pointing at.
Conclusion
This concludes the DAO tutorial. We hope it helped you recognize the complexities of Solidity development, but we also hope that it made some things clearer and made you more curious.
As always, the best way to learn is by doing. Experiment, make mistakes, reboot and rebuild. Blockchain development of this type is in high demand, and it’s only getting more popular, so you have an opportunity to get in on the ground floor.
Good luck!
P.S. If you enjoyed this tutorial, feel free to ping the author on Twitter. If you have complaints, suggestions, ideas, etc. please shoot them over into the repository on GitHub!
 Bruno Skvorc
Bruno is a blockchain developer and technical educator at the Web3 Foundation, the foundation that's building the next generation of the free people's internet. He runs two newsletters you should subscribe to if you're interested in Web3.0: Dot Leap covers ecosystem and tech development of Web3, and NFT Review covers the evolution of the non-fungible token (digital collectibles) ecosystem inside this emerging new web. His current passion project is RMRK.app, the most advanced NFT system in the world, which allows NFTs to own other NFTs, NFTs to react to emotion, NFTs to be governed democratically, and NFTs to be multiple things at once.