
This article was sponsored by WRLD 3D. Thank you for supporting the partners who make SitePoint possible.
“Anywhere in the city? Anywhere in the city: I’ll tell you the best public toilet.”
These are the words of George Costanza to Jerry Seinfeld in 1991. In that episode of Seinfeld; the visionary George invented an app before his time – the bathroom finder! If you’re a frequent traveller, a parent, or just someone who knows the importance of a clean and well-maintained space for some “serenity”, you’ll understand the utility of this idea.

So, this time in the second tutorial of our WRLD series we’re going to build a… let’s call it a “facility finder app”.
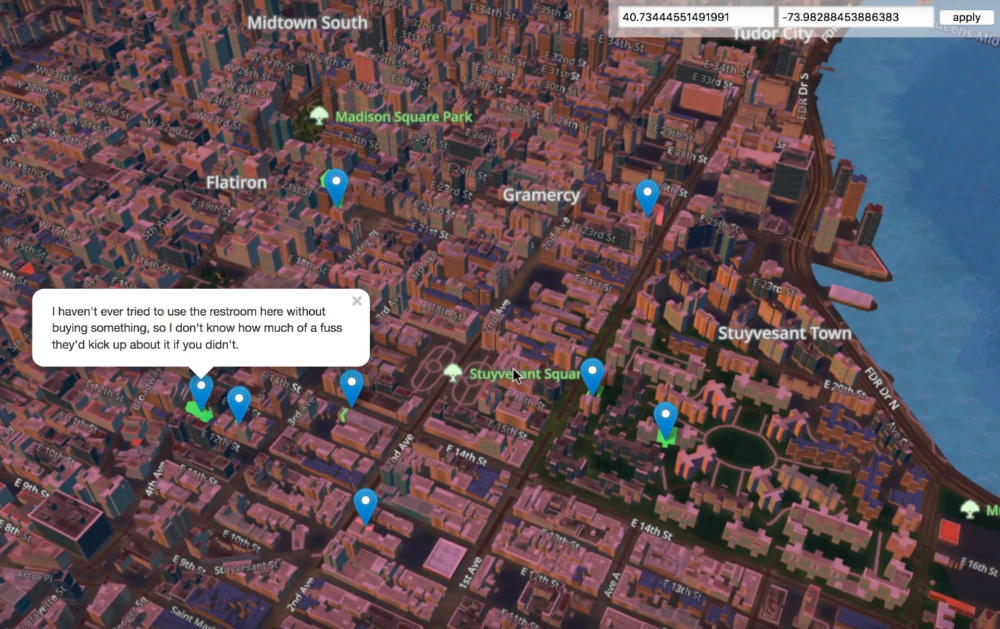 A sneak peek of what we’re going to build together
It’s not the first time someone has tried this mind you. In 2010, bathroomreview.ca did just that (as described in Forbes). But the site is no longer operational.
We covered quite a bit of ground in the last tutorial, this time round, we’re going to reuse some of that learning. For instance, we’ll use ParcelJS to build our static files, but we won’t go into too much detail about how to set it up again. We’ll also highlight buildings and set the appropriate weather conditions and time of day, depending on what they are for the user. If you’re unsure about how these work, refer back to the previous tutorial.
In this tutorial, we’re going to cover these topics:
- Creating a simple AdonisJS server-side API (to cache location data and handle CORS requests).
- Requesting public facilities data, from refugerestrooms.org, if there are no cached locations within 10 meters of the user. We’ll use the Google Distance Matrix API to calculate the distance between points of interest.
- Highlighting buildings with public facilities, colored to match their rating. Green for good, red for bad. Each building will have an info card for extra info (like how to reach the bathroom).
At the end, we’ll talk a bit about how to turn this kind of app into a viable business. That’s really the point of this isn’t it? The WRLD APIs provide tools to visualise real-world data in a map of the real world. Our job is to work out how to use this technology for commercial applications!
The code for this tutorial can be found on Github. It has been tested with a modern versions or Firefox, Node, and macOS.
Getting Facility Data
Let’s begin by learning how to get the facility data, and the form we get it in. We’re going to use refugerestrooms.org as a source of data. We learn that we can search by latitude and longitude, by looking at the documentation. In fact, we can make the following request, and see a set of facilities close to my location:
curl https://www.refugerestrooms.org/api/v1/restrooms/by_location.json? ↵
    lat=-33.872571799999996&lng=18.6339362
There are a few other parameters we could be specifying (like whether to filter by accessible and/or unisex facilities), but the main thing this gives us is a way to plug coordinates into a search and get close-by locations.
We can’t just call this from the browser, though. There are all sorts of security reasons why this is disallowed. There are also performance reasons. What if 10 people made the same request, standing 10 meters apart from each other? It would be a waste to fire off 10 requests to the same remote server, when we could serve it faster from a caching proxy.
Instead, we’re going to set up a simple AdonisJS caching API. Our browser app will send requests to the AdonisJS API, and if there’s no “nearby” data; it will send a request to the Refuge API. We can’t spend too much time on the details of AdonisJS, so you’ll have to check out the documentation for details.
I’m also just about done writing a book about it, so that’s the best place to learn how it works!
The easiest way, to create a new AdonisJS app, is to install the command-line tool:
npm install --global @adonisjs/cli
This enables the adonis command-line globally. We can use it to create a new application skeleton:
adonis new proxy
This takes a little while, since it’s installed a few things. When it finishes, you should see a message to run the development server. This can be done with:
adonis serve --dev
Open up http://127.0.0.1:3333 in your browser, and you should be greeted by this beauty:
Creating Migrations and Models
Let’s story the search data in a database. AdonisJS supports a few different engines, but we’ll use SQLite for the sake of simplicity. We can install the appropriate driver, using:
npm install --save sqlite3
Next, let’s make a migration and a model. We’re only interested in the coordinates used to search, and the returned JSON. If the coordinates are close enough to where a user is searching for, we’ll reuse the existing search response instead of re-requesting the search data.
We can use the adonis command-line utility to create migrations and models:
adonis make:migration search
adonis make:model search
That creates a couple files. The first is a migration, to which we can add three fields:
"use strict"

const Schema = use("Schema")

class SearchSchema extends Schema {
    up() {
        this.create("searches", table => {
            table.increments()
            table.string("latitude")
            table.string("longitude")
            table.text("response")
            table.timestamps()
        })
    }

    down() {
        this.drop("searches")
    }
}

module.exports = SearchSchema
This is from
proxy/database/migrations/x_search_schema.js
We’ve added the latitude, longitude, and response fields. The first two make sense as string even though they contain float data, because we want to do sub-string searches with them.
Next, let’s create a single API endpoint:
"use strict"

const Route = use("Route")

// we don't need this anymore...
// Route.on("/").render("welcome")

Route.get("search", ({ request, response }) => {
    const { latitude, longitude } = request.all()

    // ...do something with latitude and longitude
})
This is from
proxy/start/routes.js
Each AdonisJS route is defined in the routes.js file. Here, we’ve commented out the initial “welcome” route, and added a new “search” route. The closure is called with a context object; which has access to the request and request objects.
We can expect search requests to provide latitude and longitude query string parameters; and we can get these with request.all. We should check to see if we have any vaguely related coordinates. We can do this by using the Search model:
const Search = use("App/Models/Search")

const searchablePoint = (raw, characters = 8) => {
    const abs = Math.abs(parseFloat(raw))
    return parseFloat(abs.toString().substr(0, characters))
}

Route.get("search", async ({ request, response }) => {
    const { latitude, longitude } = request.all()

    const searchableLatitude = searchablePoint(latitude)
    const searchableLongitude = searchablePoint(longitude)

    // console.log(searchableLatitude, searchableLongitude)

    const searches = await Search.query()
        .where("latitude", "like", `%${searchableLatitude}%`)
        .where("longitude", "like", `%${searchableLongitude}%`)
        .fetch()

    // console.log(searches.toJSON())

    response.send("done")

    // ...do something with latitude and longitude
})
This is from
proxy/start/routes.js
We begin by importing the Search model. This is a code representation of the database table we created (using the migration). We’ll use this to query the database for “nearby” searches.
Before we can do that, we need a way to search for nearly coordinates. The searchablePoint function takes a raw coordinate string and creates an absolute float value, removing the optional - from the front of the string. Then, it returns the first 8 characters of the coordinate string. This will shorten -33.872527399999996 to 33.872527. We can then use these 8 characters in a SQL “where like” clause, to return all searches with similar coordinate strings.
AdonisJS uses the async and await keywords to great effect. Methods like Search.query return promises, so we can await their results while still writing 100% asynchronous code.
I’m skipping a lot of AdonisJS details, which I really don’t like doing. If you’re struggling with this part; speak to me on Twitter, and I’ll point you in the right direction.
Matching Nearby Locations
Now that we’ve got the “nearby” locations, we can compare their relative distances to where the user is standing. If you don’t yet have a Google API key, refer back to the previous tutorial for how to get one. We’re about to be the Google Distance Matrix service:
https://maps.googleapis.com/maps/api/distancematrix/json? ↵
    mode=walking& ↵
    units=metric& ↵
    origins=-33.872527399999996,18.6339164& ↵
    destinations=-33.872527399999997,18.6339165& ↵
    key=YOUR_API_KEY
The Distance Matrix service actually allows multiple origins, so we can combine all of your previous searches into a longish origin string:
const reduceSearches = (acc, search) => {
    const { latitude, longitude } = search
    return `${acc}|${latitude},${longitude}`
}

Route.get("search", async ({ request, response }) => {
    const { latitude, longitude } = request.all()

    // ...get searches

    const origins = searches
        .toJSON()
        .reduce(reduceSearches, "")
        .substr(1)

    // console.log(origins)

    response.send("done")

    // ...do something with latitude and longitude
})
This is from
proxy/start/routes.js
We can convert the search results into an array of objects. This is useful because we can reduce the array, combining each search’s latitude and longitude into a string. That string will begin with a |, so we need to get the string starting at index 1.
I’m a fan of the browser fetch API, so let’s install a NodeJS polyfill:
npm install --save node-fetch-polyfill
Using this polyfill, we can fetch a list of distances from Google:
"use strict"

const fetch = use("node-fetch-polyfill")

const Env = use("Env")
const Route = use("Route")
const Search = use("App/Models/Search")

const searchablePoint = (raw, characters = 8) => {
    // ...
}

const reduceSearches = (acc, search) => {
    // ...
}

Route.get("search", async ({ request, response }) => {
    const { latitude, longitude } = request.all()

    // ...get origins

    const key = Env.get("GOOGLE_KEY")

    const distanceResponse = await fetch(
        `https://maps.googleapis.com/maps/api/distancematrix/json? ↵
            mode=walking&units=metric&origins=${origins}& ↵
            destinations=${latitude},${longitude}&key=${key}`,
    )

    const distanceData = await distanceResponse.json()

    // console.log(distanceData)

    response.send("done")

    // ...do something with data
})
This is from
proxy/start/routes.js
fetch returns a promise, so we can await it. The response has a json method, which serialises the raw response into a JSON array or object.Give then combined origin coordinates (of everything remotely resembling the starting point), we get a list of all distances. The response objects are in the same order as the origin coordinates. This will become useful as we continue…
AdonisJS provides its own
.envfile support. We can forgo the previous tutorial’senv.example.jsandenv.jsfiles; and just use the.envand.env.exampleones already present. I’ve addedGOOGLE_KEYto both, as should you. We can then useEnv.getto get the value.
We can inspect the results to find whether any of them are within 10 meters of the requested coordinates:
Route.get("search", async ({ request, response }) => {
    const { latitude, longitude } = request.all()

    // ...get distance data

    for (let i in distanceData.rows) {
        const { elements } = distanceData.rows[i]

        if (typeof elements[0] === "undefined") {
            continue
        }

        if (elements[0].status !== "OK") {
            continue
        }

        const matches = elements[0].distance.text.match(/([0-9]+)\s+m/)

        if (matches === null || parseInt(matches[1], 10) > 10) {
            continue
        }

        response.json(JSON.parse(searchRows[i].response))
        return
    }

    // ...cached result not found, fetch new data!
})
This is from
proxy/start/routes.js
We can loop through the distance rows, performing a few checks for each. If the origin coordinates are invalid, the Distance Matrix service could return an error for that row. If the elements are malformed (undefined or erroneous) then we skip the row.
If there is a valid measurement (which is one in the form of n m, where n is 1 – 10); then we return the response for that row. We don’t need to request new Refuge data. In the likely event that we have no nearby coordinates cached; we can request new data:
Route.get("search", async ({ request, response }) => {
    const { latitude, longitude } = request.all()

    // ...check for cached data

    const refugeResponse = await fetch(
        `https://www.refugerestrooms.org/api/v1/restrooms/by_location.json? ↵
            lat=${latitude}&lng=${longitude}`,
    )

    const refugeData = await refugeResponse.json()

    await Search.create({
        latitude,
        longitude,
        response: JSON.stringify(refugeData),
    })

    response.json(refugeData)
    return
})
This is from
proxy/start/routes.js
If there are no cached searches, we request a new set of Refuge results. We can return them unaltered; but not before saving the search to the database. The first request should be marginally slower than subsequent requests. We’re essentially offloading Refuge API processing onto the Distance Matrix API. We also have a way to manage CORS permissions, now.
Getting Results in the Browser
Let’s start using this data in the browser. Try to set up a ParcelJS build chain (or look back to the previous tutorial where we did this). This include installing and loading the WRLD SDK into an app.js file. It should look like this:
const Wrld = require("wrld.js")

const tester = async () => {
    const response = await fetch(
        "http://127.0.0.1:3333/search? ↵
            latitude=-33.872527399999996&longitude=18.6339164",
    )

    const data = await response.json()

    console.log(data)
}

tester()
This is from
app/app.js
You should be able to bundle this with the following command:
parcel index.html
Your folder structure should resemble this:
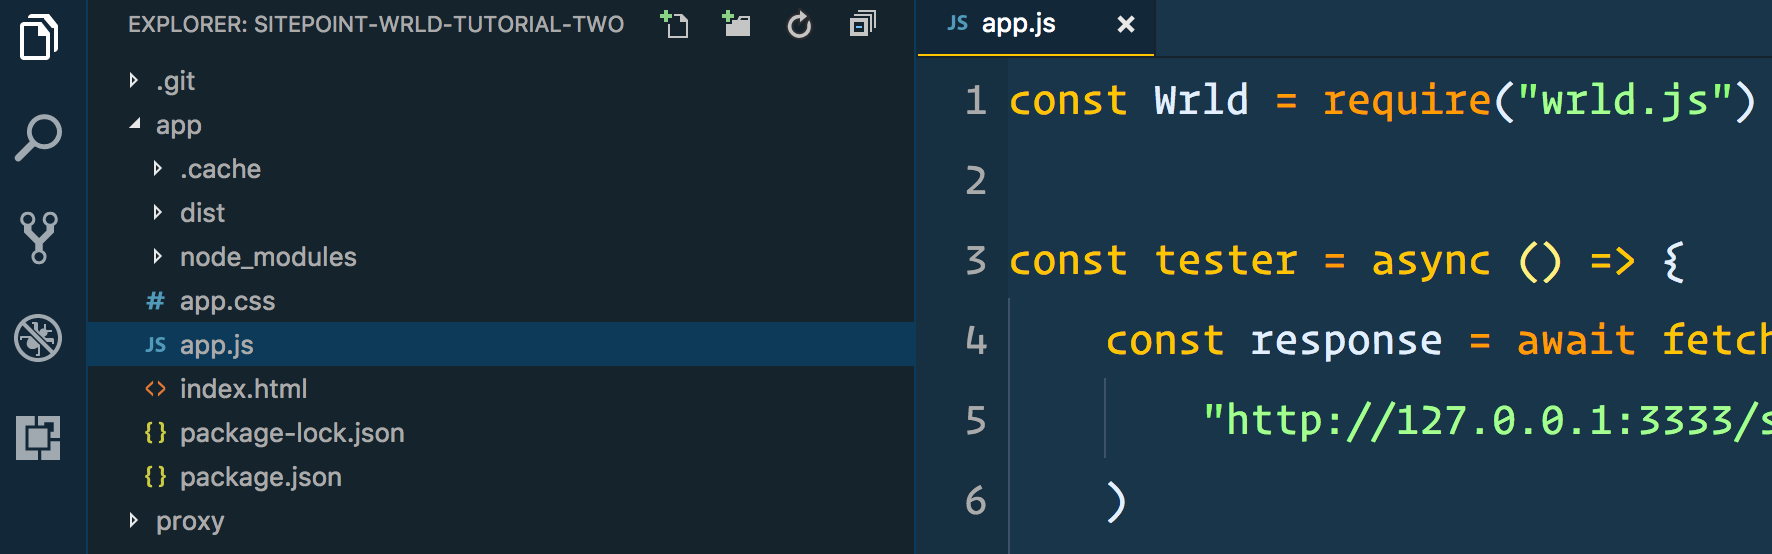
It’s the same folder structure we made, in the previous tutorial. You may as well copy all that, replacing the contents of app.js with what you see above. The tester function is to demonstrate that we can’t yet request data from our caching proxy server. For that, we need to enable the AdonisJS CORS layer:
"use strict"

module.exports = {
    /*
    |--------------------------------------------------------------------------
    | Origin
    |--------------------------------------------------------------------------
    |
    | Set a list of origins to be allowed...
    */
    origin: true,

    // ...rest of the CORS settings
}
This is from
proxy/config/cors.js
If we set origin to true, all CORS requests will be successful. In a production environment, you’d probably want to provide a closure that conditionally returns true; so that you can limit who can make requests to this API.
If you refresh the browser, that is open to the URL ParcelJS is serving; you should now be able to see results in the console:
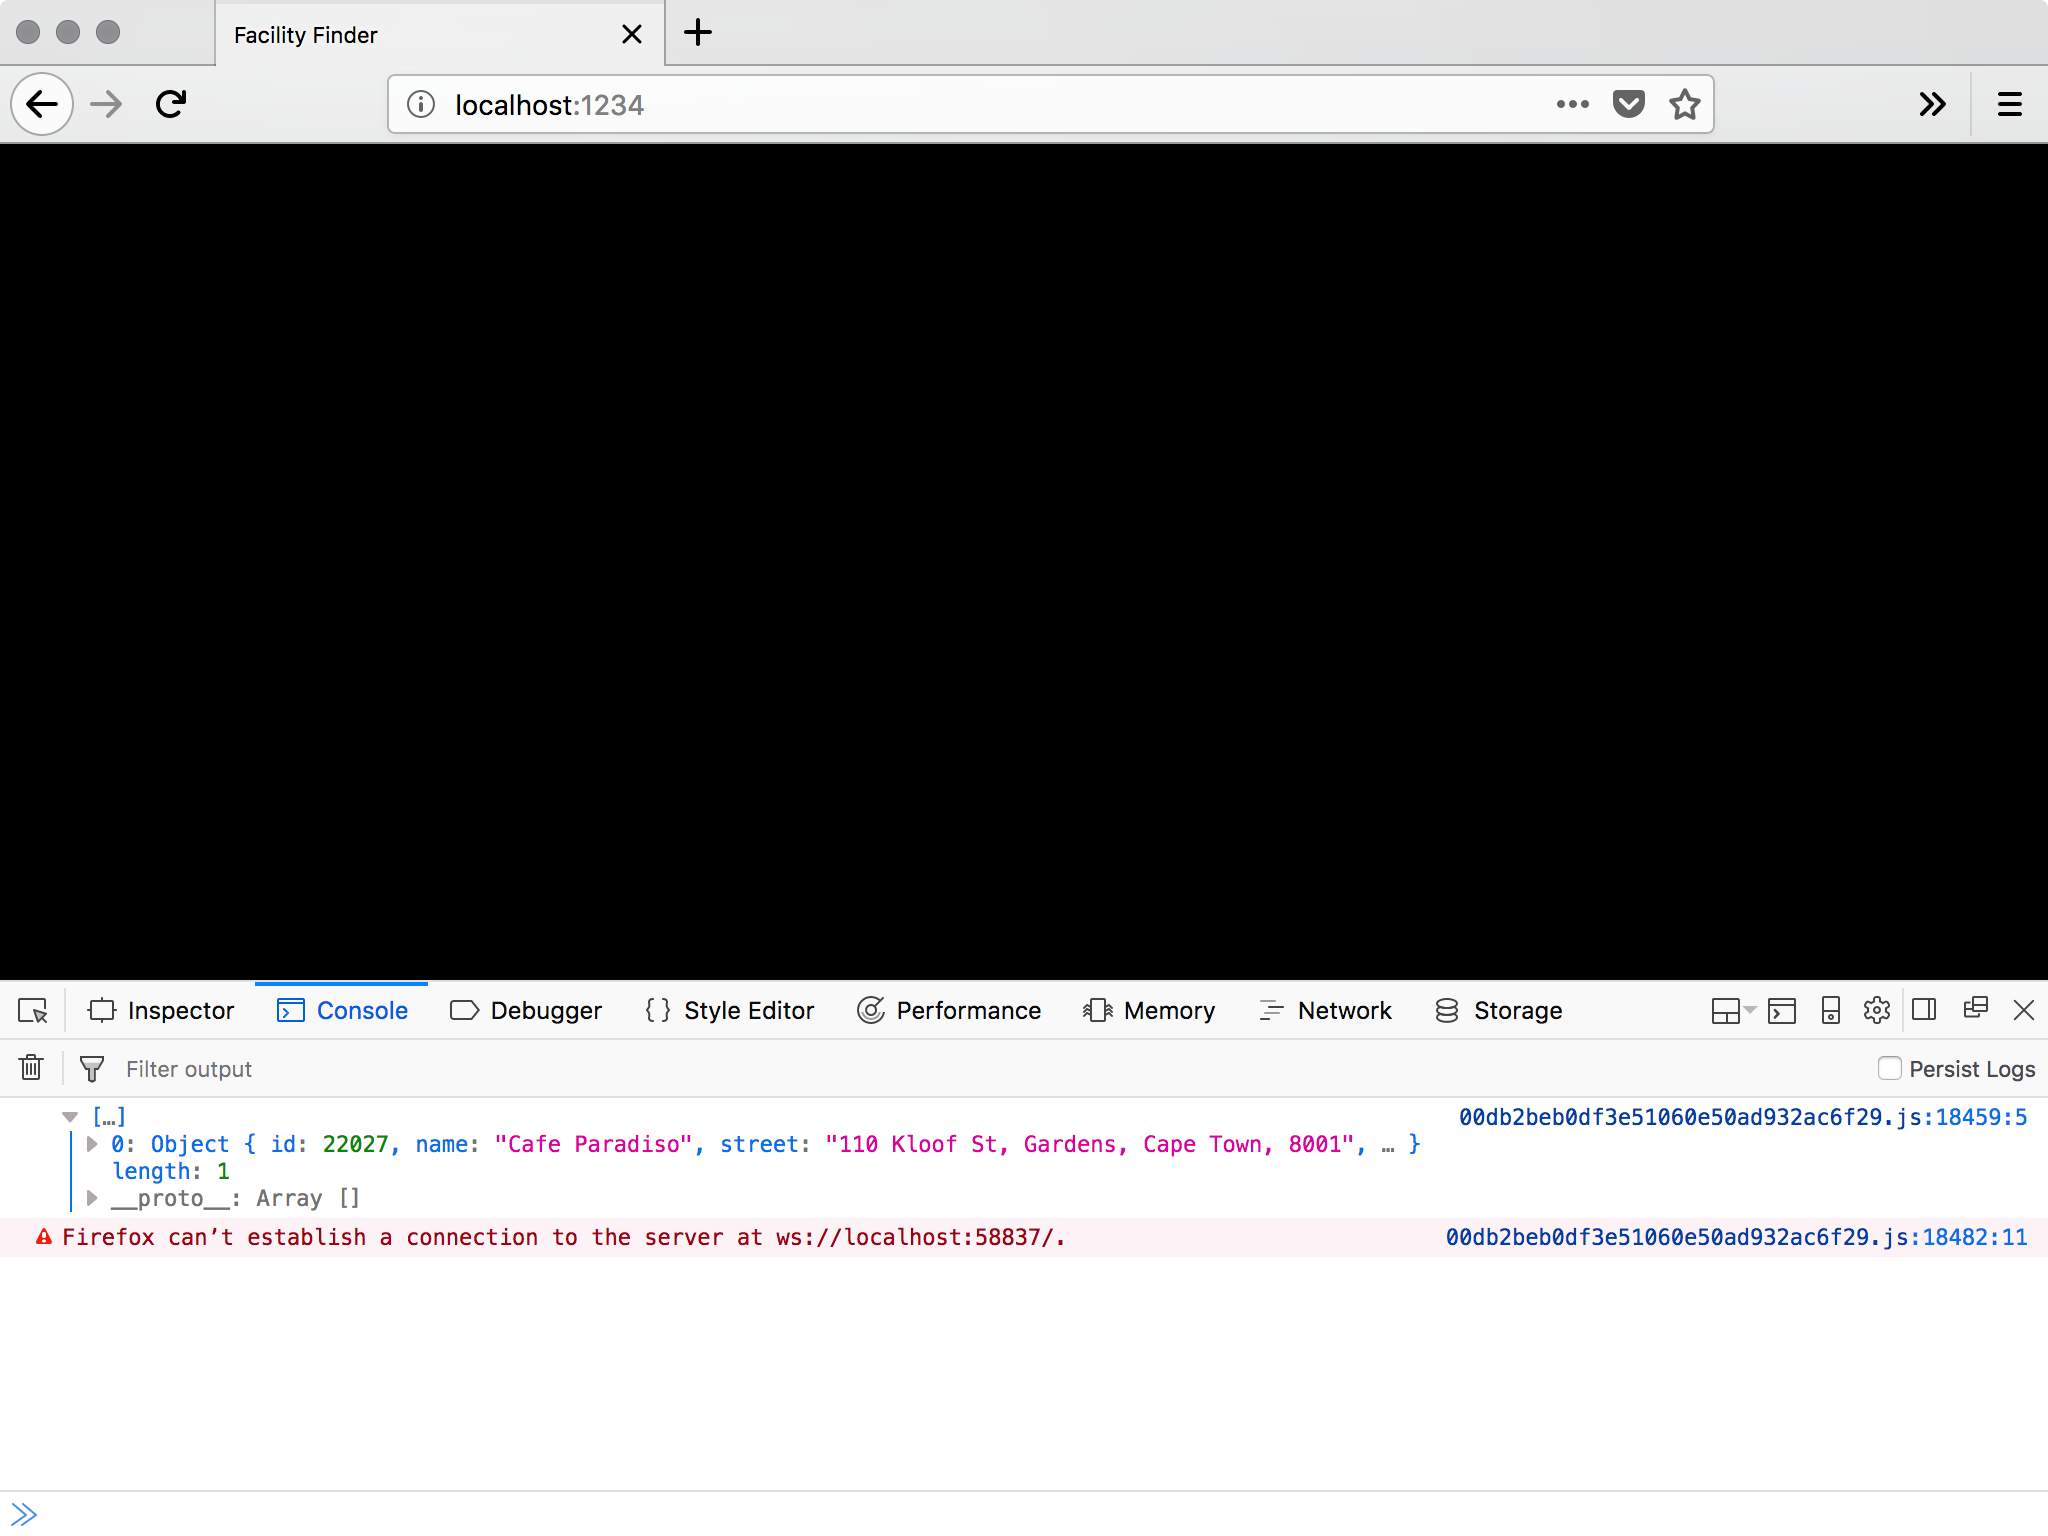
Pay no attention to that warning. It’s just ParcelJS Hot Module Replacement having a moment…
From this point forward, we can start to use the caching proxy server to find the nearest facilities to a set of coordinates. Let’s add the map!
Integrating with the WRLD
Let’s begin by adding the env.js and env.example.js files, from the first tutorial, to the app folder. Then we can use these to render the map again:
const Wrld = require("wrld.js")
const env = require("./env")

const keys = {
    wrld: env.WRLD_KEY,
}

// ...tester code

window.addEventListener("load", async () => {
    const map = Wrld.map("map", keys.wrld, {
        center: [40.7484405, -73.98566439999999],
        zoom: 15,
    })
})
This is from
app/app.js
Here we are, back at the Empire State Building. It would be better if we could start off somewhere closer to the user though. And, if we could provide a way to override the geolocation with custom coordinates. Let’s tap into the HTML5 Geolocation API:
window.addEventListener("load", async () => {
    let map

    navigator.geolocation.getCurrentPosition(
        position => {
            const { latitude, longitude } = position.coords

            map = Wrld.map("map", keys.wrld, {
                center: [latitude, longitude],
                zoom: 15,
            })
        },
        error => {
            map = Wrld.map("map", keys.wrld, {
                center: [40.7484405, -73.98566439999999],
                zoom: 15,
            })
        },
    )
})
This is from
app/app.js
We can use getCurrentPosition to get the best-guess coordinates of the user. If the user declines the request for geolocation data, or something else goes wrong, we can default to a set of known coordinates.
There’s no documented error argument, but I like to put the parameter there to make the code clearer.
That’s the automatic location detection taken care of. Now, what if we want to override it with custom coordinates? We can add some form inputs to our HTML, and target them with some Javascript:
<body>
    <div id="map"></div>
    <div class="controls">
        <input type="text" name="latitude" />
        <input type="text" name="longitude" />
        <input type="button" name="apply" value="apply" />
    </div>
    <script src="./app.js"></script>
</body>
This is from
app/index.html
.controls {
    position: absolute;
    top: 0;
    right: 0;
    background: rgba(255, 255, 255, 0.5);
    padding: 10px;
}
This is from
app/app.css
window.addEventListener("load", async () => {
    let map

    const latitudeInput = document.querySelector("[name='latitude']")
    const longitudeInput = document.querySelector("[name='longitude']")
    const applyButton = document.querySelector("[name='apply']")

    applyButton.addEventListener("click", () => {
        map.setView([latitudeInput.value, longitudeInput.value])
    })

    navigator.geolocation.getCurrentPosition(
        position => {
            const { latitude, longitude } = position.coords

            latitudeInput.value = latitude
            longitudeInput.value = longitude

            map = Wrld.map("map", keys.wrld, {
                center: [latitude, longitude],
                zoom: 15,
            })
        },
        error => {
            map = Wrld.map("map", keys.wrld, {
                center: [40.7484405, -73.98566439999999],
                zoom: 15,
            })
        },
    )
})
This is from
app/app.js
We begin by getting references to the new input elements we added. When applyButton is clicked, we want to recenter the map. When the geolocation data is successful, we can populate these inputs with the appropriate latitude and longitude.
Now, how about highlighting nearby facility buildings?
let map
let highlightedFacilities = []

const highlightFacilities = async (latitude, longitude) => {
    for (let facility of highlightedFacilities) {
        facility.remove()
    }

    highlightedFacilities = []

    const facilitiesResponse = await fetch(
        `http://127.0.0.1:3333/search?latitude=${latitude}&longitude=${longitude}`,
    )

    const facilitiesData = await facilitiesResponse.json()

    for (let facility of facilitiesData) {
        // console.log(facility)

        const color =
            facility.upvote >= facility.downvote
                ? [125, 255, 125, 200]
                : [255, 125, 125, 200]

        const highlight = Wrld.buildings
            .buildingHighlight(
                Wrld.buildings
                    .buildingHighlightOptions()
                    .highlightBuildingAtLocation([
                        facility.latitude,
                        facility.longitude,
                    ])
                    .color(color),
            )
            .addTo(map)

        highlightedFacilities.push(highlight)
    }
}

window.addEventListener("load", async () => {
    // ...add button event

    navigator.geolocation.getCurrentPosition(
        position => {
            const { latitude, longitude } = position.coords

            // ...create map

            map.on("initialstreamingcomplete", () => {
                highlightFacilities(latitude, longitude)
            })
        },
        error => {
            // ...create map

            map.on("initialstreamingcomplete", () => {
                highlightFacilities(40.7484405, -73.98566439999999)
            })
        },
    )
})
This is from
app/app.js
When we create the map, or change its focus, we can call the highlightFacilities function. This accepts a latitude and longitude, removes all previously highlighted buildings, and highlights all buildings returned by the caching proxy search.
We’re choosing a green highlight, for buildings with 50% or more upvotes; and a red highlight for the rest. This will make it easier to find better facilities.
We could even update the override inputs with the current centre of the map, so a user can pan around and find new bathrooms close to that map region. We could also make the highlighted buildings a bit clearer; by adding map markers and show popups when pressed/clicked:
let map
let highlightedFacilities = []
let highlighterMarkers = []

const highlightFacilities = async (latitude, longitude) => {
    for (let facility of highlightedFacilities) {
        facility.remove()
    }

    highlightedFacilities = []

    for (let marker of highlighterMarkers) {
        marker.remove()
    }

    highlighterMarkers = []

    const facilitiesResponse = await fetch(
        `http://127.0.0.1:3333/search?latitude=${latitude}&longitude=${longitude}`,
    )

    const facilitiesData = await facilitiesResponse.json()

    for (let facility of facilitiesData) {
        const location = [facility.latitude, facility.longitude]

        // ...add highlight color

        const intersection = map.buildings.findBuildingAtLatLng(location)

        let marker

        if (intersection.found) {
            marker = L.marker(location, {
                elevation: intersection.point.alt,
                title: facility.name,
            }).addTo(map)
        } else {
            marker = L.marker(location, {
                title: facility.name,
            }).addTo(map)
        }

        if (facility.comment) {
            marker.bindPopup(facility.comment).openPopup()
        }

        highlighterMarkers.push(marker)
    }
}

window.addEventListener("load", async () => {
    // ...add button event

    navigator.geolocation.getCurrentPosition(
        position => {
            const { latitude, longitude } = position.coords

            // ...create map

            map.on("panend", event => {
                const { lat, lng } = map.getBounds().getCenter()

                latitudeInput.value = lat
                longitudeInput.value = lng
            })
        },
        error => {
            // ...create map

            map.on("panend", event => {
                const { lat, lng } = map.getBounds().getCenter()

                latitudeInput.value = lat
                longitudeInput.value = lng
            })
        },
    )
})
This is from
app/app.js
We can add panend events to the places we create the map. This is triggered when the user has started to pan, and the map comes to rest. We get the visible map bounds, and get the centre from that.
Then, in the highlightFacilities function, we added markers and optional popups (if there are commends to display. This makes it a little easier to spot the highlighted buildings, and to find out any additional information about the facilities they contain.
Adding Atmosphere
Let’s finish up by adding some atmospheric effects to the map view. For starters, we can add a “weather conditions” endpoint to our caching proxy:
Route.get("condition", async ({ request, response }) => {
    const { latitude, longitude } = request.all()

    const key = Env.get("OPENWEATHER_KEY")

    const weatherResponse = await fetch(
        `http://api.openweathermap.org/data/2.5/weather? ↵
            lat=${latitude}&lon=${longitude}&appid=${key}`,
    )

    const weatherData = await weatherResponse.json()

    response.json(weatherData)
})
This is from
proxy/start/routes.js
This requires the creation of a Open Weather Map account. The API key we get there needs to be added to .env and .env.example. We can then start to request this data in the browser. If the weather for that region matches one of the WRLD weather presets; we can apply it to the map. We can also use the browser’s time to set the time of day:
const Wrld = require("wrld.js")
const env = require("./env")

const keys = {
    wrld: env.WRLD_KEY,
}

let map
let highlightedFacilities = []
let highlighterMarkers = []

const highlightFacilities = async (latitude, longitude) => {
    // ...highlight buildings and add markers

    try {
        const weatherResponse = await fetch(
            `http://127.0.0.1:3333/condition? ↵
                latitude=${latitude}&longitude=${longitude}`,
        )

        const weatherData = await weatherResponse.json()

        if (weatherData.weather && weatherData.weather.length > 0) {
            const condition = weatherData.weather[0].main.toLowerCase()

            switch (condition) {
                case "snow":
                    map.themes.setWeather(Wrld.themes.weather.Snowy)
                    break
                case "few clouds":
                case "scattered clouds":
                case "broken clouds":
                    map.themes.setWeather(Wrld.themes.weather.Overcast)
                    break
                case "mist":
                    map.themes.setWeather(Wrld.themes.weather.Foggy)
                    break
                case "shower rain":
                case "rain":
                case "thunderstorm":
                    map.themes.setWeather(Wrld.themes.weather.Rainy)
                    break
                default:
                    map.themes.setWeather(Wrld.themes.weather.Clear)
                    break
            }
        }

        const time = new Date().getHours()

        if (time > 5 && time <= 10) {
            map.themes.setTime(Wrld.themes.time.Dawn)
        } else if (time > 10 && time <= 16) {
            map.themes.setTime(Wrld.themes.time.Day)
        } else if (time > 16 && time < 21) {
            map.themes.setTime(Wrld.themes.time.Dusk)
        } else {
            map.themes.setTime(Wrld.themes.time.Night)
        }
    } catch (e) {
        // weather and time effects are entirely optional
        // if they break, for whatever reason, they shouldn't kill the app
    }
}

const latitudeInput = document.querySelector("[name='latitude']")
const longitudeInput = document.querySelector("[name='longitude']")
const applyButton = document.querySelector("[name='apply']")

const initMapEvents = async (latitude, longitude) => {
    map.on("initialstreamingcomplete", () => {
        highlightFacilities(latitude, longitude)
    })

    map.on("panend", event => {
        const { lat, lng } = map.getBounds().getCenter()

        latitudeInput.value = lat
        longitudeInput.value = lng
    })

    applyButton.addEventListener("click", () => {
        map.setView([latitudeInput.value, longitudeInput.value])
        highlightFacilities(latitudeInput.value, longitudeInput.value)
    })
}

window.addEventListener("load", async () => {
    navigator.geolocation.getCurrentPosition(
        position => {
            // ...create map

            initMapEvents(latitude, longitude)
        },
        error => {
            // ...create map

            initMapEvents(latitude, longitude)
        },
    )
})
This is from
app/app.js
I’ve taken the opportunity to move all the post-map-creation code into a reusable initMapEvents function. Additionally, I’ve added weather and time effects into the highlightBuildings function; as this is the most reasonable place to change these things. We don’t want the map to continue snowing if the user enters coordinates for a desert…
Unfortunately, without a lot more work, the time of day will always be relative to the user’s browser, but I don’t think it’s essential that we do that for this tutorial.
Summary
This has been a fun project to create. More than that, it’s something you could make and turn into a business (hopefully with more success than George’s various exploits). Maybe you have discovered another kind of thing people need an app to look for. If you have the right permissions and account limits (like OpenWeatherMap, Google, Refuge, and WRLD), you can create any kind of finder app.
The way I see it, there are a couple ways to make money from such an app. You could sell it on the iOS and Android stores. You could build it into a React Native app, or even just a simple web app wrapper.
Alternatively, you could display ads on screen. Users could pay to have those ads removed, but then you’d probably also need to think a bit about account logins and/or restoring purchases.
Either way, it’s a practical thing you can build; in less than 200 lines of code. Take things a step further and add directions for each point of interest. Perhaps even allow users to filter points of interest so that only the closes 3 are shown…
WRLD has most of the tools you need.
Frequently Asked Questions (FAQs) about Building a Seinfeld Bathroom Finder
How can I start building a Seinfeld Bathroom Finder?
To start building a Seinfeld Bathroom Finder, you need to have a basic understanding of web development languages such as HTML, CSS, and JavaScript. You will also need to use Google Maps API to locate the bathrooms and MongoDB to store the data. The first step is to set up your development environment, then you can start coding your application.
What is the role of Google Maps API in the Seinfeld Bathroom Finder?
Google Maps API plays a crucial role in the Seinfeld Bathroom Finder. It is used to locate the bathrooms on the map. When a user searches for a bathroom, the API fetches the location data and displays it on the map. It also provides directions to the bathroom from the user’s current location.
How does MongoDB contribute to the functionality of the Seinfeld Bathroom Finder?
MongoDB is a NoSQL database that stores data in a flexible, JSON-like format. In the Seinfeld Bathroom Finder, MongoDB is used to store the data of the bathrooms, including their locations and ratings. When a user searches for a bathroom, the application fetches the data from the MongoDB database.
Can I add a rating system to the Seinfeld Bathroom Finder?
Yes, you can add a rating system to the Seinfeld Bathroom Finder. This can be done using JavaScript and MongoDB. Users can rate the bathrooms based on their experience, and these ratings can be stored in the MongoDB database. The average rating of each bathroom can be displayed on the map.
How can I ensure the accuracy of the bathroom locations in the Seinfeld Bathroom Finder?
To ensure the accuracy of the bathroom locations, you can use the Google Maps Geocoding API. This API converts addresses into geographic coordinates, which can be used to place markers on the map. You can also allow users to suggest corrections to the bathroom locations.
Can I customize the appearance of the Seinfeld Bathroom Finder?
Yes, you can customize the appearance of the Seinfeld Bathroom Finder using CSS. You can change the colors, fonts, and layout of the application to match your preferences. You can also customize the markers on the map using the Google Maps API.
How can I optimize the performance of the Seinfeld Bathroom Finder?
To optimize the performance of the Seinfeld Bathroom Finder, you can use techniques such as minifying your JavaScript and CSS files, optimizing your database queries, and using a Content Delivery Network (CDN) to serve your static files. You can also use performance profiling tools to identify any bottlenecks in your application.
Can I make the Seinfeld Bathroom Finder mobile-friendly?
Yes, you can make the Seinfeld Bathroom Finder mobile-friendly using responsive web design techniques. This involves designing your application so that it looks and works well on a variety of devices and screen sizes. You can use CSS media queries to adjust the layout of your application based on the screen size.
How can I handle errors in the Seinfeld Bathroom Finder?
To handle errors in the Seinfeld Bathroom Finder, you can use JavaScript’s error handling mechanisms, such as try/catch blocks. You can also use error logging tools to track and analyze errors. It’s important to provide helpful error messages to users when something goes wrong.
Can I add more features to the Seinfeld Bathroom Finder?
Yes, you can add more features to the Seinfeld Bathroom Finder. For example, you could add a feature that allows users to add new bathrooms to the map, or a feature that allows users to filter bathrooms based on their ratings. You could also integrate with other APIs to provide additional information about the bathrooms, such as their opening hours or accessibility features.
 Christopher Pitt
Christopher is a writer and coder, working at Over. He usually works on application architecture, though sometimes you'll find him building compilers or robots.